
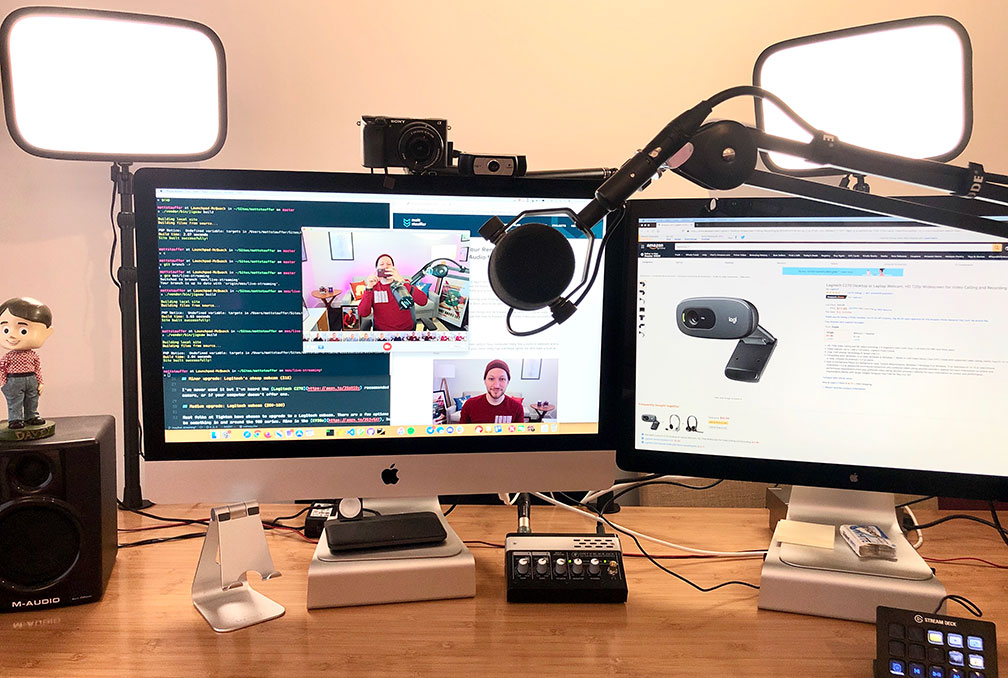
I’ve started live streaming and publishing videos on my YouTube Channel again recently and it made my realize just how much work I’ve put into getting a good hardware setup — not just for the streams, but also just as someone who works remote and sits on video calls every day.
I’ve spent quite a bit of time obsessing over lights and camera, and I wanted to help you — new streamer, podcaster, new remote worker, or someone trying to level up their setup — see a few different types of option for your remote work or streaming setup.
Note : I’m on a Mac, so most things will be biased in that direction. Other note: these are all affiliate links. Please feel free to bypass those if they make you uncomfortable!
 What’s here?
First, I’ll cover each section, starting from the cheapest options for each:
Lighting
Audio
Then, I’ll tell you my setup, and a few suggested full setups at various price points.
Streamer / YouTuber
Only you really know what level of clarity you want from each piece of your setup. Are you happy with what you have? Please, dear Lord, don’t spend any money. This is intended to be a resource if You want more and don’t know how to do it, not a stress or a judgment to anyone happy with their current setup.
And while it’s a lot of fun to have a really high-quality webcam for my remote work, would I have bought it if I didn’t have a more intense need for high quality video for my YouTube stuff? Hell no. Get what you need, in your budget. This is just a resource.
Podcasters need much nicer mics. Streamers need decent mics and cameras, but lighting probably matters the most. YouTubers need the best cameras and light, but audio still matters a lot. Remote workers have the least strict requirements. Do what works for you.
Webcams The basics: $ free
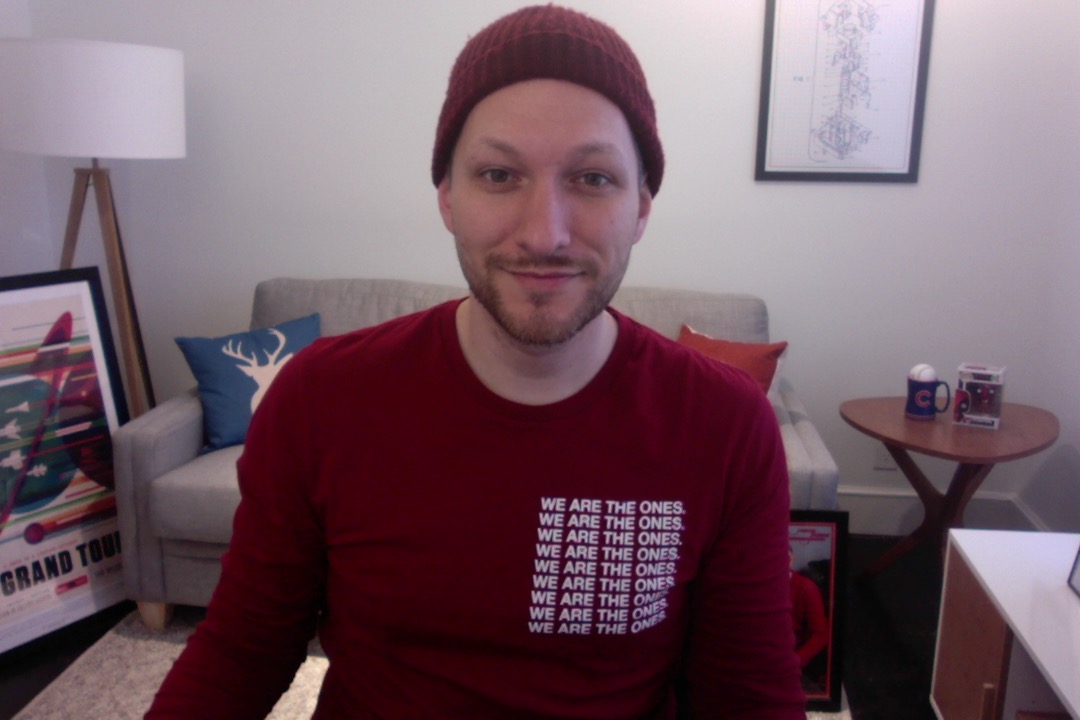
Let’s start with the simplest option. Your computer likely has a built-in webcam. It’s also probably awful.
As you can see, even on a Mac, the picture is low quality, and, especially in low-light situations like my room when I don’t turn on my streaming lights, it’s very flat and hard to see.
Minor upgrade: Logitech’s cheap webcams ($ or $ 39)
I’ve never used it but I’ve heard the Logitech C 400 recommended as a minor upgrade to your built- in camera. This will certainly be an upgrade to the built-in camera, but whether it will be enough for you depends both on your needs and whether you’ll have a sufficient light source; cheaper cameras are very dependent on having enough light.
Logitech C ($ )
Classic Medium upgrade: Logitech webcam ($ – 200)
Most folks at Tighten have chosen to upgrade to a Logitech webcam. There are a few options but most recommendations will be something in and around the 930 series. Mine is the C e, but Wirecutter now recommends the c s, which is cheaper and adds a privacy shield. The c e also has a wider field of view — great if you have a big room to capture but unnecessary if you’re reading this article.
As you can see, these p Logitech cameras have higher resolution, better light sensing, and (with the c) e, at least) a broader view into my room (if you want that — Logitech’s drivers also allow you to zoom).
($
While I was writing this post I was linked to a great post on webcam lighting and best practices in which the author, Olivier Lacan, recommends a Razer Kiyo webcam, which has a built-in ring light.
Here’s Olivier’s side-by-side comparison of the Logitech C (left) vs the Razer Kiyo (right):
He also gives some great tips there about zooming, webcam settings, and the natural lighting in your room.
If you’re ready to move it up to the next level, especially if you plan to stream and especially if you plan to record videos for YouTube, it’s time to look at connecting an actual camera to your computer.
Elgato makes a device called the Camlink , which allows you to use any device that outputs HDMI as a webcam, meaning you can now grab any video-and-HDMI-enabled handheld camera and use it as a webcam.
Elgato has a list of cameras you can use for this function : they all output HDMI and can be rigged to plug into the wall instead of drawing their power from a battery.
Sony cameras are the most popular; You’ll almost definitely find someone out there recommending the A 202847393. You can find a Sony A 6300 for around $ on Amazon, but if you’re willing to go used you can get it for a few hundred dollars cheaper — some times as low as $ .
Because I also record videos for YouTube, I wanted one with 4k video, which means I had to spend a bit more. I bought the A 01575879, which is almost exactly the same as the a 1225076476594348032 but it supports 4k video. An a  new on Amazon costs $ , so I don’t think that’s going to be reasonable for most folks, but I was able to get mine used on eBay for $ . Again, if you’re not planning on shooting full frame 4k videos, go for something more like the a , and try to get it on eBay.
(
If you’re going for a Sony camera, you’ll also need to get a power adapter that allows you to plug a power cord into the battery compartment so it runs off A / C power instead of a battery.
HDMI input :  Elgato Camlink
Camera : (Sony a) or a) or similar ($ – $ ()
($)
 – $ 75)
 I started with the camera, because it’s not only important broadly, but Most of what I thought were lighting issues were actually solved when I upgraded my camera.
That said, lights can still make a huge difference — especially if your camera isn’t the highest quality.
The basics: $ cheap
The best option to start with is to get the best possible light using normal lamps. Buy floor stand lights and point them at the walls or toward you, so that as little of your light as possible comes from overheads, especially if the overheads are fluorescent.
Unfortunately, it’ll probably take a lot of lamps to light you this way, so you’ll probably also need to get at least one desk lamp.
This is my “cheap” setup: overhead LEDs that I can point at the walls to get some bounce light.
(
Minor upgrade: Webcam ringlight ($ )
I’ve never used this, but Scott Hanselman recommends a $ 37 ring light that works great if you have a Logitech webcam.
($ 36)
While it says it’s for Logitech cameras, I’m pretty sure that when he upgraded to a fancier camera, he kept using that same light.
Minor upgrade: DIY (varied cost)
If you’d like to make a more complex setup yourself, you can get a few cheap clamp lights (with any kind of bulb in it — pick the right color temperature for you!), Then build your own diffuser. If you want to step this one up just a bit, you could put Hue or LIFX bulbs into this so you can control the color temperature and brightness.
If you use this setup, you’ll notice the light is much too harsh to point directly at your face. First, consider a diffuser of some sort (parchment paper and binder clips is your cheap option, or you can go for a diffuser sock or something similar). But additionally, consider not aiming the lights directly at your face, but instead bouncing them off a wall or some other nearby flat plane.
Medium upgrade: LED panels (varied cost)
There’s a growing market of pro-sumer LED panels. Be careful, because the cheapest LED panels you’ll find on Amazon are garbage, and they’ll fall apart fast.
Neewer is a brand that provides probably the lowest quality option I’d still recommend you considering; It’s definitely for consumers but my experience with their stuff is it’s been good enough to use in a non-professional setting without worrying about it always falling apart.
I haven’t used this particular set, but this LED kit comes with stands and can be dimmed and adjusted in terms of color balance.
Twitter user @Marktechson reached out after I posted this and shared his setup, which is around $ 120 / light:
($ Major upgrade: Elgato Key Light ($ (each)
After years of trying every DIY option I could come up with, I ended up splurging on first one, then 6 months later a second, Elgato Key Light. If you can afford them these are an absolute dream: flat panel diffused LED, mounted on a powerful and simple stand, with both brightness and color controllable via computer and attached hardware devices like the Elgato Stream Deck. This is definitely the best option if price isn’t an issue.
Here’s me with those lights, shaded blue:
And the same, now shaded orange:
The same, with a well-balanced color profile:
If you really want to nerd out, you can play around with your background. I added some 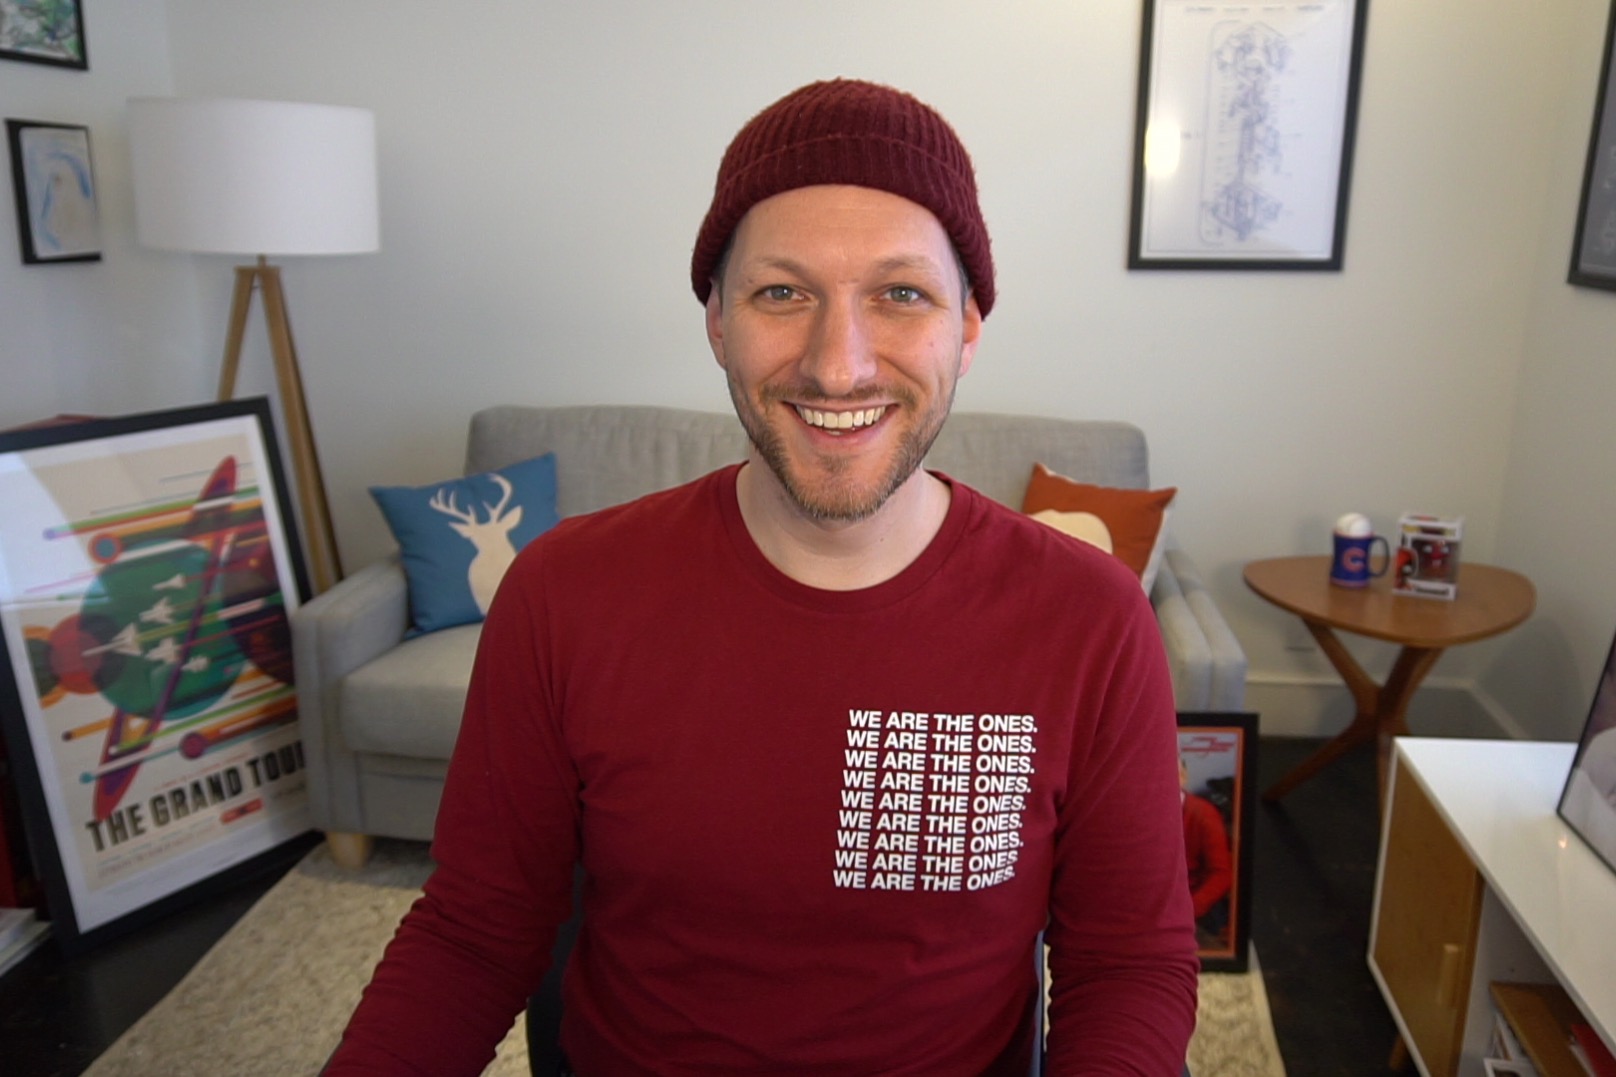 LIFX Z Lights
behind my couch and a LIFX color bulb , both Black Friday steals. , in my lamp:
Audio: Mics
OK. We’ve got you looking good; what about audio?
The simplest answer is that you should do anything in your power to get a standalone mic. I don’t, unfortunately, have very many examples sitting around, because I eventually saved up for my dream mic and got rid of the rest. But here are a few options.
We’ll start with our onboard mic, then headsets, and finally standalone USB mics and then the top of the pack, standalone XLR mics with USB audio interfaces.
Onboard / webcam mic ($ free)
Your onboard or webcam mics will sound like garbage. Echoey, somehow so bad that they defeat software noise cancellation (to the point where the other person will hear themselves back) … this is not it.
Airpods (don’t buy for this purpose)
Airpods compress your audio quite a bit and run out of batteries fast. They’re convenient but not a great solution for anything other than occasional calls.
Don’t buy Airpods for this purpose. But, if you’ve already got them, there’s a good chance they’ve at least got better audio than your onboard mic. Not by much. But a bit.
Headset
If you have a wired boom mic headset, or even a re-chargable wireless sort, you’re likely to get all-day battery with better-than-Airpods and better-than-your-computer-or-webcam -onboard-mic sound quality. This is a great option if you’re only remote, not streaming, and you don’t care too much about audio quality. And plenty of streamers are even happy with this option, so don’t knock it.
There are a ton of great options here, but here are a few I’ve had recommended lately:
)
Jabra Evolve ($
- )
- (Jabra Evolve) ($
- (Microsoft LifeChat LX – ( $ 75)
If you want a step up in sound quality, and / or don’t feel like wearing a headset, you’ll want a standalone mic. Let’s start with the cheapest and easiest option: USB mics.
My first piece of advice:
Don’t. Buy. A. Blue. Snowball. Or. A. Blue. Yeti.
Why not? The Snowball isn’t worth the cost, and the Yeti is a great mic to pick up every damn noise in an entire room
, but a terrible mic to isolate a single person speaking. If you’re a remote worker, I guess that’s fine, but if you don’t care that much about sound quality, why not try the AmazonBasics option below, cheaper and with better noise isolation?
Note: I’m being a bit extreme because this is such a popular mic
and it burns so many people by how much background noise it picks up. If you have one, enjoy it. But if you don’t … if you’re reading this, you’re almost definitely not its actual best market fit. That’s not to say it’s not a good mic (although, honestly, it’s not even worth its cost relative to other Large Diaphragm Condensers, in my opinion), but just that its noisiness is the number one pain point I’ve seen for new podcasters and video creators with regard to audio.
(You can geek out on this topic by learning about condenser vs. dynamic mics — for now, focus on dynamic mics).
If you’re getting a mic to record yourself (podcasting or videos, or maybe streaming as well), and you’re willing to learn good mic technique, there’s a pretty impressive mic that’s affordable, dynamic (better noise rejection ), and USB:
However, dynamic mics, especially the ATR – , require good mic technique. So, if you want a casual desk mic (especially if you’re a remote worker, not a YouTuber / podcaster), check out the AmazonBasics Desktop Mini Condenser. I was skeptical, because it’s a condenser mic, which means it’s likely to pick up a lot of background noise, but reviews online say it’s a lot better in terms of filtering out background noise than the Yeti, and it’s half the cost. You’ll likely not get quite the same quality or background noise canceling, but it’ll be a lot more forgiving. Do what works for you!
) Rode has introduced a higher quality USB mic called the Rode Podcaster USB. It costs around $ , and if you don’t want to go the whole way up to the cost of an audio interface and an XLR mic, this is a good bridge above the ATR – 6300.
Audio interfaces (for XLR, not USB, mics)
If you want to move up from there in quality, you’re probably going to be getting into XLR mics. The (cost) downside of these mics is that you’ll have to now add an audio interface into your setup.
I use the Onyx Blackjack, and many of my friends use the Scarlett 2i2, but you don’t really need two-input interfaces like this; a single-input like the Scarlett Solo will do just fine.
These interfaces are doing several things: first, converting XLR to USB. Next, they’ll likely have gain knobs for manually adjusting the input level from the mic, and headphone monitors, so you can hear what you sound like as you’re recording. Finally, they’ll likely have microphone preamps inside of them, which boost and often increase the sound quality of your signal .
Scarlett Solo ($ () Entry-level XLR mics
When it comes to XLR mics, the workhorse of the audio industry is the SM 81, and you could definitely do much worse. It’s $ 165, and with this, an XLR cable, and an audio interface, you’re pretty good to go.
($ )
There’s an older mic, the Samson CL8, that I often hear recommended, so if you can find one used it’s probably going to treat you well, but they’re discontinued now.
Pro level XLR Mics
Once you move up from there, you have a few frequently-recommended top-of-the-line studio mics. I’m partial to the Shure SM7b, but it’s by far the most expensive option: you have to buy both the $ (mic) and (a $) (inline signal booster (because its output is quiet compared to to other mics).
Another mic that’s very popular for podcasters is the Heil PR – 72. It’s cheaper, at $ , and you don’t need to buy the $ 220 booster with it.
($ )
($ ( ) ($) (Cloudlifter or ($) Triton Fethead ))
If you want to geek out about microphones, mounts, mic technique, and even the quality of your power and cables , I just stumbled across this (post from Olivier Lacan about microphones , and there also Marco Arment’s classic Podcasting Microphones Mega-Review .
Audio: Mic accessories and headphones
Now that you have a mic, you might need some new headphones, and you might also need help getting your mic or your room set up for good recording.
Headphones
Honestly? Get whatever works for you. Nothing wrong with you using the iPhone headphones you have at least a pair of.
If you really want to splurge, I love the Sennheiser HD 823 Pro’s. For $ , you get a studio-quality headphone (and I mean that; I’ve recorded in one of the biggest studios in Chicago and that’s the headphone we used) that’s durable and ugly as hell.
But, truly. This is the last place to worry about spending money. Just make sure you can hear the other people and use your money elsewhere.
Standalone mic accessories
If you’re buying a standalone mic, you’ll likely need an XLR cable (if it’s not USB), a stand, and, depending on the mic, a shock mount and / or a pop filter.
(Stand)
The most-often recommended desk stand for mics is the Rode PSA1. It’s a fantastic boom arm … and it’s also $
I don’t yet have a really great, consistent recommendation for a cheaper competitor, but when I got started I used a tripod boom mic stand I had from my music playing:
I always just go on Amazon and pick what looks good. Got knowledge to share? Let me know on Twitter!
(Shock mounts and pop filters)
The shock mount and pop filter you use (and whether you need either) will depend entirely on the mic you pick. Check out the (Marco Arment and
Olivier Lacan mic articles to see their ideas about which mic needs which.
A note: if you can see the metal mesh of the mic you’re considering, you’re probably going to at least want a pop filter or a screen or something similar. Here’s a cheap, OK, entry-level pop filter:
Someone (not me) could write three more blog posts on room treatment alone, but here are a few simple tricks.
First, your best option for noise isolation is to move your recording into a closet full of clothes, or record with a blanket over your head. Obviously this is a budget choice for podcasters, not a viable option for remote workers or YouTubers or streamers. But, it’s free, and it works.
Second, you want to reduce the number of flat surfaces in your room that can bounce sound. Bring in rugs and furniture and hang stuff on the walls — especially if that stuff is fabric.
If you really want to spend some money on your room acoustics, ATS Acoustic panels are very large and very good.
OK, so we’ve covered a lot of ground. Let’s look at a few example setups you might consider. Of course, you can mix and match however makes sense for you, but these are a few examples I’ve helped folks set up in the past.
My setup
I work remotely and I’m on video calls all day. I also run several podcasts (Five-Minute Geek Show and Laravel Podcast), create YouTube videos , and stream on Twitch and YouTube . I’m also doing much of this for work — my job isn’t exactly developer relations but that’s certainly a part of it. So, I care a lot about my setup, and I’ve been slowly investing in it for years.
For example, the Onyx Blackjack was a Christmas present years ago, for recording my bass playing. The lights I bought one at a time over the span of months to years, I can’t remember. The mic I saved up for … for a long time. It takes time to get the right setup if you don’t have an overflowing bank account.
Onyx Blackjack (gift, discontinued)
(new, $
used)
($
)
For my remote work, I use an old Plantronics wireless headset that’s since been discontinued more than I use my actual podcasting mic, and if I was not using my Sony camera for YouTube and streaming, I’d still be using my old Logitech C e webcam (although, if I had to buy it today, I would try the Razer Kiyo).
Bare Bones
If you’re working on a machine that has no audio or video capability and need the cheapest possible option , get a Logitech C and use it for both video and audio.
If you’re a remote worker and you just need a webcam and a headset to be on calls all day, I’d get the Logitech C 920 and the Lifechat headset. These aren’t my favorite choices, though; if you can skip up to the mid level setup would recommend it.
If you’re an entry level podcaster, I’d go for either the AmazonBasics mic (if you know you have a decent room and no A / C unit or kids) or the ATR 277894 (if you’re willing to work on your mic technique.) This is a (very acceptable) setup. You honestly shouldn’t need any more than this.
($ )
If you can get a bit more budget for your remote work setup, I’d go for the Razer Kiyo (caveat: I haven’t tried it yet!) Or the Logitech C 1100 s. And then the best Jabra you can afford.
($ ()
($
If you’re talking pro level, I’d suggest you get the Scarlett Solo, a Shure SM7b, a Fethead booster, and the Rode PSA1 boom. For the slightly-cheaper version, get a Heil PR 72 and drop the Fethead.
I’ve got pretty much my dream setup for streaming video, but what if you want to get started? Here’s what I would get:
This should cut it for streaming. Honestly, you can do even less and still get by — the streaming isn’t as much about you as it’s about your content. But this is also high-enough quality to record (p video) at (fps), with plenty of light, and to get very good audio if you’re willing to learn good mic technique.
$ 150 for the Kiyo, $ 72 for some cans and light bulbs, and, if you’re recording full -screen videos instead of streaming, maybe $ for the ATR 277894 and another $ for a stand.
Wow. That was a lot. Got questions? Hit me up on Twitter
. I’ll hopefully add any new stuff I learn in here. FAQs I love my Blue Yeti . What gives? If you like what you have keep using it for God’s sake! I’m making broad sweeping statements and if you have an environment in which that mic thrives, enjoy it !!Notes: After writing this article I remembered Scott Hanselman had written a great, similar post , so I added a few of his recommendations here, using his original referral link. Thanks Scott!
Tags: hardware • live streaming • podcasting • youtube • cameras • webcam • audio • remote work
(Read More


GIPHY App Key not set. Please check settings