

Check out my step-by-step guides!
What do you need help with?
How Do I Get Started?
You’re interested in Computer Vision, Deep Learning, and OpenCV…but you don’t know how to get started.
Follow these steps to get OpenCV configured / installed on your system, learn the fundamentals of Computer Vision, and graduate to more advanced topics, including Deep Learning, Face Recognition, Object Detection,and more!
-
Step # 1: Install OpenCV Python on Your System (Beginner)

- Before you can start learning OpenCV you first need to install the OpenCV library on your system.
- By farthe easiest way to install OpenCV is via pip:
- However, for the full, optimized install I would recommend compiling from source:
- Compiling from source will take longer and requires basic Unix command line and Operating System knowledge (but is worth it for the full install).
- If you’rebrand newto OpenCV and / or Computer Science in general, I would recommend you follow the pip install. Otherwise, you can compile from source.
- If you run into any problems compiling from source you should revert to the pip install method.
- Please note do that I (do not) support Windows.
- I do not recommend Windows for Computer Vision, Deep Learning, and OpenCV.
- Furthermore, I have not used the Windows OS in over 10 years so I cannot provide support for it.
- If you are using Windows and want to install OpenCV, be sure to follow theofficial OpenCV documentation.
- Once you have OpenCV installed on your Windows system all code examples included in my tutorialsshould (work (just understand that I cannot provide support for them if you are using Windows).
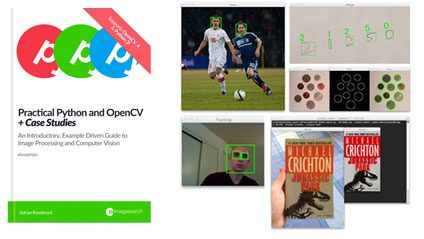
- If you are struggling to configure your development environment be sure to take a look at my book,Practical Python and OpenCV, which includes a pre-configured VirtualBox Virtual Machine.
- All you need to do is installVirtualBox, download the VM file, import it and load the pre-configured development environment.
- And best of all, this VM will work on Linux, macOS, and Windows!
-
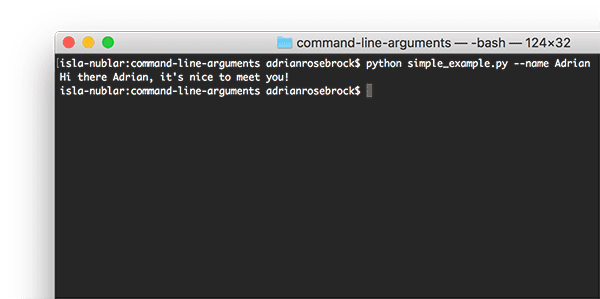
Step # 2: Understand Command Line Arguments (Beginner)

- Command line arguments aren’t a Computer Vision concept but theyareused heavily here on PyImageSearch and elsewhere online.
- If you intend on studying advanced Computer Science topics such as Computer Vision and Deep Learning then youneedto understand command line arguments:
- Take the timenowto understand them as they are a crucial Computer Science topic that cannot, under any circumstance, be overlooked.
-
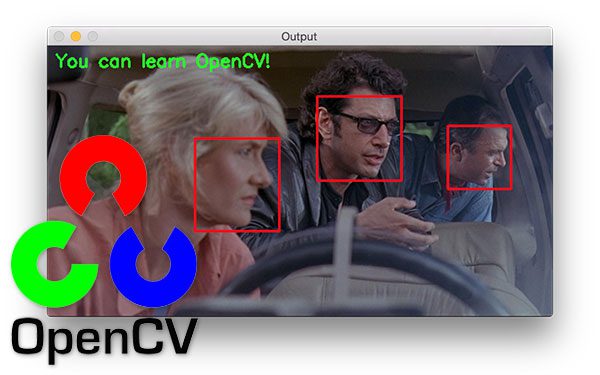
Step # 3: Learn OpenCV by Example (Beginner)

- Congrats, you are now ready to learn the fundamentals of Computer Vision and the OpenCV library!
- This OpenCV Tutorial will teach you the basics of the OpenCV library,including:
- Loading an image
- Accessing individual pixels
- Array / Region of Interest (ROI) cropping
- Resizing images
- Rotating an image
- Edge detection
- Thresholding
- Drawing lines, rectangles, circles, and text on an image
- Masking and bitwise operations
- Contour and shape detection
- … and more!
- Additionally, if you want a consolidated review of the OpenCV library that willget you up to speedin less than a weekend,you should take a look at my book,Practical Python and OpenCV.
-
Step # 4: Build OpenCV Mini-Projects (Beginner)

- At this point you have learned the basics of OpenCV and have a solid foundation to build upon.
- Take the time now to follow these guides and practice building mini-projects with OpenCV.
- To start, Ihighly recommendyou follow this guide on debugging common “NoneType” errors with OpenCV:
- OpenCV: Resolving NoneType errors
- You’ll see these types of errors when (1) your path to an input image is incorrect, returning inCV2.imreadreturningNoneor (2) OpenCV cannot properly access your video stream.
- Trust me, at some point in your Computer Vision / OpenCV career you’ll see this error– take the time now to read the article above to learn how to diagnose and resolve the error .
- The following tutorials will help you extend your OpenCV knowledge and build on the fundamentals:
- Contoursare a very basic image processing technique – but they are alsovery powerfulif you use them correctly.
- The following tutorials will teach you the basics ofcontours with OpenCV:
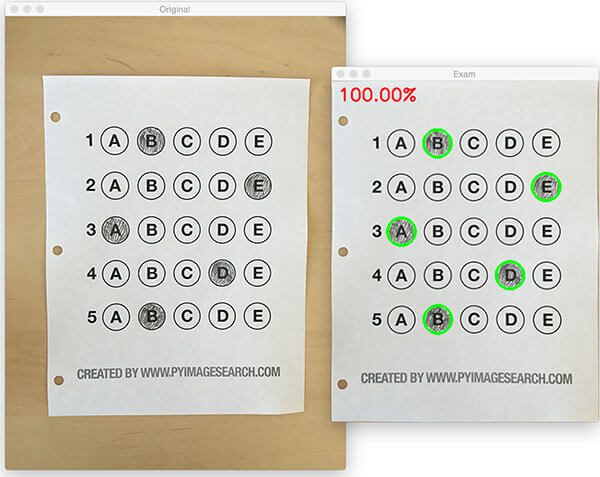
- From there, follow this guide to build a document scanner using OpenCV:
- This tutorial extends the document scanner to create an automatic standardized test (i.e, bubble multiple choice) scanner and grader:
- To start, Ihighly recommendyou follow this guide on debugging common “NoneType” errors with OpenCV:
- Additionally, I recommend that you take these projects and extend them in some manner, enabling you to gain additional practice.
- As you work through each tutorial, keep a notepad handy and jot down inspiration as it comes to you.
- For example:
- How might you apply the algorithm covered in a tutorial toyourparticular dataset of images ?
- What would you change if you wanted to filter out specific objects using contours?
- Make notes to yourself and come back and try to solve these mini-projects later.
-
Step # 5: Solve More Advanced OpenCV Projects (Intermediate)

- Practice makes perfect and Computer Vision / OpenCV are no different.
- After working through the tutorials in Step # 4 (and ideally extending them in some manner), you are now ready to apply OpenCV to more intermediate projects.
- My first suggestion is tolearn how to access your webcam using OpenCV.
- The following tutorial will enable you to access your webcam in a threaded, efficient manner:
- Unifying picamera and cv2.VideoCapture into a single class with OpenCV
- Again, refer to theresolving NoneType errorspost if you cannot access your webcam
- The following tutorial will enable you to access your webcam in a threaded, efficient manner:
- Next, you should learn how towrite to video using OpenCVas well ascapture “key events ”And log them to disk as video clips:
- Let’s now access a video streamand combine itcontour techniquesto build a real-world project:
- One of my favorite algorithms to teach computer vision isimage stitching:
- OpenCV panorama stitching
- (Real-time panorama and image stitching with OpenCV)
- Image Stitching with OpenCV and Python
- These algorithms utilize keypoint detection, local invariant descriptor extraction, and keypoint matching to build a program capable of stitching multiple images together, resulting in a panorama.
- There is a dedicatedOptical Character Recognition (OCR)section later in this guide, but it doesn’t hurt to gain some experience with it now:
- You should also gain some experience usingimage Gradients:
- Eventually, you’ll want to build an OpenCV project that canstream your output to a web browser– this tutorial will show you how to do exactly that:
- The following guides are miscellaneous tutorials that I recommend you work through to gain experience working with various Computer Vision algorithms:
- Again, keep a notepad handy as you work through these projects.
- Practice extending them in some manner to gain additional experience.
-
Step # 6: Pick Your Niche (Intermediate)
- Congratulations, you have now learned the fundamentals of Image Processing, Computer Vision, and OpenCV!
- The Computer Vision field is compromised of subfields (ie, niches), including Deep Learning, Medical Computer Vision, Face Applications,and many others.
- Many of these fieldsoverlapandintertwineas well – they arenotmutually exclusive.
- That said, as long as you follow this page you’ll always have the proper prerequisites for a given niche, so don’t
- Most readers jump immediately into(Deep Learning)as it’s one of themost popularfields in Computer Science; however,
-
Where to Next?

- If you need additional help learning the basics of OpenCV, I would recommend you read my book,Practical Python and OpenCV.
- This book is meant to be a gentle introduction to the world of Computer Vision and Image Processing through the OpenCV library.
- And if you don’t know Python, don’t worry!
- Since I explaineverycode examples in the bookline-by-line, 1000 s of PyImageSearch readers have used this book to not only learnOpenCV, but alsoPythonat the same time!
- If you’re looking for a more in-depth treatment of the Computer Vision field, I would instead recommend thePyImageSearch Gurus course.
- The PyImageSearch Gurus course is similar to a college survey course in Computer Vision, butmuchmore hands-on and practical (including well documented source code examples).
- Otherwise, my personal recommendation would be to jump into theDeep Learningsection – most PyImageSearch readers who are interested in Computer Vision arealsointerested in Deep Learning as well.
Deep Learning
Deep Learning algorithms are capable of obtainingunprecedentedaccuracy in Computer Vision tasks, including Image Classification, Object Detection, Segmentation,and more.
Follow these steps and you’ll have enough knowledge to start applying Deep Learning to your own projects.
-
Step # 1: Configure your Deep Learning environment (Beginner)
- Before you can apply Deep Learning to your projects, you first need to configure your Deep Learning development environment.
- The following guides will help you install Keras, TensorFlow, OpenCV,and all other necessary CV and DL libraries you needto be successful when applying Deep Learning to your own projects:
- Again, Ido notprovide support for the Windows OS.
- I do not recommend Windows for Computer Vision and Deep Learning.
- Definitely consider using a Unix-based OS (ie, Ubuntu, macOS, etc.) when building your Computer Vision and Deep Learning projects .
- If you are struggling to configure your Deep Learning development environment, you can:
- Use myPre-configured Amazon AWS deep learning AMI with Python
- Pick up a copy of my book,Deep Learning for Computer Vision with Python, which includes a VirtualBox Virtual Machine with all the DL and CV libraries you needpre-configuredandpre-installed.
- All you need to do is installVirtualBox, download the VM file, import it and load the pre-configured development environment.
- And best of all, this VM will work on Linux, macOS, and Windows!
-
Step # 2: Train Your First Neural Network (Beginner)

- Provided that you have successfully configured your Deep Learning development environment, you can move now to training your first Neural Network!
- I recommend starting with this tutorial which will teach you the basics of the Keras Deep Learning library:
- After that, you should read this guide on training LeNet, a classic Convolutional Neural Network that is both simple to understand and easy to implement :
- LeNet – Convolutional Neural Network in Python
- Implementing LeNet by hand is often the“Hello , world! ”of deep learning projects.
-
Step # 3: Understand Convolutional Neural Networks (Beginner)

- Convolutional Neural Networks rely on a Computer Vision / Image Processing technique calledconvolution.
- A CNNautomaticallylearnskernelsthat are applied to the input images during the training process.
- But what exactlyarekernels and convolution?
- To answer that, you should read this tutorial:
- Now that you understand what kernels and convolution are, you should move on to this guide which will teach you how Keras’ utilizes convolution to build a CNN:
-
Step # 4: Build Your Own Image Dataset (Intermediate)

- So far you’ve learned how to train CNNs onpre-compileddatasets –but what if you wanted to work with your owncustomdata?
- But how are you going to train a CNN to accomplish a given task if you don’t already have a dataset of such images?
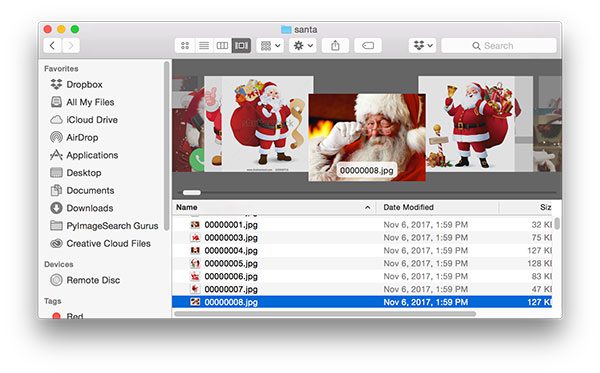
- The short answer is you can’t –you need to gather your image dataset first:
- The Google Images method is fast and easy, but can also be a bit tedious at the same time.
- If you are an experiencing programming you will likely prefer the Bing API method as it’s “cleaner” and you have more control over the process .
-
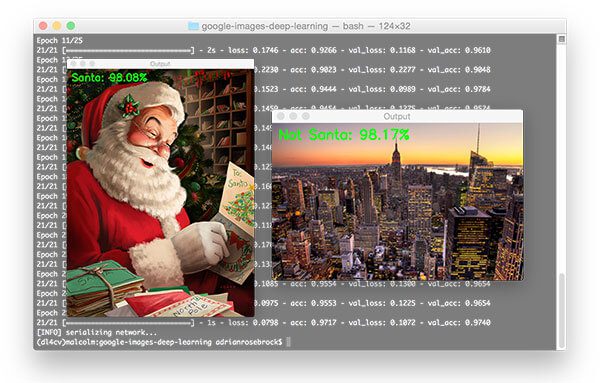
Step # 5: Train a CNN on Your Dataset (Intermediate)

- At this point you have used Step # 4 to gather your own custom dataset.
- Let’s now learn how to train a CNN on top of that data:
- You’ll also want to refer to this guide which will give you additional practice training CNNs with Keras:
- Along the way you should learn how to save and load your trained models, ensuring you can make predictions on imagesafteryour model has been trained:
- (Keras – Save and Load Your Deep Learning Models)
-
Step # 6: Tuning Your Learning Rate (Intermediate)

- So, you trained your own CNN from Step # 5 –but your accurate isn’t as good as what you want it to be.
- What now?
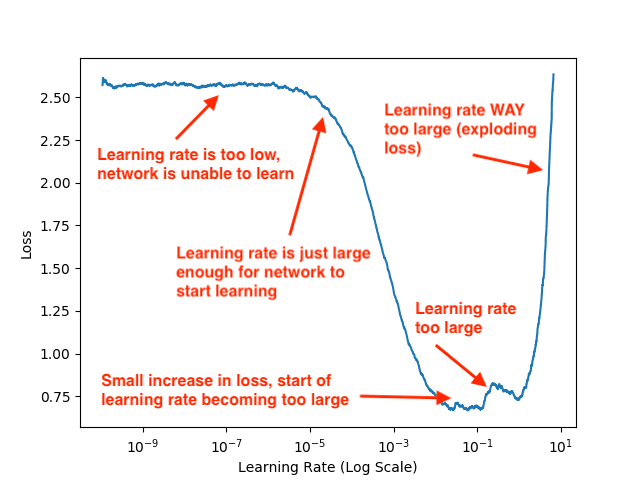
- In order to obtain a highly accurate Deep Learning model,you need to tune your learning rate,the most important hyperparameterwhen training a Neural Network.
- The following tutorial will teach youhow to start training, stop training, reduce your learning rate, and continue training,a critical skill when training neural networks:
- This guide will teach you about learning rate schedules and decay, a method that can be quickly implemented to slowly lower your learning rate when training , allowing it to descend into lower areas of the loss landscape, and ideally obtain higher accuracy:
- (Keras learning rate schedules and decay)
- You should also read aboutCyclical Learning Rates (CLRs), a technique used to oscillate your learning rate between an upper and lower bound, enabling your model to break out of local minima:
- But what if you don’t know what your initial learning rate should be?
- style=”list-style: none;”
- Don’t worry, I have a simple method that will help you out:
- (Keras Learning Rate Finder)
- Don’t worry, I have a simple method that will help you out:
-
Step # 7: Data Augmentation (Intermediate)

- If you haven’t already, you will run into two important terms in Deep Learning literature:
- Generalization:The ability of your model to correctly classify images that areoutsidethe training set used to train the model.
- Your model is said to “Generalize well” if it can correctly classify images that it hasneverseen before.
- Generalization isabsolutely criticalwhen training a Deep Learning model.
- Imagine if you were working for Tesla and needed to train a self-driving car application used to detect cars on the road.
- Your model worked well on the training set…but when you evaluated it on the testing set you found that the model failed to detect the majority of cars on the road!
- In such a situation we would say that your model “failed to generalize”.
- To fix this problem you need to apply regularization.
- Regularization:The term “regularization” is used to encompass all techniques used to (1) prevent your model from overfitting and (2) generalize well to your validation and testing sets.
- Regularization techniques include:
- L2 regularization(also called weight decay)
- Updating the CNN architecture to includedropout
- You can read the following tutorial for an introduction / motivation to regularization:
- Regularization techniques include:
- Generalization:The ability of your model to correctly classify images that areoutsidethe training set used to train the model.
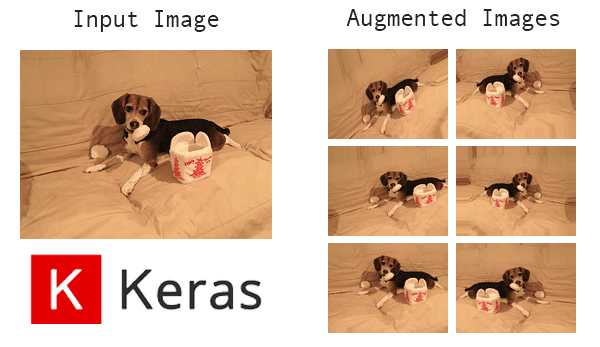
- Data augmentationis a type of regularization technique.
- There are three types of data augmentation, including:
- Type # 1: Dataset generation and expanding an existing dataset (less common)
- Type # 2: In-place / on-the-fly data augmentation(most common)
- Type # 3: Combining dataset generation and in-place augmentation
- Unless you have a good reasonnotto apply data augmentation, you shouldalwaysutilize data augmentation when training your own CNNs.
- You can read more about data augmentation here:
- There are three types of data augmentation, including:
-
Step # 8: Feature Extraction and Fine-tuning Pre-trained Networks (Intermediate )

- So far we’ve trained our CNNs from scratch –but is it possible to take apre-trainedmodel and use it to classify imagesit was never trained on?
- Yes, it absolutely is!
- Taking a pre-trained model and using it to classify data it was never trained on is calledtransfer learning.
- There are two types of transfer learning:
- Feature extraction:Here we treat our CNN as an arbitrary feature extractor.
- An input image is presented to the CNN.
- The image is forward-propagated to an arbitrary layer of the network.
- We take those activations as ouroutputand treat them like a feature vector.
- Given feature vectors for all input images in our dataset we train an arbitrary Machine Learning model (ex., Logistic Regression, Support Vector Machine , SVM) on top of our extracted features.
- When making aprediction, we:
- Forward-propagate the input image.
- Take the output features.
- Pass them to our ML classifier to obtain our output prediction.
- You can read more about feature extraction here :
- Fine-tuning:Here wemodifythe CNN architecture itself by performingnetwork surgery.
- Think of yourself as a “CNN Surgeon.”
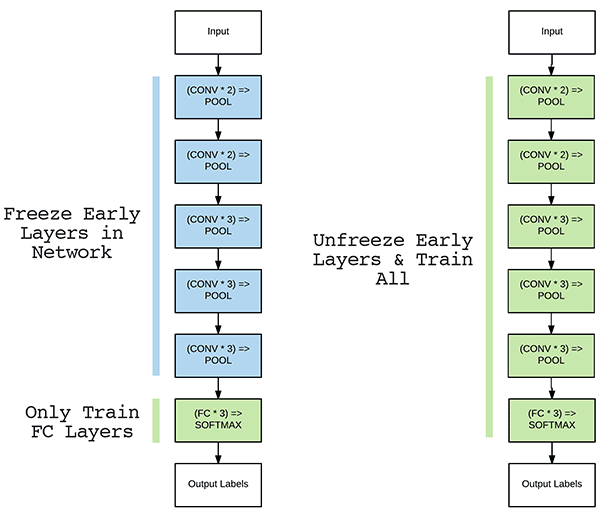
- We start by removing the Fully-Connected (FC) layer head from the pre-trained network.
- Next, we add abrand new, randomly initializedFC layer head to the network
- Optionally, wefreeze layers earlier in the CNNprior to training
- Keep in mind that CNNs are hierarchical feature learners:
- Layers earlier in the CNN can detect “structural building blocks”, including blobs, edges, corners, etc.
- Intermediate layers use these building blocks to start learning actual shapes
- Finally, higher-level layers of the network learn abstract concepts (such as the objects themselves).
- We freeze layers earlier in the network to ensure we retain our structural building blocks
- Keep in mind that CNNs are hierarchical feature learners:
- Training is then started using avery low learning rate.
- Once our new FC layer head is “warmed up” we may then optionally unfreeze our earlier layers and continue training
- You can learn more about fine-tuning here:
- Feature extraction:Here we treat our CNN as an arbitrary feature extractor.
- I’ll wrap up this section by saying thattransfer learning is acriticalskill for you to properly learn.
- Use the above tutorials to help you get started, but for a deeper dive into my tips, suggestions, and best practices when applying Deep Learning and Transfer Learning, be sure to read my book:
- Inside the text I not only explain transfer learning in detail, but also provide a number of case studies to show you how to successfully apply it to your own custom datasets.
-
Step # 9: Video Classification (Advanced)

- At this point you have a good understanding of how to apply CNNs toimages–but what aboutvideos?
- Can the same algorithms and techniques be applied?
- Video classification is an entirely different beast – typical algorithms you may want to use here includeRecurrent Neural Networks(RNNs) andLong Short-Term Memory networks(LSTMs).
- However, before you start breaking out the “big guns” you should read this guide:
- Video classification with Keras and Deep Learning
- Inside you’ll learn how to useprediction averagingto reduce“prediction flickering”and create a CNN capable of applying stable video classification.
-
Step # 10: Multi-Input and Multi-Output Networks (Advanced)

- Imagine you are hired by a large clothing company (ex., Nordstorms, Neiman Marcus, etc.) and are tasked with building a CNN to classify two attributes of an input clothing image:
- Clothing Type:Shirt, dress, pants, shoes, etc.
- Color:The actualcolorof the item of clothing (ie, blue, green, red, etc.).
- To get started building such a model, you should refer to this tutorial:
- As you’ll find out in the above guide, building amore accuratemodel requires you to utilize amulti-output network:
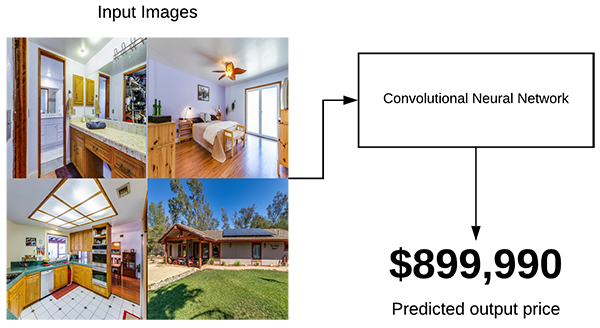
- Now, let’s imagine that for your next job you are hired by real estate company used toautomaticallypredict the price of a house basedsolelyon input images.
- You are given images of the bedroom, bathroom, living room, and house exterior.
- You now need to train a CNN to predict the house price usingjustthose images.
- To accomplish that task you’ll need amulti-input network:
- Both multi-input and multi-output networks are a bit on the “exotic” side.
- You won’t need them often, but when you do,you’ll be happy you know how to use them!
-
Step # 11 : Improve Your Deep Learning Models (Advanced)

- The best way to improve your Deep Learning model performance is to learn viacase studies.
- The following case studies and tutorials will help you learn techniques that you can apply to your projects.
- To start, I would familiarize yourself withcommon state-of-the-art architecturesincluding VGGNet, ResNet, Inception / GoogLeNet, Xception, and others:
- If you want to learn how toimplement your own custom data generatorswhen training Keras models, refer here:
- Fortraining your Keras models with multiple GPUs ,you’ll want to read this guide:
- You can alsouse Keras for regressionproblems:
- The OpenCV library ships with a number of pre-trained models forneural style transfer,black and white image colorization,holistically-nested edge detectionand others – you can learn about these models using the links below:
- While SGD is the most popular optimizer used to train deep neural networks, others exist, including Adam, RMSprop, Adagrad, Adadelta and others
- These two tutorials cover theRectified Adam (RAdam) optimizer, including comparing Rectified Adam to the standard Adam optimizer:
- If you intend ondeploying your models to production, and more specifically,behind a REST API, I’ve authored three tutorials on the topic, each building on top of each other:
- Take your time practicing and working through them – the experience you gain will besuper valuablewhen you go off on your own!
-
Step # 12: AutoML and Auto-Keras (Advanced)

- What if you…
- Didn’thave to select and implement a Neural Network architecture?
- Didn’thave to tune your learning?
- Didn’thave to tune your regularization parameters?
- What if you instead could treat the training process like a “black box”:
- Input your data to an API
- And let the algorithms insideautomaticallytrain the model for you!
- Sound too good to be true?
- In some cases it is…
- … but in others it works just fine!
- We call these sets of algorithmsAutomatic Machine Learning (AutoML)– you can read more about these algorithms here:
- (Auto-Keras and AutoML: A Getting Started Guide)
- The point here is that AutoML algorithms aren’t going to be replacing you as a Deep Learning practitioner anytime soon.
- They are super important to learn about, but they have along way to goif they are ever going to replace you!
-
Where to Next?

- Congratulations! If you followed the above steps then you now have enough Deep Learning knowledge to consider yourself a “practitioner”!
- But where should you go from here?
- If you’re interested in a deeper dive into the world of Deep Learning, I would recommend reading my book,Deep Learning for Computer Vision with Python.
- Inside the book you’ll find:
- Super practical walkthroughsthat present solutions to actual, real-world image classification problems, challenges, and competitions.
- Hands-on tutorials (with lots of code)that not only show you thealgorithmsbehind deep learning for computer vision but theirimplementationsas well.
- A no-nonsense teaching stylethat is guaranteed to help you master deep learning for image understanding and visual recognition
- You can learn more about the book here.
- Otherwise, I would recommend reading the following sections of this guide:
- Object Detection:State-of-the-art object detectors, including Faster R-CNN, Single Shot Detectors (SSDs), YOLO, and RetinaNetallrely on Deep Learning.
- If you want to learn how to not onlyclassifyan input image but alsolocate where in the object is, then you’ll want to read these guides.
- Embedded and IoT Computer VisionandComputer Vision on the Raspberry PiIf you’re interested in applying DL to resource constrained devices such as the Raspberry Pi, Google Coral, and NVIDIA Jetson Nano,these are the sections for you!
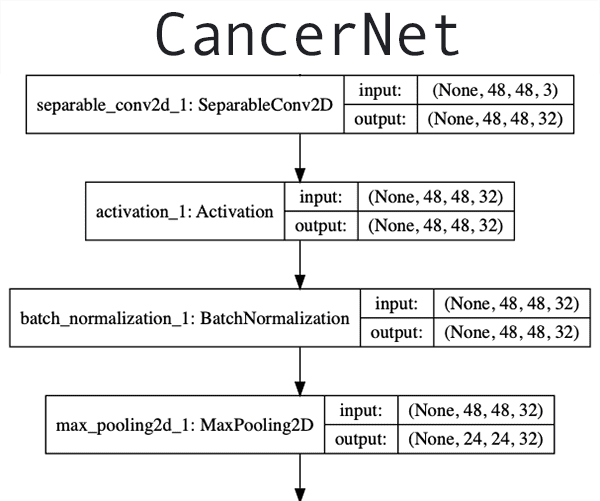
- Medical Computer Vision:Apply Computer Vision and Deep Learning to medical image analysis and learn how to classify blood cells and detect cancer.
- Object Detection:State-of-the-art object detectors, including Faster R-CNN, Single Shot Detectors (SSDs), YOLO, and RetinaNetallrely on Deep Learning.


Face Applications
Using Computer Vision we can perform a variety of facial applications, includingfacial recognition,building a virtual makeover system(ie, makeup, cosmetics, eyeglasses / sunglasses, etc.), or evenaiding in law enforcementto help detect, recognize, and track criminals.
Computer Vision is powering facial recognition at amassivescale – just take a second to consider thatover350 millionimages are uploaded to Facebookevery day.
For each of those images, Facebook is runningface detection(to detect thepresence) of faces followed byface recognition(to actuallytagpeople in photos).
In this section you’ll learn the basics of facial applications using Computer Vision.
-
Step # 1: Install OpenCV, dlib, and face_recognition (Beginner)

- Before you can build facial applications, you first need to configure your development environment.
- Start by following Step # 1 of theHow Do I Get Started?section to install OpenCV on your system.
- From there, you’ll need to install the dlib and face_recognition libraries.
- TheInstall your face recognition librariesofthis tutorialwill help you install both dlib and face_recognition.
- Make sure you have installed OpenCV, dlib , and face_recognition before continuing!
-
Step # 2: Detect Faces in Images and Video (Beginner)

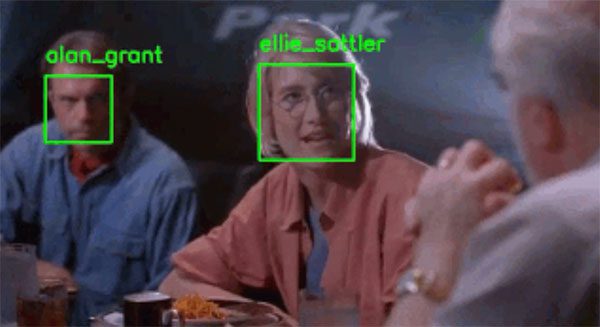
- In order to apply Computer Vision to facial applications you first need todetectandfindfaces in an input image.
- Face detection isdifferentthan face recognition.
- During face detection we are simply trying tolocatewhere in the image faces are.
- Our face detection algorithms do not knowwhois in the image, simply that a given face (exists) at a particular location.
- Once we have our detected faces, we pass them into a facial recognition algorithm which outputs the actual identify of the person / face.
- Thus, all Computer Vision and facial applicationsmuststart with face detection.
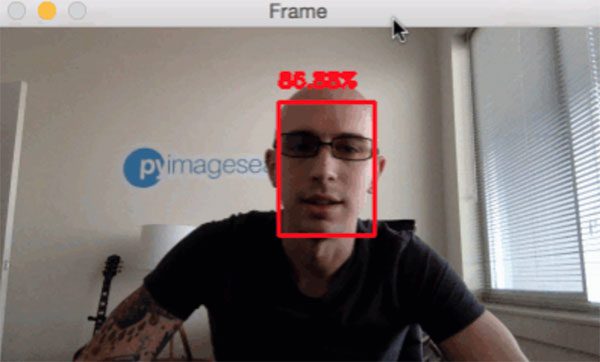
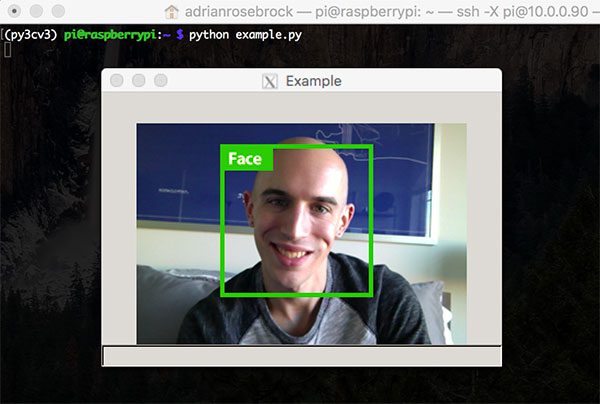
- There are a number of face detectors that you can use, but my favorite is OpenCV’s Deep Learning-based face detector:
- OpenCV’s face detector isaccurateand able torun in real-timeon modern laptops / desktops.
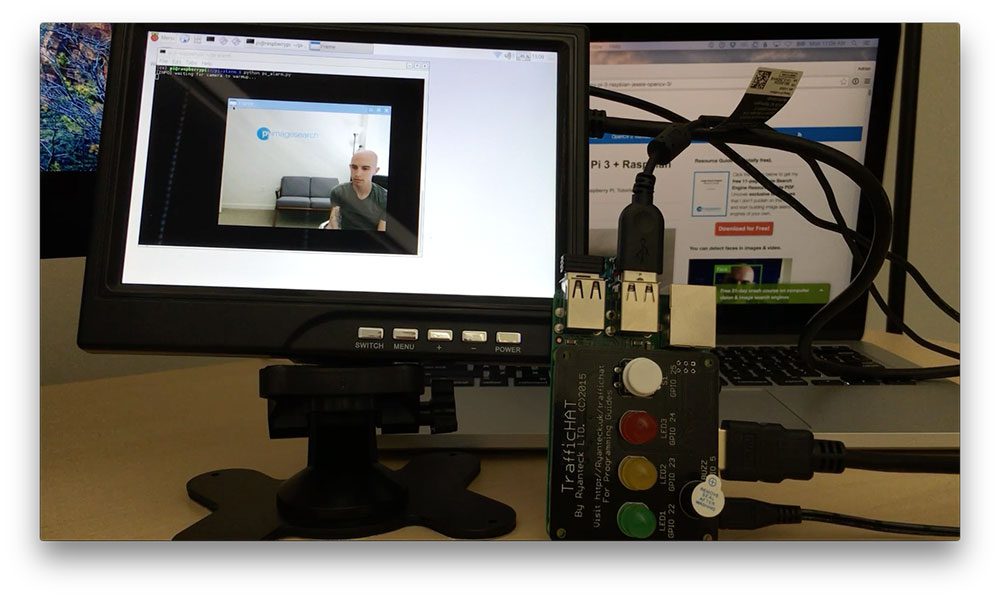
- That said, if you ‘re using a resource constrained devices (such as the Raspberry Pi), the Deep Learning-based face detector may be too slow for your application.
- In that case, you may want to utilize (Haar cascades) ****************** (orHOG Linear SVM) instead:
- Haar cascades areveryfast but prone to false-positive detections.
- It can also be a pain to properly tune the parameters to the face detector.
- HOG Linear SVM is a nice balance between the Haar cascades and OpenCV’s Deep Learning-based face detector.
- This detector isslowerthan Haar but is alsomore accurate.
- Here’s my suggestion:
- If you needaccuracy, go with OpenCV’s Deep Learning face detector.
- If you needpure speed, go with Haar cascades.
- And if you need abalanceBetween the two, go with HOG Linear SVM.
- Finally, make sure you try all three detectors before you decide!
- Gather a few example images and test out the face detectors.
- Let your empirical results guide you – apply face detection using each of the algorithms, examine the results, and double-down on the algorithm that gave you the best results.
-
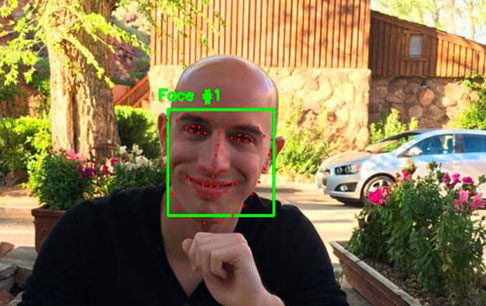
Step # 3: Discover Facial Landmarks (Intermediate)

- At this point you can detect the location of a face in an image.
- But what if we wanted to localize various facial structures, including:
- Nose
- Eyes
- Mouth
- Jawline
- Usingfacial landmarkswe can do exactly that!
- And best of all, facial landmark algorithms are capable of running inreal-time!
- Most of your computation is going to be spentdetectingthe actual face –once you have the face detected, facial landmarks are quite fast!
- Start by reading the following tutorials to learn how localize facial structures on a detected face:
-
Step # 4: Create Face Application Mini-Projects (Intermediate)

- Now that you have some experience with face detection and facial landmarks, let’s practice these skills and continue to hone them.
- I suggest going through the following guides to help you apply Computer Vision to facial applications:
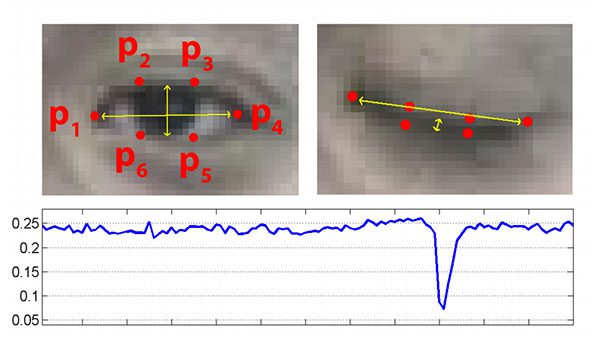
- Eye blink detection with OpenCV, Python, and dlib
- Drowsiness detection with OpenCV
- Raspberry Pi: Facial landmarks drowsiness detection with OpenCV and dlib
- Creating“Deal With It ”GIFs / memes with OpenCV and facial landmarks
-
Step # 5: Build a Face Recognition Dataset (Intermediate)

- Are you ready tobuild your first facial
- Hold up – I get that you’re eager, but before you canbuilda face recognition system, you first need togather your dataset of example images.
- The following tutorials will help you create a face recognition dataset:
- You can then take the dataset you created and proceed to the next step to build your actual face recognition system.
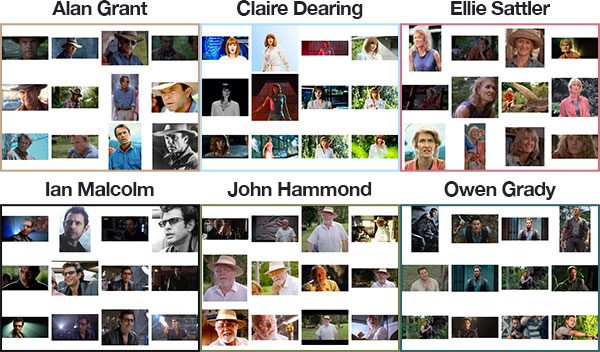
- Note:If you don’t want to build your own dataset you can proceed immediately to Step # 6 – I’ve provided my own personal example datasets for the tutorials in Step # 6 so you can continue to learn how to apply face recognition even if you don’t gather your own images.
-
Step # 6: Face Recognition (Intermediate)

- At this point you have ei ther (1) created your own face recognition dataset using the previous step or (2) elected to use my own example datasets I put together for the face recognition tutorials.
- To build your first face recognition system, follow this guide:
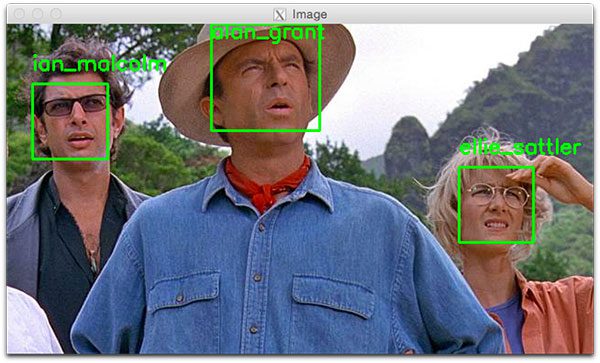
- Face recognition with OpenCV, Python, and deep learning
- This tutorial utilizes OpenCV, dlib, and face_recognition to create a facial recognition application.
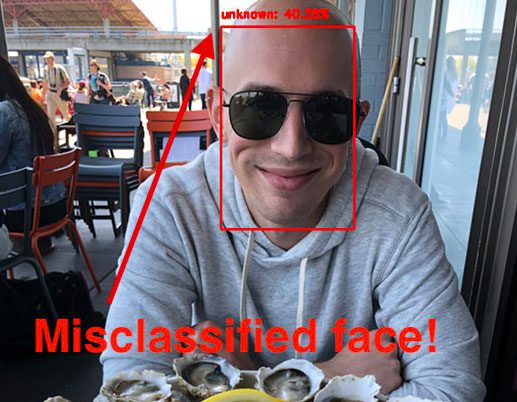
- The problem with the first method is that it relies on a modified k-Nearest Neighbor (k-NN) search to perform the actual face identification.
- k-NN, while simple, can easily fail as the algorithm doesn’t “learn” any underlying patterns in the data.
- To remedy the situation(and obtain probabilities associated with the face recognition), you should follow this guide:
- OpenCV Face Recognition
- You’ll note that this tutorial does not rely on the dlib and face_recognition libraries – instead, we use OpenCV’s FaceNet model.
- A great project foryouwould be to:
- (Replace) OpenCV’s FaceNet model with the dlib and face_recognition packages.
- Extractthe 128 – d facial embeddings
- Traina Logistic Regression or Support Vector Machine (SVM) on the embeddings extracted by dlib / face_recognition
- Take your time whewn implementing the above project –it will be a great learning experience for you.
-
Step # 7: Improve Your Face Recognition Accuracy (Intermediate)

- Whenever I write about face recognition the # 1 question I get asked is:
- “How can I improve my face recognition accuracy?”
- I’m glad you asked – and in fact, I’ve already covered the topic.
- Make sure you refer to theDrawbacks, limitations, and how to obtain higher face recognition accuracysection (right before theSummary) of the following tutorial:
- You should also read up onface alignmentas proper face alignment can improve your face recognition accuracy:
- Inside that section I discuss how you can improve your face recognition accuracy.
-
Step # 8: Detect Fake Faces and Perform Anti-Face Spoofing

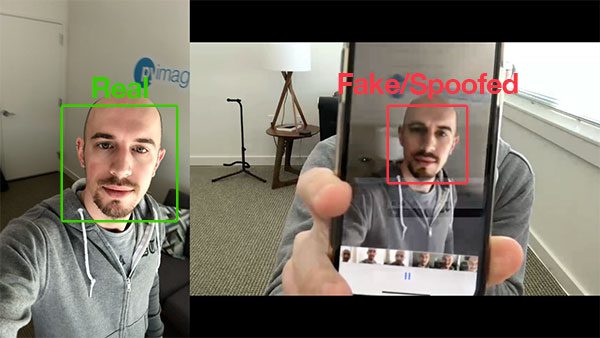
- You may have noticed that it’s possible to “trick” and “fool” your face recognition system by holding up a printed photo of a person or photo of the person on your screen.
- In those situations your face correctlyrecognizes the person,but fails to realize that it’s afake / spoofedface!
- What do you do then?
- The answer is to applyliveness detection:
- Liveness Detection with OpenCV
- Liveness detection algorithms are used to detect real vs. fake / spoofed faces.
- Once you have determined that the face is indeed real,thenyou can pass it into your face recognition system.
-
Where to Next?

- Congrats on making it all the way through the Facial Applications section!
- That was quite a lot of content to cover and you did great.
- Take a second now to be proud of yourself and your accomplishments.
- But what now – where should you go next?
- My recommendation would be thePyImageSearch Gurus course.
- The PyImageSearch Gurus course includes additional modules and lessons on face recognition.
- Additionally, you’ll also find:
- Anactionable, real-world courseon OpenCV and computer vision (similar to a college survey course on Computer Vision butmuchmore hands-
- The most comprehensive computer vision education online today .The PyImageSearch Gurus course covers13 modulesbroken out into168 lessons, with other2, 161 pagesof content. You won’t find a more detailed computer vision course anywhere else online, I guarantee it.
- A community of like-minded developers, researchers, and studentsjust like you, who are eager to learn computer vision and level-up their skills.
- To learn more about the PyImageSearch Gurus course, just use the link below:
- My recommendation would be thePyImageSearch Gurus course.
Optical Character Recognition (OCR)
One of the first applications of Computer Vision was Optical Character Recognition (OCR).
OCR algorithms seek to (1)take an input imageand then (2)recognize the text / charactersin the image, returning a human-readable string to the user (in this case a “string” is assumed to be a variable containing the text that was recognized).
While OCR is a simple concept to comprehend (input image in, human-readable text out) it’s actuallyextremely challengingproblem that isfar from solved.
The steps in this section will arm you with the knowledge you need to build your own OCR pipelines.
-
Step # 1: Install OpenCV (Beginner)
- Before you can apply OCR to your own projects you first need to install OpenCV.
- Follow Step # 1 of theHow Do I Get Started?section above to install OpenCV on your system.
- Once you have OpenCV installed you can move on to Step # 2.
-
Step # 2: Discover Tesseract for OCR (Beginner)

- Tesseract is an OCR engine / API that was originally developed by Hewlett-Packard in the (s.)
- The library was open-sourced in 2005 and later adopted by Google in 2006.
- Tesseract supports over 100 written languages, ranging from English to to Punjabi to Yiddish.
- Combining OpenCV with Tesseract isby farthe fastest way to get started with OCR.
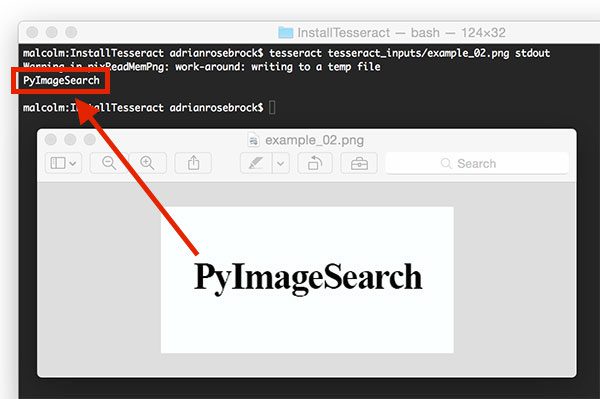
- First, make sure you Tesseract installed on your system:
- From there, you can create your first OCR application using OCR and Tesseract:
-
Step # 3: OCRWithoutTesseract (Intermediate)

- It’s entirely possible to perform OCRwithoutlibraries such as Tesseract.
- To accomplish this task you need to combinefeature extractionalong with a bit ofheuristicsand / ormachine learning.
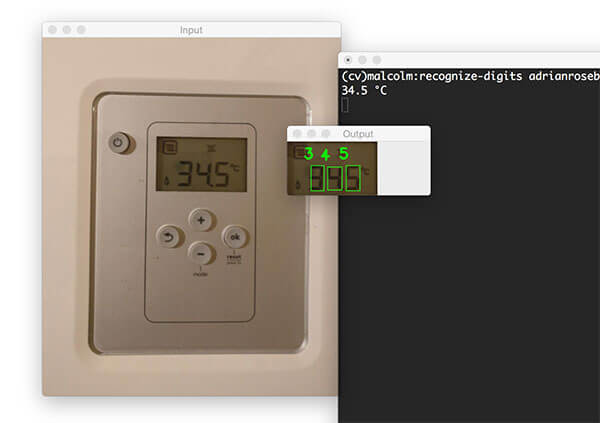
- The following guide will give you experience recognizing digits on a 7-segment display usingjustOpenCV:
- Take your time and practice with that tutorial – it will help you learn how to approach OCR projects.
-
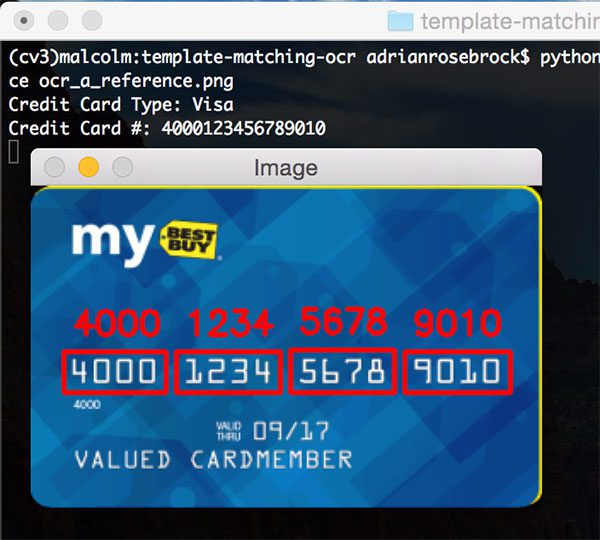
Step # 4: Practice OCR with Mini-Projects (Intermediate)

- Let’s continue our study of OCR by solving mini-projects:
- Again, follow the guides and practice with them – they will help you learn how to apply OCR to your tasks.
-
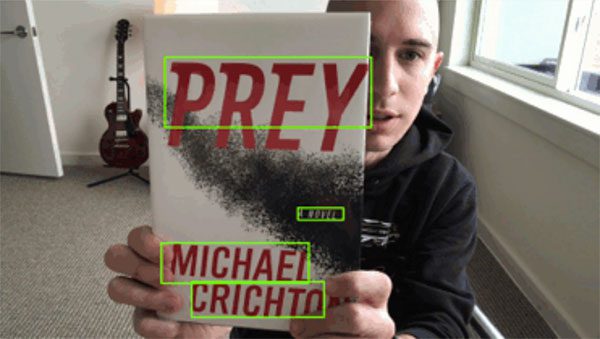
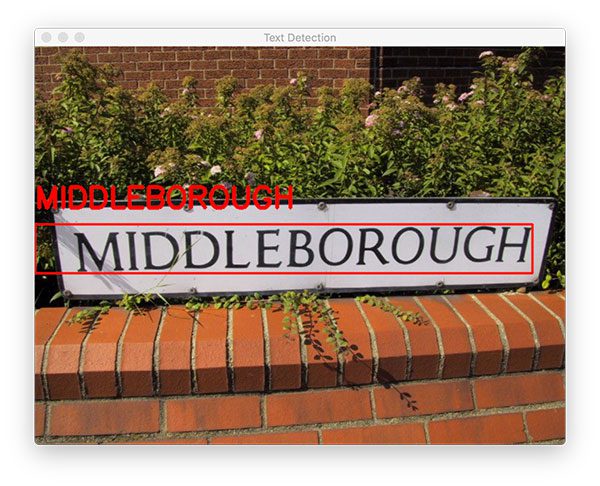
Step # 5: Text Detection in Natural Scenes (Intermediate)

- So far we’ve applied OCR to images that were captured undercontrolled environments(ie, no major changes in lighting, viewpoint, etc.).
- But what if we wanted to apply OCR to images inuncontrolled environments?
- Imagine we were tasked with building a Computer Vision system for Facebook to handle OCR’ing the 350 million new images uploaded to their new system.
- In that we case, we can makezero assumptionsregarding the environment in which the images were captured.
- Some images may be captured using a high quality DSLR camera, others with a standard iPhone camera, and even others with a decade old flip phone – again, we can makeno assumptionsregarding the quality, viewing angle, or even contents of the image.
- In that case, we need to break OCR into a two stage process:
- Stage # 1:Use the EAST Deep Learning-based text detector to locatewheretext resides in the input image.
- Stage # 2:Use an OCR engine (ex., Tesseract) to take the text locations and then actuallyrecognizethe text itself.
- To perform Stage # 1 (Text Detection ) you should follow this tutorial:
- If you’ve read theFace Applicationssection above you’ll note that our OCR pipeline is similar to our face recognition pipeline:
- First, wedetect the textin the input image (akin to to detecting / locating a face in an image)
- And then we take the regions of the image that contain the text,and then actually recognize it(which is similar to taking the location of a face and then actuallyrecognizingwho is in the face).
-
Step # 6: Combine Text Detection with OCR (Advanced)

- Now that we knowwherein the input image text resides, we can then take those text locationsand actually recognize the text.
- To accomplish this task we’ll again be using Tesseract, but this time we’ll want to useTesseract v4.
- The v4 release of Tesseract contains a LSTM-based OCR engine that isfar more accuratethan previous releases.
- You can learn how to combine Text Detection with OCR using Tesseract v4 here:
-
Where to Next?
- Keep in mind that OCR , while widely popular,is still far from being solved.
- It is likely, if not inevitable, that your OCR results willnotbe 100% accurate.
- Commercial OCR engines anticipate results not being 100% correct as well.
- These engines will sometimes apply auto-correction / spelling correction to the returned results to make them more accurate.
- Thepyspellcheckerpackage would likely be a good starting point for you if you’re interested in spell checking the OCR results.
- Additionally, you may want to look at theGoogle Vision API:
- While the Google Vision API requires (1) an internet connection and (2) payment to utilize, in my opinion it’s one of thebestOCR engines available to you.
- It is likely, if not inevitable, that your OCR results willnotbe 100% accurate.
- OCR is undoubtedly one of the mostchallengingareas of Computer Vision.
- If you need helpbuilding your own custom OCR systemsorincreasing the accuracy of your current OCR system,, I would recommend joining thePyImageSearch Gurus course.
- The course includes private forums where I hang out and answer questions daily.
- It’s a great place to get expert advice, both from me, as well as the more advanced students in the course.
- Click here to learn more about the PyImageSearch Gurus course.
- If you need helpbuilding your own custom OCR systemsorincreasing the accuracy of your current OCR system,, I would recommend joining thePyImageSearch Gurus course.
- Keep in mind that OCR , while widely popular,is still far from being solved.
Object Detection
Object detection algorithms seek todetect the locationof where an object resides in an image.
These algorithms can be as simple as basic color thresholding or as advanced as training a complex deep neural network from scratch.
In the first part of this section we’ll look at some basic methods of object detection, working all the way up to Deep Learning-based object detectors including YOLO and SSDs.
-
Step # 1: Configure Your Development Environment (Beginner)
- Prior to working with object detection you’ll need to configure your development environment.
- To start, make sure you:
- Follow Step # 1 of TheHow Do I Get Started?section to install OpenCV.
- Install Keras and TensorFlow via Step # 1 of theDeep Learning(section.)
- Provided you have OpenCV, TensorFlow, and Keras installed, you are free to continue with the rest of this tutorial.
-
Step # 2: Create a Basic Object Detector / Tracker (Beginner)

- We’ll keep our first object detector / tracker super simple.
- We’ll rely strictly onbasic image processing concepts, namelycolor thresholding.
- To apply color threshold we define anupperand (lower) range in a given color space (such as RGB, HSV, L * a * b *, etc.)
- Then, for an incoming image / frame, we use OpenCV’s(cv2).inRangefunction to apply color thresholding, yielding amask, where:
- Allforegroundpixels arewhite
- And allbackgroundpixels areblack
- Therefore, all pixels that fall into our upper and lower boundaries will be marked asforeground.
- Color thresholding methods, as the name suggestions, are super useful when you know the color of the object you want to detect and track will bedifferentthan all other colors in the frame.
- Furthermore, color thresholding algorithms arevery fast, enabling them to run in super real-time, even on resource constrained devices, such as the Raspberry Pi.
- Let’s go ahead and implement your first object detector now:
- Then, when you’re done, you can extend it to track object movement (north, south, east, west, etc. ):
- Once you’ve implemented the above two guides I suggest you extend the project by attempting to track your own objects.
- Again, keep in mind that this object detector is based oncolor,so make sure the object you want to detect has a different color than the other objects / background in the scene!
-
Step # 3: Basic Person Detection (Beginner)
 Color-based object detectors are fast and efficient, but they do nothing to understand the semantic contents of an image.
- For example, how would you go about defining a color range to detect an actual person?
- Would you attempt to track based on skin tone?
- That would fail pretty quickly – humans have a large variety of skin tones, ranging from ethnicity, to exposure to the sun. Defining such a range would beimpossible.
- Would clothing work?
- Well, maybe if you were at a soccer / football game and wanted to track players on the pitch via their jersey colors.
- But for general purpose applications that wouldn’t work either – clothing comes in all shapes, sizes, colors, and designs.
- Would you attempt to track based on skin tone?
- I think you get my point here – trying to detect a person based on color thresholding methods alone simply isn’t going to work.
- Instead, you need to use a dedicated object detection algorithm.
- One of the most common object detectors is the Viola-Jones algorithm, also known asHaar cascades.
- The Viola-Jones algorithm was published back in 2001 but is still used today (although Deep Learning-based object detectors obtainfarbetter accuracy).
- To try out a Haar cascade out, follow this guide:
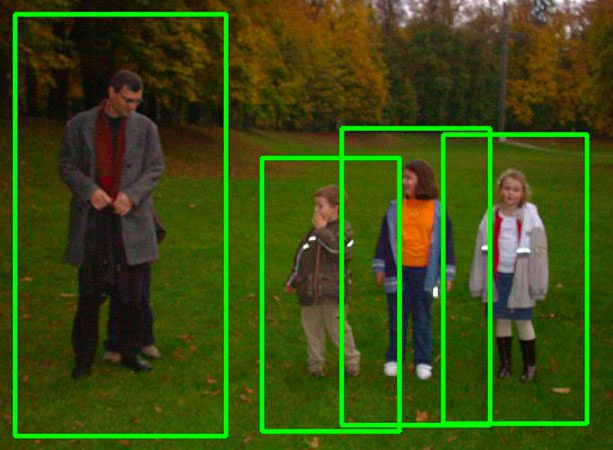
- In 2005, Dalal and Triggs published the seminal paper,Histogram of Oriented Gradients for Human Detection.
- This paper introduces what we call theHOG Linear SVM Object Detector:
- Let’s gain some experience applying HOG Linear SVM to pedestrian detection:
- You’ll then want tounderstand the parametersto OpenCV’s detectMultiScale function,including how to tune them obtain higher accuracy:
-
Step # 4: Improving Our Basic Object Detector (Beginner)

- Now that we’ve seen how HOG Linear SVM works in practice, let’s dissect the algorithm a bit.
- To start, the HOG Linear SMV object detectors uses a combination of sliding windows, HOG features, and a Support Vector Machine to localize objects in images.
- Image pyramids allow us to detect objects atdifferent scales(ie, objects that are closer to the camera as well as objects farther away):
- Sliding windows enable us to detect objects atdifferent locationsin a given scale of the pyramid:
- Finally, you need to understand the concept of (non-maxima suppression, a technique used in (both) traditional object detection as well as Deep Learning-based object detection:
- (Non-Maxima Suppression for Object Detection in Python)
- (Faster) Non-Maxima Suppression in Python
- When performing object detection you’ll end up locating (multiple) bounding boxes surrounding asingle object.
- This behavior is actually agood thing–it implies that your object detector is working correctly and is “Activating” when it gets close to objects it was trained to detect.
- The problem is that we now havemultiplebounding boxes foroneobject.
- To rectify the problem we can apply non-maxima suppression, which as the name suggestions, suppresses (ie, ignores / deletes) weak, overlapping bounding boxes.
- The term “weak” here is used to indicate bounding boxes of low confidence / probability.
- To rectify the problem we can apply non-maxima suppression, which as the name suggestions, suppresses (ie, ignores / deletes) weak, overlapping bounding boxes.
- If you are interested in learning more about the HOG Linear SVM object detector, including:
- How totrain your own custom HOG Linear SVM object detector
- Theinner-workingsof the HOG Linear SVM detector
- … then you’ll want to refer to the PyImageSearch Gurus course
- Inside the course you ‘ ll find 30 lessons on HOG feature extraction and the HOG Linear SVM object detection algorithm.
-
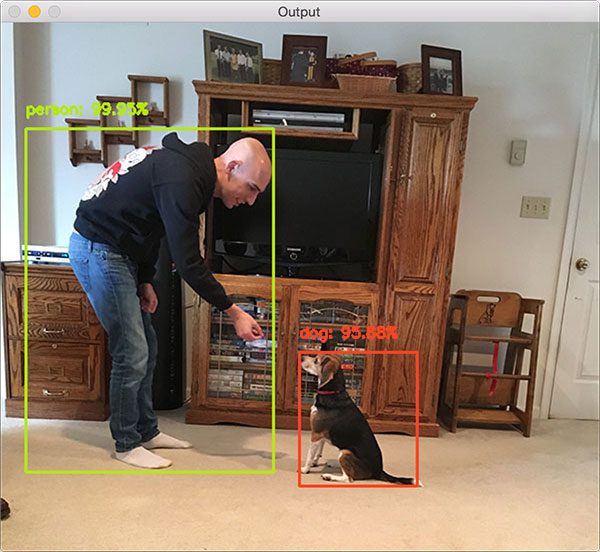
Step # 5: Your First Deep Learning Object Detector (Intermediate)

- For ~ 10 years HOG Linear SVM (including its variants) was considered the state-of-the-art in terms of object detection.
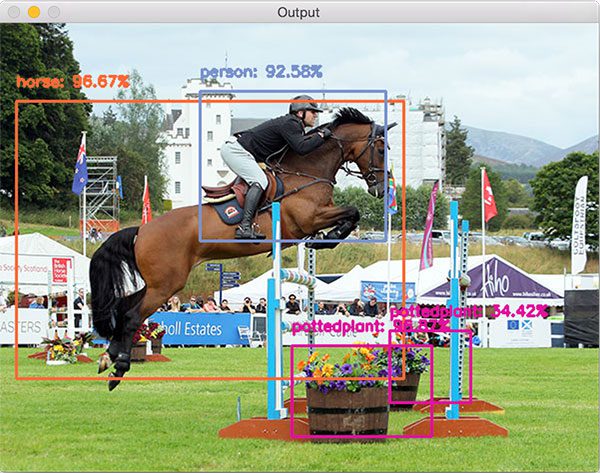
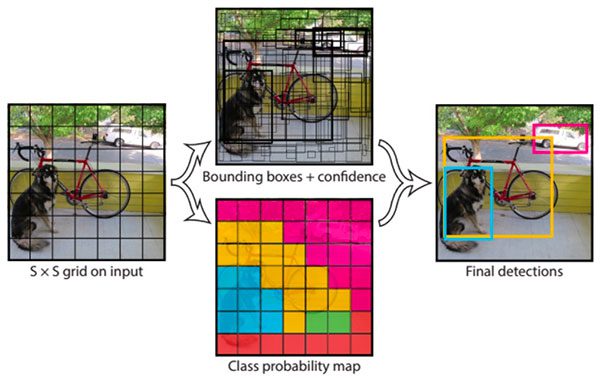
- However, Deep Learning-based object detectors, including (Faster R-CNN, (Single Shot Detector) SSDs),You Only Look Once (YOLO), andRetinaNethave obtainedunprecedentedobject detection accuracy.
- The OpenCV library is compatible with a number of pre-trained object detectors – let’s start by taking a look at this SSD:
-
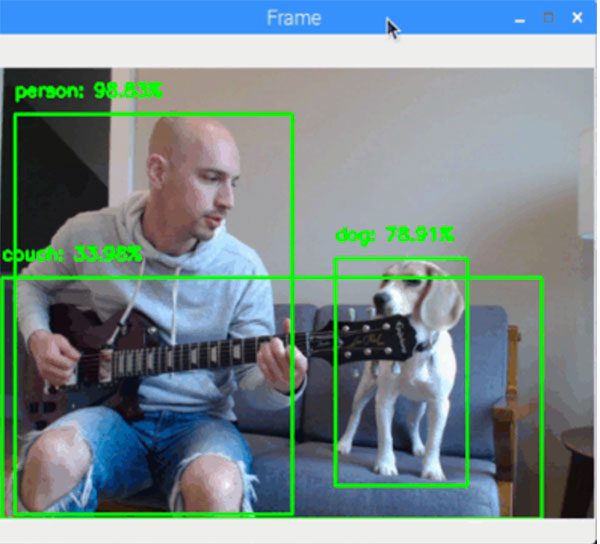
Step # 6: Real-time Object Detection with Deep Learning (Intermediate)

- In Step # 5 you learned how to apply object detection toimages–but what about video?
- Is it possible to apply object detection to real-time video streams?
- On modern laptops / desktops you’ll be able to runsome(but not (all) ) Deep Learning-based object detectors in real-time.
- This tutorial will get you started:
-
Step # 7: Deep Learning Object Detectors (Intermediate)

- For a deeper dive into Deep Learning-based object detection, including how tofilter / remove classes that you want to ignore / not detect, refer to this tutorial:
- Next, you’ll want to practice applying theYOLO object detector:
- (YOLO object detection with OpenCV)
- The YOLO object detector is designed to besuper fast; however, it appears that the OpenCV implementation is actuallyfar slowerthan the SSD counterparts.
- I’m not entirely sure why that is.
- Furthermore, OpenCV’s Deep Neural Network (DNN) moduledoes not yet support NVIDIA GPUs, meaning that youcannot use your GPUto improve inference speed.
- OpenCV is reportedly working on NVIDIA GPU support but it may not be until 2020 until that support is available.
-
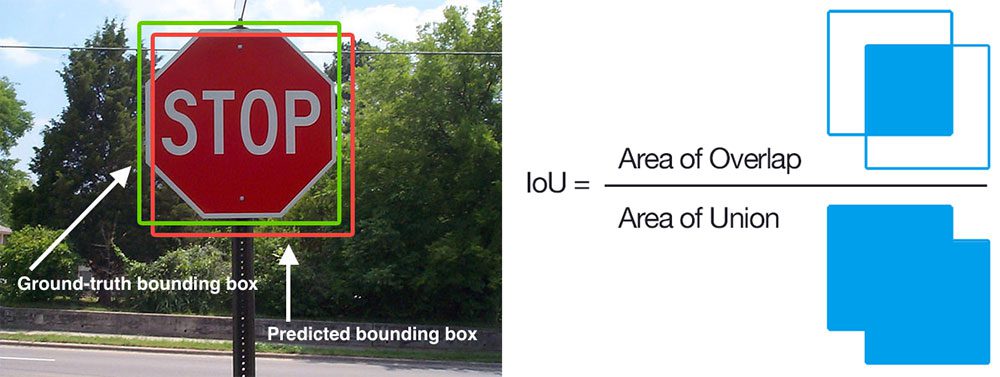
Step # 8: Evaluate Deep Learning Object Detector Performance (Intermediate)

- If you decide you want to train your own custom object detectors from scratch you’ll need a method to evaluate the accuracy of the model .
- To do that we use two metrics:Intersection over Union (IoU)andmean Average Precision ( mAP)– you can read about them here:
- (Intersection over Union) IoU) for object detection
-
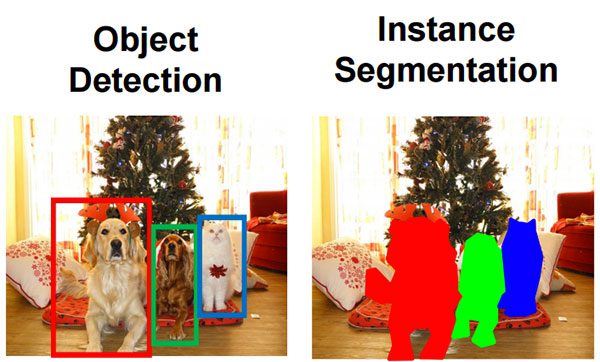
Step # 9: From Object Detection to Semantic / Instance Segmentation (Intermediate)

- If you’ve followed along so far, you know that object detection producesbounding boxesthat report thelocationandclass labelof each detected object in an image.
- But what if you wanted to extend object detection to producepixel-wise masks?
- These masks would not only report the bounding box location of each object, but would reportwhich individual pixels belong to the object.
- These types of algorithms are covered in theInstance Segmentation and Semantic Segmentationsection.
-
Step # 10: Object Detection on Embedded Devices (Advanced)

- Deep Learning-based object detectors, while accurate, areextremelycomputationally hungry, making themincredibly challengingto apply them to resource constrained devices such as the Raspberry Pi, Google Coral, and NVIDIA Jetson Nano.
- If you would like to apply object detection to these devices, make sure you read the(Embedded and IoT Computer Vision)andComputer Vision on the Raspberry Pisections, respectively.
-
Where to Next?
- Congratulations, you now have a solid foundation on how object detection algorithms work!
- If you’re looking to study object detection in more detail, I would recommend you:
- Join the(PyImageSearch Gurus course)
- Inside the course I cover Theinner-workings of the HOG Linear SVM algorithm,includinghow to train your own custom HOG Linear SVM detector.
- Take a look atDeep Learning for Computer Vision with Python
- That book covers Deep Learning -based object detection in-depth, includinghow to (1) annotate your datasetand(2) train the follow object detectors:
- Faster R-CNNs
- Single Shot Detectors (SSDs)
- RetinaNet
- If you’re interested in instance / semantic segmentation, the text coversMask R-CNNas well.
- That book covers Deep Learning -based object detection in-depth, includinghow to (1) annotate your datasetand(2) train the follow object detectors:
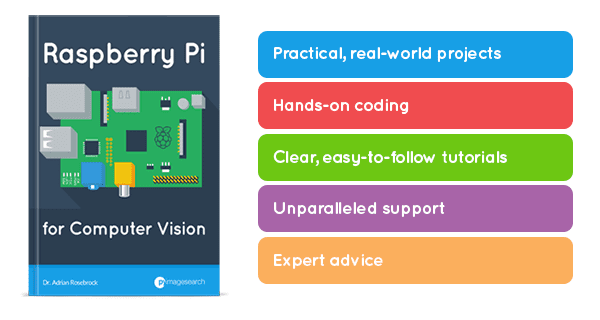
- Read throughRaspberry Pi for Computer Vision
- As the name suggestions, this book is dedicated to developing and optimizing Computer Vision and Deep Learning algorithms on resource constrained devices, including the:
- Raspberry Pi
- Google Coral
- Intel Movidius NCS
- NVIDIA Jetson Nano
- Inside you’ll learn how to train your own object detectors, optimize / convert them for the RPi, Coral, NCS, and / or Nano, and thenrun the detectors in real-time!
- As the name suggestions, this book is dedicated to developing and optimizing Computer Vision and Deep Learning algorithms on resource constrained devices, including the:
- Join the(PyImageSearch Gurus course)
 Color-based object detectors are fast and efficient, but they do nothing to understand the semantic contents of an image.
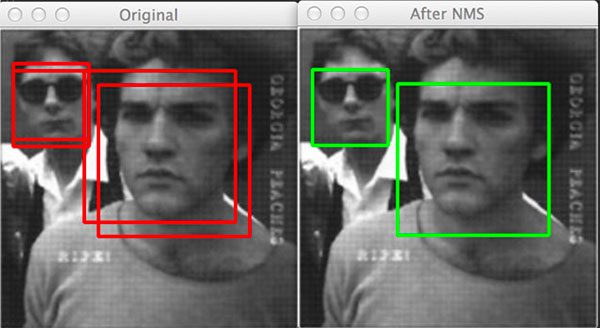
Object Tracking
Object Tracking algorithms are typically appliedafterand object has already been detected; therefore, I recommend you read theObject Detectionsection first. Once you’ve read those sets of tutorials, come back here and learn about object tracking.
Object detection algorithms tend to beaccurate, but computationally expensive to run.
It may be infeasible / impossible to run a given object detector oneveryframe of an incoming video stream andstillmaintain real-time performance.
Therefore, we need an intermediary algorithm that can accept the bounding box location of an object, track it, and thenautomatically update itselfas the object moves about the frame.
We’ll learn about these types of object tracking algorithms in this section.
-
Step # 1: Install OpenCV on Your System (Beginner)
- Prior to working through this section you’ll need to install OpenCV on your system.
- Make sure you follow Step # 1 ofHow Do I Get Started?to configure and install OpenCV.
- Additionally, I recommend reading theObject Detectionsection first as object detection tends to be a prerequisite to object tracking.
- Prior to working through this section you’ll need to install OpenCV on your system.
-
Step # 2: Your First Object Tracker (Beginner)

- The first object tracker we’ll cover is a color-based tracker.
- This algorithm combinesbothobject detection and tracking into a single step, and in fact, is thesimplestobject tracker possible.
- You can read more about color-based detection and tracking here:
-
Step # 3: Discover Centroid Tracking (Intermediate)

- Our color-based tracker was a good start, but the algorithm will fail if there ismore than one object we want to track.
- For example, let’s assume there aremultiple objectsin our video stream and we want toassociate unique IDs with each of them– how might we go about doing that?
- The answer is to apply aCentroid Trackingalgorithm:
- Using Centroid Tracking we can not only associate unique IDs with a given object, but also detect when an object is lost and / or has left the field of view.
-
Step # 4: Better Object Tracking Algorithms (Intermediate)
- OpenCV comes with eight object tracking algorithms built-in to the library, including:
- BOOSTING Tracker
- MIL Tracker
- KCF Tracker
- CSRT Tracker
- MedianFlow Tracker
- TLD Tracker
- MOSSE Tracker
- GOTURN Tracker
- You can learn how to use each of them in this tutorial:
- The dlib library also has an implementation ofcorrelation tracking:
- When utilizing object tracking in your own applications you need to balancespeedwithaccuracy.
- My persona recommendation is to :
- Use CSRT when you needhigher object detection accuracyand cantolerate slower FPS throughput.
- Use KCF when you needfaster FPS throughputbut canhandle slightly lower object tracking accuracy.
- UseMOSSE when you need pure speed.
- My persona recommendation is to :
-
Step # 5: Multi-Object Tracking (Intermediate)

- Step # 4 handled single object tracking using OpenCV and dlib’s object trackers –but what about multi-object tracking?
- You should start by reading aboutmulti- object tracking with OpenCV:
- Multi-object tracking is, by definition, significantly more complex, both in terms of the underlying programming, API calls, and computationally efficiency .
- Most multi-object tracking implementations instantiate a brand new Python / OpenCV class to handle object tracking, meaning that if you haveNobjects you want to track, you therefore haveNobject trackers instantiated –which quickly becomes a problem in crowded scenes.
- Your CPU will choke on the load and your object tracking system will come to a grinding halt.
- One way to overcome this problem is to usemultiprocessinganddistribute the load across multiple processes / cores ,thus enabling you to reclaim some speed:
-
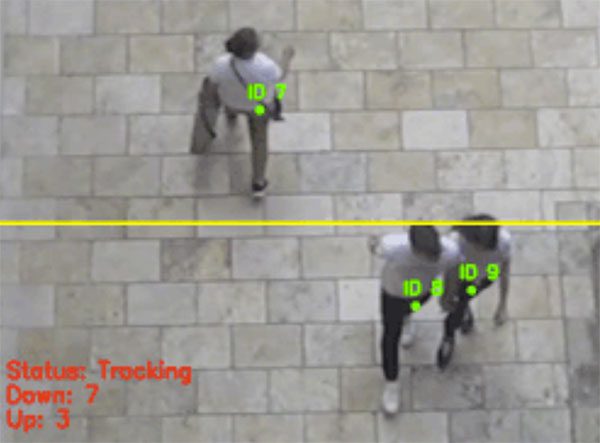
Step # 6: Applied Object Tracking and Counting (Intermediate)

- So far you’ve learned how to apply single object tracking and multi-object tracking.
- Let’s put all the pieces together and build aperson / footfall counter applicationcapable of detecting, tracking, and counting the number of people that enter / exit a given area (ie, convenience store , grocery store, etc.):
- In particular, you’ll want to note how the above implementation takes ahybrid approachto object detection and tracking, where:
- The object detector is only applied everyNframes.
- One object tracker is created per detected object.
- The trackers enable us to track the objects.
- Then, once we reach theN-th frame, we apply object detection, associate centroids, and then create new object trackers.
- Such a hybrid implementation enables us to balancespeedwithaccuracy.
-
Where to Next?
- Object tracking algorithms are more of an advanced Computer Vision concept.
- If you’re interested in studying Computer Vision in more detail, I would recommend thePyImageSearch Gurus course.
- This course is similar to a college survey in Computer Vision, butwaymore practical , including hands-on coding and implementations.
Instance Segmentation and Semantic Segmentation
There are three primary types of algorithms used for image understanding:
- Image classificationalgorithms enable you to obtain asingle labelthat represents the contents of an image. You can think of image classification as inputting a singleimage to a network and obtaining asingle labelas output.
- Object detectionalgorithms are capable of telling you not onlywhatis in an image, but alsowherein the image a given object is. Object detectors thus accept a single input image and then returningmultiple values as an output. The output itself is a list of values containing (1) the class label and (2) the bounding box(x, y) –coordinates of where the particular object is in the image.
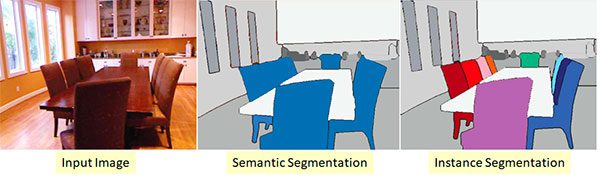
- Instance segmentation and semantic(segmentation) take object detection farther. Instead of returning bounding box coordinates, instance / semantic segmentation methods instead yieldpixel-wise masksthat tell us (1) the class label of an object, (2) the bounding box coordinates of the object, and (3)the coordinates of the pixels that belong to the object.
These segmentation algorithms are intermediate / advanced techniques, so make sure you read theDeep Learning
section above to ensure you understand the fundamentals.
-
Step # 1: Configure Your Development Environment (Beginner)
- In order to perform instance segmentation you need to haveOpenCV,TensorFlow, and (Keras) installed on your system.
- Make sure you follow Step # 1 from theHow Do I Get Started?section to install OpenCV.
- From there, follow Step # 1 from theDeep Learningsection to ensure TensorFlow and Keras are properly configured.
-
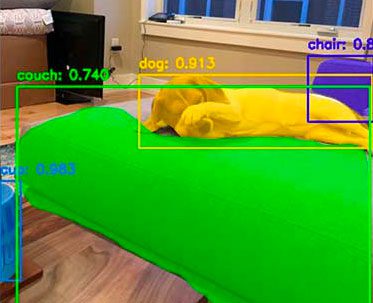
Step # 2: Segmentation vs. Object Detection (Intermediate)
- Now that you have your deep learning machine configured, you can learn aboutinstance segmentation.
- Follow this guide to utilize your first instance segmentation network using OpenCV:
- (Instance segmentation with OpenCV
- That guide will also teach you how instance segmentation is different from object detection.
-
Step # 3: Applying Mask R-CNN (Intermediate)

- Mask R-CNN is arguablythe most popularinstance segmentation architecture.
- Mask R-CNNs have been successfully applied to self-driving cars (vehicle, road, and pedestrian detection), medical applications (automatic tumor detection / segmentation),and much more!
- This guide will show you how to use Mask R-CNN with OpenCV:
- (Mask R-CNN with OpenCV)
- And this tutorial will teach you how to use the Keras implementation of Mask R-CNN:
- (Keras Mask R-CNN)
-
Step # 4: Semantic Segmentation with OpenCV (Intermediate)

- When performinginstance segmentationour goal is to (1) detect objects and then (2) compute pixel-wise masks for each object detected.
- Semantic(segmentation) is a bit different – instead of labelingjustthe objects in an input image, semantic segmentation seeks tolabelevery pixelin the image.
- That means that if a given pixel doesn’t belong to any category / class, we label it as“background”(meaning that the pixel does not belong to any semantically interesting object).
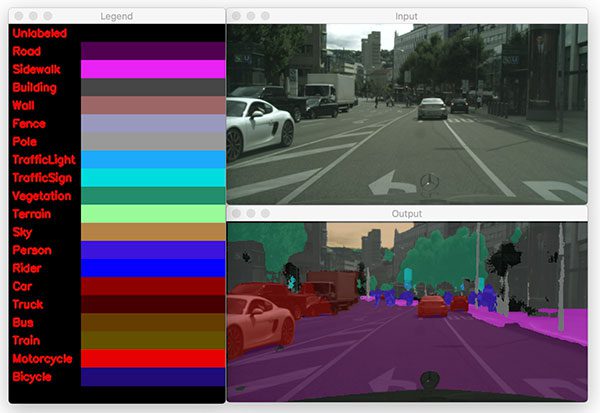
- Semantic segmentation algorithms arevery popularforself-driving car applicationsas they can segment an input image / frame into components, including road, sidewalk, pedestrian, bicyclist, sky, building, background, etc.
- To learn more about semantic segmentation algorithms, refer to this tutorial:
-
Where to Next?

- Congratulations, you now understand how to work with instance segmentation and semantic segmentation algorithms!
- However, we worked only withPre-trainedsegmentation networks –what if you wanted to train your own?
- That isabsolutelypossible – and to do so, you’ll want to refer to
- Inside the book you’ll discover
- The annotation tools I recommend(and how to use them) when labeling your own image dataset for instance / semantic segmentation.
- How totrain a Mask R-CNN on your own custom dataset.
- How to take your trained Mask R-CNN andapply it to your own images.
- Mybest practices, tips, and suggestionswhen training your own Mask R-CNN.
- To learn more about the book just click here.
Embedded and IoT Computer Vision
Applying Computer Vision and Deep Learning algorithms to resource constrained devices such as the Raspberry Pi, Google Coral, and NVIDIA Jetson Nano can besuper challengingdue to the fact that state-of-the-art CV / DL algorithms arecomputationally hungry– these resource constrained devices just don’t have enough CPU power and sufficient RAM to feed these hungry algorithm beasts.
But don’t worry!
You can still apply CV and DL to these devices – you just need to follow these guides first.
-
Step # 1: Configure Your Embedded / IoT Device (Beginner)
- Before you start applying Computer Vision and Deep Learning to embedded / IoT applications you first need to choose a device.
- I suggest starting with theRaspberry Pi– it’s a super cheap ($ 35) and easily accessible device for your initial forays into embedded / IoT Computer Vision and Deep Learning.
- These guides will help you configure your Raspberry Pi:
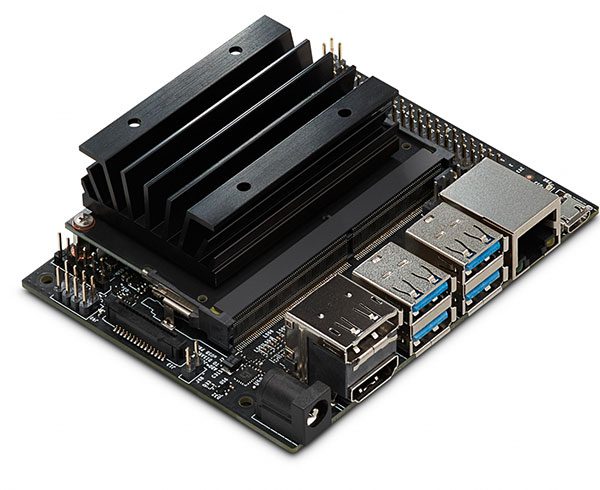
- Another option to consider isNVIDIA’s Jetson Nano ,what many call the“Raspberry Pi for Artificial Intelligence” .
- At $ 99 It’s still reasonable affordable and packs a Maxwell 128 CUDA core GPU capable of 472 GFLOPS of computation.
- To get started with the NVIDIA Jetson Nano, follow this guide:
- You may also want to considerGoogle’s Coral Platformalong with theMovidius NCS.
- TheGoogle Coral USB Acceleratoris a particularly attractive option as it’s essentially a (Deep Learning USB Stick) ****************** ((similar to Intel’s Movidius NCS).)
- Both the Movidius NCS and Google Coral USB Accelerator plug into a USB port on your embedded device (such as a Raspberry Pi or Jetson Nano
- You can then performance inference (ie, prediction) on the USB stick, yielding faster throughput than using the CPU alone.
- We’ll cover both the Movidius NCS and Google Coral USB Accelerator later in this section.
-
Step # 2: Your First Embedded Computer Vision Project (Beginner)

- Again, Istrongly recommendthe Raspberry Pi as your first embedded vision platform – it’s super cheap and very easy to use.
- To get started, I would recommend that you understand how to:
- Next,build your first motion detectorusing the Raspberry Pi:
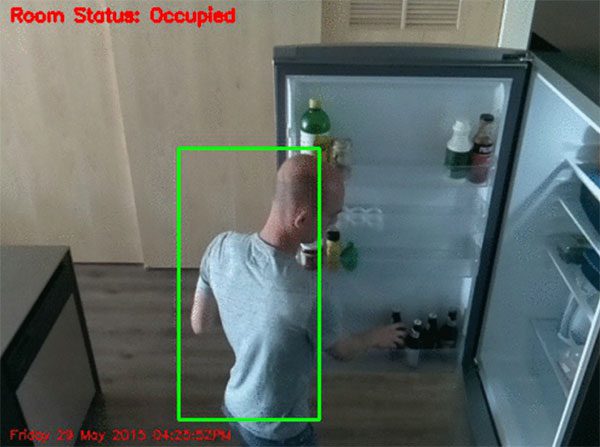
- And then extend it to build anIoT home surveillance system:
-
Step # 3: Create Embedded / IoT Mini-Projects (Intermediate)
- If I’ve said it once, I’ve said it a hundred times – the best way to learn Computer Vision is through practical , hands-on the projects.
- The same is true for Embedded Vision and IoT projects as well.
- To gain additional experience building embedded CV projects, follow these guidesto work with video on embedded devices, including working withmultiple camerasandlive streaming video over a network:
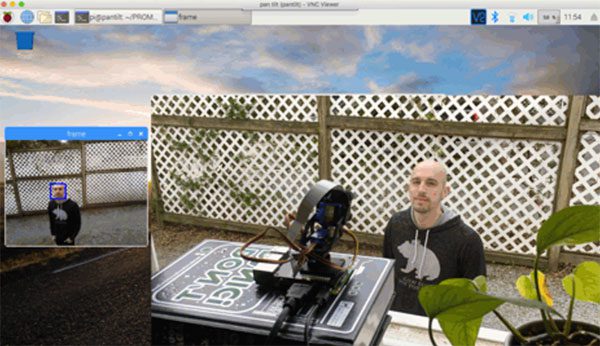
- To gain experience working with hardware, check out thispan / tilt face tracker:
- There is a dedicatedFace Applicationssection in this guide, but there’s no harm in getting experience withface applications on the RPinow:
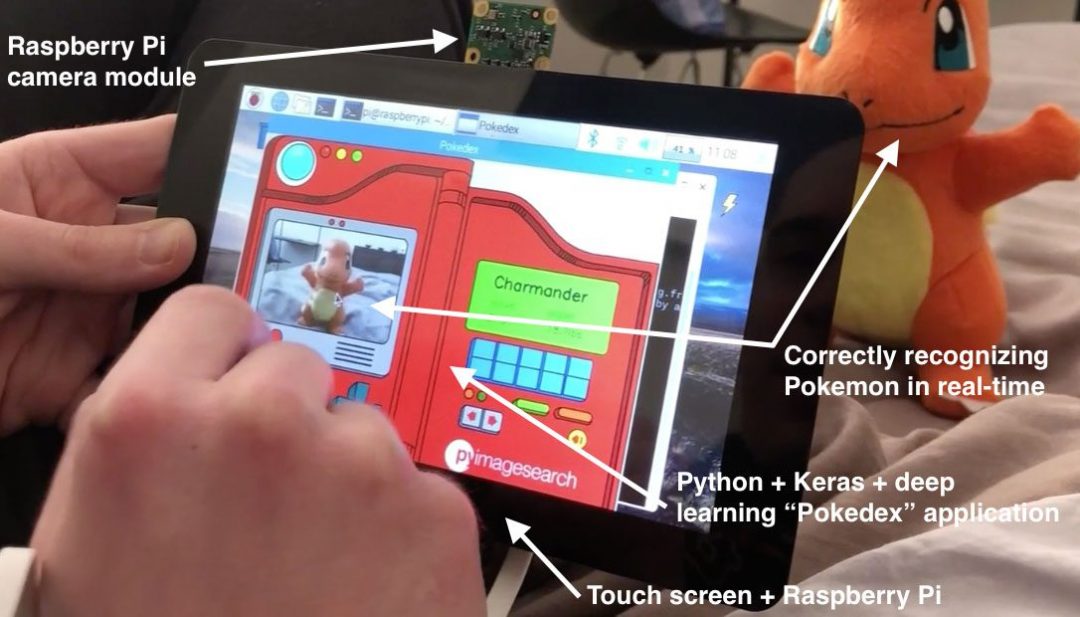
- If you’re eager to gain some initial experience usingdeep learningon embedded devices, start with this guide:
- Keras and deep learning on the Raspberry Pi
- From there you’ll want to go through the steps in theDeep Learningsection.
- Finally, if you want to integratetext message notificationsinto the Computer Visions security system we build in the previous step, then read this tutorial:
-
Step # 4: Image Classification on Embedded Devices (Intermediate)
- If you followed Step # 3 then you found out that running Deep Learning models on resource constrained devices such as the Raspberry Pi can be computationally prohibitive, preventing you from obtaining real-time performance.
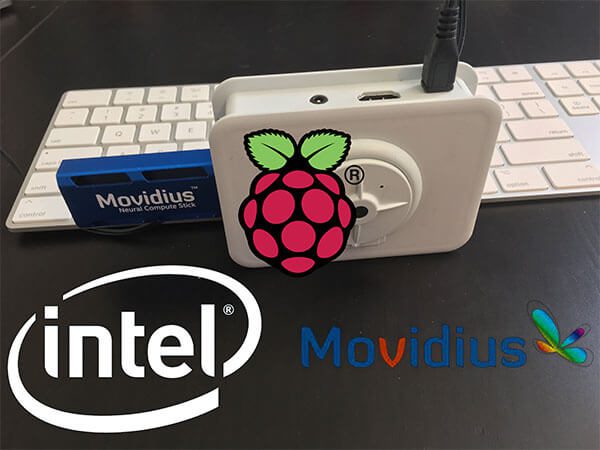
- In order to boost your Frames Per Second (FPS) throughput rate, you should consider using acoprocessorsuch asIntel’s Movidius NCSorGoogle’s Coral USB Accelerator :
- (Getting started with the Intel Movidius Neural Compute Stick)
- Getting started with Google Coral’s TPU USB Accelerator
- Or, you may want to switch to a different board entirely! For that I would recommend NVIDIA’s Jetson Nano:
- These devices / boards cansubstantiallyboost your FPS throughput!
-
Step # 5: Object Detection on Embedded Devices (Intermediate)

- Just as image classification can be slow on embedded devices, the same is true for object detection as well.
- And in fact, object detection is actuallyslowerthan image classification given the additional computation required.
- To see how object detection on the RPi CPU can be a challenge, start by reading this guide:
- To get around this limitation we can once again lean on theMovidius NCS, (Google Coral) , andNVIDIA Jetson Nano:
-
Where to Next?

- At this point you should:
- Understand how to apply basic Computer Vision algorithms to resource constrained devices.
- And more importantly, appreciate howchallengingit can be to apply these algorithms given limited CPU, RAM, and power.
- If you’d like a deeper understanding of this material, including how:
- Build practical, real-world computer vision applicationson the Raspberry Pi
- Createcomputer vision and Internet of Things ( IoT)projects and applications with the RPi
- Optimize your OpenCV code and algorithmson the resource constrained Pi
- Perform Deep Learning on the Raspberry Pi (including utilizing theMovidius NCSandOpenVINO toolkit)
- Utilize theGoogle CoralandNVIDIA Jetson Nanoto buildembedded computer vision and deep learning applications
- … .then you should definitely take a look at my book,Raspberry Pi for Computer Vision!
- This book is yourone-stop shopfor learning how to master Computer Vision and Deep Learning on embedded devices.
Computer Vision on the Raspberry Pi
At only $ 35, the Raspberry Pi (RPi) is a cheap, affordable piece of hardware that can be used by hobbyists, educators, and professionals / industry alike.
The Raspberry Pi 4 (the current model as of this writing) includes a Quad core Cortex-A 72 running at 1.5Ghz and either 1GB, 2GB, or 4GB of RAM (depending on which model you purchase) – all running on a computer the size of a credit card.
But don’t let its small size fool you!
The Raspberry Pi canabsolutelybe used for Computer Vision and Deep Learning (but you need to know how to tune your algorithms first).
-
Step # 1: Install OpenCV on the Raspberry Pi (Beginner)
- Prior to working through these steps I recommend that you first work through theHow Do I Get Started?section first.
- Not only will that section teach you how to install OpenCV on your Raspberry Pi, but it will also teach you the fundamentals of the OpenCV library.
- If you find yourself struggling to get OpenCV installed on your Raspberry Pi, take a look at both:
- Both of those books contain apre- configured Raspbian .img file.
- All you need to do is download the .img file, flash it to your micro-SD card, and boot your RPi.
- From there you’ll have apre -configured development environment with OpenCV and all other CV / DL libraries you needpre-installed.
- This .img file can save you days of heartache trying to get OpenCV installed.
- The documentation for the .img file can be found here.
- Prior to working through these steps I recommend that you first work through theHow Do I Get Started?section first.
-
Step # 2: Development on the RPi (Beginner)

- Assuming you now have OpenCV installed on your RPi, you might be wondering about development best practices –what is the best way to write code on the RPi?
- Should you install a dedicated IDE, such as PyCharm, directly on the Pi itself and code there?
- Should you use a lightweight code editor such as Sublime Text?
- Or should you SSH / VNC in to the RPi and edit the code that way?
- You couldpotentiallydo all three of those, but my favorite is to use eitherPyCharm or Sublime Text on my laptop / desktop with a SFTP plugin:
- Doing so enables me to code using my favorite IDE on my laptop / desktop.
- Once I’m done editing a file, I save it, after which the file isautomaticallyuploaded to the RPi.
- It does take some additional time to configure your RPi and laptop / desktop in this manner, but once you do,It’s so worth it!
-
Step # 3: Access your Raspberry Pi Camera or USB Webcam (Beginner)

- Now that your development environment is configured, you should verify that you can access your camera, whether that be a (USB webcam) or theRaspberry Pi camera module:
-
Step # 4: Your First Computer Vision App on the Raspberry Pi (Beginner)
- The Raspberry Pi is naturally suited forhome security applications, so let’s learn how we can utilizemotion detectionto detect when there is an intruder in our home:
-
Step # 5: OpenCV, GPIO, and the Raspberry Pi (Beginner)

- If you want to use the GPIO to control additional hardware, specificallyHardware on Top (HATs), you should study how OpenCV and GPIO can be used together on the Raspberry Pi:
-
Step # 6: Facial Applications on the Raspberry Pi (Intermediate)
- Facial applications, includingface recognitioncan beextremely trickyon the Raspberry Pi due to the limited computational horsepower.
- Algorithms that worked well on our laptop / desktop may not translate well to our Raspberry Pi, so therefore, we need to take care to perform additional optimizations.
- These tutorials will get you started applying facial applications on the RPi:
-
Step # 7: Apply Deep Learning on the Raspberry Pi (Intermediate)

- Deep Learning algorithms are notoriously computationally hungry, and given the resource constrained nature of the RPi, CPU and memory come at a premium.
- To discover why Deep Learning algorithms are slow on the RPi, start by reading these tutorials:
- Then, when you’re done, come back and learn how to implement acomplete, end-to-end deep learning projecton the RPi:
-
Step # 8: Work with Servos and Additional Hardware (Intermediate)

- One of the benefits of the using the Raspberry Pi is that it makes itso easyto work with additional hardware,especiallyfor robotics applications.
- In this tutorial you will learn how to apply face tracking using a pan / tilt servo:
-
Step # 9: Utilize Intel’s NCS for Faster Deep Learning (Advanced)
- In order to speedup Deep Learning model inference on the Raspberry Pi we can use acoprocessor.
- Think of a coprocessor as a USB stick that contains a specialized chip used to make Deep Learning models run faster.
- We plug the stick into our RPi, integrate with the coprocessor API, and then push all Deep Learning prediction to the USB stick.
- One of the most popular Deep Learning coprocessors is (Intel’s Movidius NCS.
- Using the NCS we can obtain upwards of a1, 200% speedupin our algorithms!
- To learn more about the NCS, and use it for your own embedded vision applications, read these guides:
- (Getting started with the Intel Movidius Neural Compute Stick)
- Real-time object detection on the Raspberry Pi with the Movidius NCS
- OpenVINO, OpenCV, and Movidius NCS on the Raspberry Pi
- Additionally, my new book,Raspberry Pi for Computer Vision, includes detailed guides on how to:
- Train your own Deep Learning model on your owncustom dataset
- Optimize the modelusing the OpenVINO Toolkit
- Deploy the optimized modelto the RPi
- Enjoy faster inference on the Raspberry Pi!
- To learn more about the book, just click here.
-
Step # 10: Utilize Google Coral USB Accelerator for Faster Deep Learning (Advanced)
- Google’s Coral USB accelerator is a competitor to Intel’s Movidius NCS coprocessor.
- One of the benefits of combining the the Google Coral USB Accelerator with the RPi 4 isUSB 3.0.
- Using USB 3 we can obtainfaster inferencethan the Movidius NCS.
- The Google Coral USB Accelerator is alsoveryeasy to use – you can read more about it here:
-
Where to Next?
- Congrats on using the Raspberry Pi to apply Computer Vision algorithms!
- If you would like to take the next step, I would suggest reading my new book,Raspberry Pi for Computer Vision.
- That book will teach you how to use the RPi, Google Coral, Intel Movidius NCS, and NVIDIA Jetson Nano for embedded Computer Vision and Deep learning applications.
- And just like all my tutorials, each chapter of the text includes well documented code and detailed walkthroughs, ensuring that you understandexactlywhat’s going on.
- To learn more about the book, just click here.


Medical Computer Vision
Computer Vision and Deep Learning algorithms have touched nearly every facet of Computer Science.
One area that CV and DL algorithms are making amassiveimpact on is the field of Medical Computer Vision.
Using Medical Computer Vision algorithms, we can now automatically analyze cell cultures, detect tumors, and evenpredict cancerbefore it even metastasizes!
-
Step # 1: Configure Your Development Environment (Beginner)
- Step # 2 and # 3 of this section will require that you haveOpenCVconfigured and installed on your machine.
- Make sure you follow Step # 1 from theHow Do I Get Started?section to install OpenCV.
- Step # 4 covers how to use Deep Learning for Medical Computer Vision.
- You will need to haveTensorFlowandKerasinstalled on your system for those guides.
- You should follow Step # 1 from theDeep Learningsection to ensure TensorFlow and Keras are properly configured.
- Step # 2 and # 3 of this section will require that you haveOpenCVconfigured and installed on your machine.
-
Step # 2: Your First Medical Computer Vision Project (Beginner)

- Our first Medical Computer Vision project uses only basic Computer Vision algorithms, thus demonstrating how even basic techniques can make aprofoundimpact on the medical community:
- Fun fact:I wrote the above tutorial in collaboration with PyImageSearch reader, Joao Paulo Folador, a PhD student from Brazil.
- We then published a paper detailing the method in CLAIB
- It’s just further proof that PyImageSearch tutorials can lead to publishable results!
-
Step # 3: Create Medical Computer Vision Mini-Projects (Intermediate)
- Now that you have some experience, let’s move on to a slightly more advanced Medical Computer Vision project.
- Here you will learn how to use Deep Learning to analyze root health of plants:
-
Step # 4: Solve Real-World Medical Computer Vision Projects (Advanced)

- Our previous sections dealt with applying Deep Learning to a small medical image dataset.
- But what aboutlargermedical datasets?
- Can we apply DL to those datasets as well?
- You bet we can!
- The following two guides will show you how to use Deep Learning toautomatically classify malaria in blood cellsandperform automatic breast cancer detection:
- Take your time working through those guides and make special note of how we compute thesensitivityandspecificity, of the model –two key metricswhen working with medical imaging tasks thatdirectlyimpact patients.
-
Where to Next?

- As I mention in myAbout page, Medical Computer Vision is a topic near and dear to my heart.
- Previously, my company has consulted with theNational Cancer InstituteandNational Institute of Healthto develop image processing and machine learning algorithms to automatically analyze breast histology images for cancer risk factors.
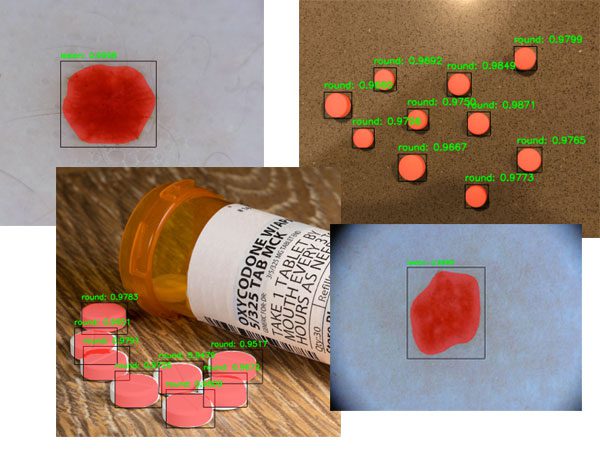
- I’ve also developed methods toautomaticallyrecognize prescription pills in images, thereby reducing the number of injuries and deaths that happen each year due to the incorrect medication being taken.
- I continue to write about Medical Computer Vision, so if you’re interested in the topic, be sure to keep an eye on the PyImageSearch blog.
- Otherwise, you should take a look at my book,Deep Learning for Computer Vision with Python, which covers chapters on:
- Automaticcancer / skin lesion segmentationusing Mask R-CNNs
- Prescription pill detection /(localization) using Mask R-CNNs
- To learn more about my deep learning book, just click here.


Working with Video
Most tutorials I have on the PyImageSearch blog involve working withimages–but what if you wanted to work withvideosinstead?
If that’s you, make sure you pay attention to this section.
-
Step # 1: Install OpenCV on Your System (Beginner)
- Prior to working with video (both on file and live video streams), you first need to install OpenCV on your system.
- You should follow Step # 1 of theHow Do I Get Started?section to configure and install OpenCV on your machine.
-
Step # 2: Accessing your Webcam (Beginner)

- Now that you have OpenCV installed, let’s learn how to access your webcam.
- If you are using either aUSB webcamorbuilt-in webcam(such as the camera on your laptop), you can use OpenCV’scv2VideoCaptureclass.
- Theproblemwith this method is that it will block your main execution thread until the next frame is read from the camera sensor.
- That can be abig problemas it candramaticallydecrease the Frames Per Second (FPS) throughput of your system.
- To resolve the issue, I have implemented aThreadedVideoStreamclass that more efficiently reads frames from a camera:
- I would also suggest reading the following tutorial which provides a direct comparison of thecv2. VideoCaptureclass to myVideoStream
- If you are using aRaspberry Pi camera modulethen you should follow this getting started guide to access the RPi camera:
- Once you’ve confirmed you can access the RPi camera module you can use theVideoStreamclass which is compatible withbothbuilt-in / USB webcamsandthe RPi camera module:
- Inevitably, there will be a time where OpenCV cannot access your camera and your script errors out, resulting in a “NoneType” error – this tutorial will help you diagnose and resolve such errors:
-
Step # 3: Face Detection in Video (Beginner)

- I’m strong believer in learning by doing through practical, hands-on applications – and it’s hard to get more practical than face detection
- This tutorial will teach you how to apply face detection to video streams:
-
Step # 4: Face Applications in Video (Intermediate)

- Building on face detection, let’s learn how to apply face applications to video streams as well:
-
Step # 5: Object Detection in Video (Intermediate)
- Face detection is a special class ofobject detection.
- Object detectors can be trained to recognize just about any type of object.
- The OpenCV library enables us to usepre -trained object detectorsto detect common objects we encounter in our daily lives (people, cars, trucks, dogs, cats, etc.).
- The following tutorials will teach you how toapply object detection to video streams:
-
Step # 6: Create OpenCV and Video Mini-Projects (Beginner / Intermediate)

- At this point you have a fair amount of experience applying Computer Vision and OpenCV to videos – let’s continue practicing using these tutorials:
- Take you time working through them and take notes as you do so.
- You should pay close attention to the tutorials that interest you and excite you the most.
- Take note of them and then revisit your ideas after you finish these tutorials.
- Ask yourself how could extend them to work with your own projects?
- What if you tried a different video source?
- Or how might you integrate one of these video applications into a home security system?
- Brainstorm these ideas and then try to implement them yourself –the best way to learn is tolearn by doing!
-
Step # 7: Image / Video Streaming with OpenCV (Intermediate)
- So far we’ve looked at how to process video streams with OpenCV,provided that we have physical access to the camera.
- But what if wanted to to access a network or an IP camera – how might we do that?
- Accessing RTSP streams with OpenCV is a big pain and not something I recommend doing.
- Instead, you should use ImageZMQ to stream frames directly from a camera to a server for processing:
-
Step # 8: Video Classification with Deep Learning (Advanced)
- For this step I’ll be making the assumption that you’ve worked through the first half of theDeep Learningsection.
- Provided that you have, you may have noticed that applyingimage classificationtovideo streamsresults in a sort ofprediction flickering.
- A “prediction flicker” occurs when an image classification model reportsLabel Afor (Frame N) , but then reportsLabel B(ie, a different class label) forFrame N 1(ie, the next frame in the video stream),despite the frames having near-identical contents!
- Prediction flickering is a natural phenomena in video classification.
- It happens due to noise in the input frames confusing the classification model.
- One simple method to rectify prediction flickering is to applyPrediction averaging:
- Using prediction averaging you can overcome the prediction flickering problem.
- Additionally, you may want to look into more advanced Deep Learning-based image / video classifiers, including Recurrent Neural Networks (RNNs) and Long Short-Term Memory Networks (LSTMs).
-
Where to Next?
- If you’re brand new to the world of Computer Vision and Image Processing, I would recommend you readPractical Python and OpenCV.
- That book will teach you the basics of Computer Vision through the OpenCV library – and best of all,you can complete that book in only asingle weekend.
- It’sby farthe fastest way to get up and running with OpenCV.
- And furthermore, the book includes complete code templates and examples for working with video files and live video streams with OpenCV.
- For a more detailed review of the Computer Vision field, I would recommend thePyImageSearch Gurus course.
- The PyImageSearch Gurus course is a comprehensive dive into the world of Computer Vision.
- You can think of the Gurus course as similar to a college survey course on CV (butmuchmore hands-on and practical).
- Finally, you’ll note that we utilized a number ofpre-trained Deep Learning image classifiers and object detectorsin this section.
- If you’re interested int raining your own custom Deep Learning modelsyou should look no further thanDeep Learning for Computer Vision with Python.
- You’ll learn how to create your own datasets, train models on top of your data, and then deploy the trained models to solve real-world projects.
- It’sby farthe most comprehensive, detailed, and complete Computer Vision and Deep Learning education you can find online today.
- Click here to learn more.
- If you’re brand new to the world of Computer Vision and Image Processing, I would recommend you readPractical Python and OpenCV.
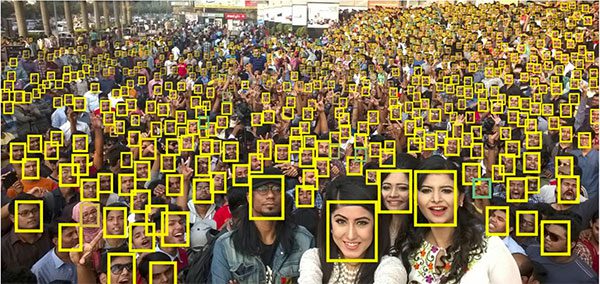
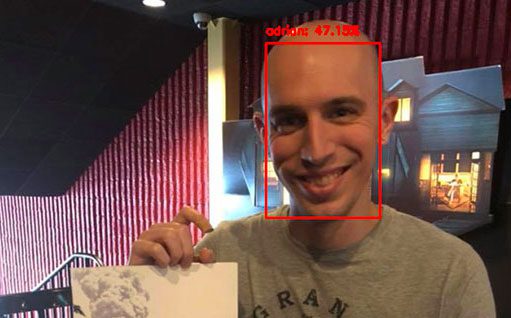
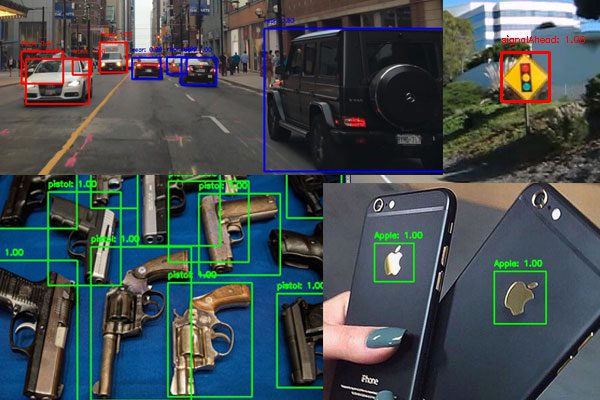
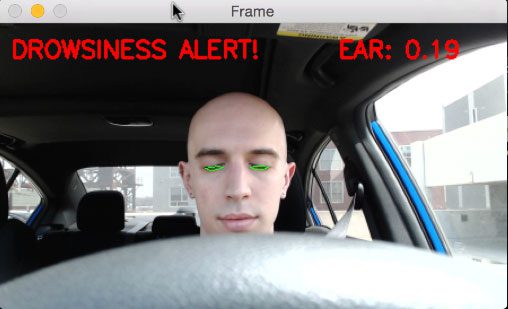
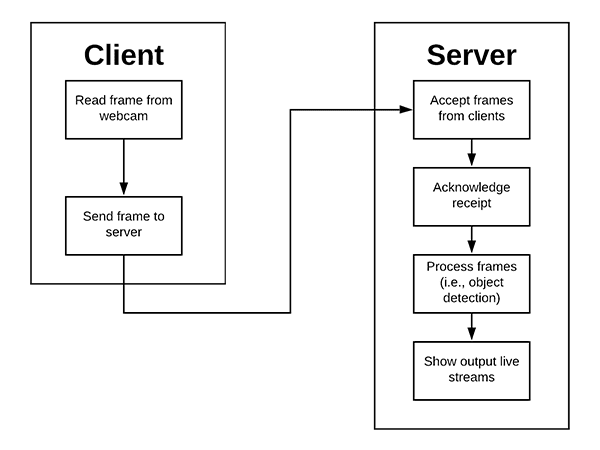
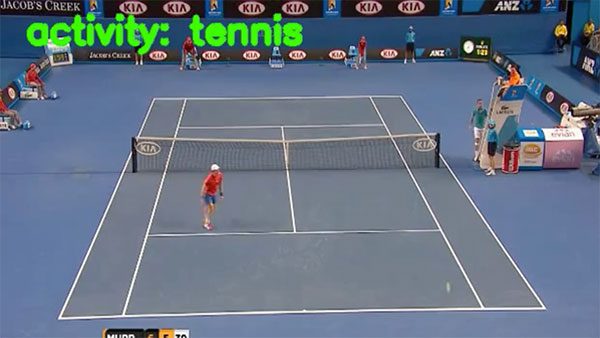
Image Search Engines
Content-based Image Retrieval (CBIR)is encompasses all algorithms, techniques, and methods to build animage search engine.
An image search engine functions similar to a text search engine (ex., Google, Bing, etc.).
A user visits the search engine website, but instead of having a text query (ex.,“How do I learn OpenCV? ”)they instead have animageas a query.
The goal of the image search engine is to accept the query image and find allvisually similarimages in a given dataset.
CBIR is the primary reason I started studying Computer Vision in the first place. I found the topic fascinating and am eager to share my knowledge with you.
-
Step # 1: Install OpenCV on your System (Beginner)
- Before you can perform CBIR or build your first image search engine, you first need to install OpenCV your system.
- Follow Step # 1 of theHow Do I Get Started?section above to configure OpenCV and install it on your machine.
-
Step # 2: Build Your First Image Search Engine (Beginner)

- The first image search engine you’ll build is also one of thefirsttutorials I wrote here on the PyImageSearch blog.
- Using this tutorial you’ll learn how to search forvisually similarimages in a dataset usingcolor histograms :
- (A How-To Guide to Building Your First Image Search Engine in Python
-
Step # 3: Understand Image Quantification (Beginner)

- In Step # 2 we built an image search engine that characterized the contents of an image based oncolor– but what if we wanted to quantify the image based ontexture,shape, orsome combination of all Three?
- How might we go about doing that?
- In order to describe the contents of an image, we first need to understand the concept ofimage quantification:
- How To Describe and Quantify an Image Using Feature Vectors
- Image quantification is the process of:
- Accepting an input image
- Applying an algorithm to characterize the contents of the image based on shape, color, texture, etc.
- Returning a list of values representing the quantification of the image (we call this ourfeature vector).
- The algorithm that performs the quantification is ourimage descriptororfeature descriptor.
-
Step # 4: The 4 Steps of Any Image Search Engine (Beginner)

- There are four key steps to buildinganyimage search engine:
- As your CBIR system becomes more advanced you’ll start to include sub-steps between the main steps, but for now, understand that those four steps will be present in any image search engine you build.
-
Step # 5: Build Image Search Engine Mini-Projects (Beginner)

- Now that you understand the fundamentals of CBIR, let’s apply it to a mini-project:
- The complete guide to building an image search engine with Python and OpenCV
- In the above tutorial you’ll learn how to combinecolorwithlocality, leading to a more accurate image search engine.
-
Step # 6: Image Hashing (Intermediate)
- So far we’ve learned how to build an image search engine to findvisually similarimages in a dataset.
- But what if we wanted to findduplicateornear-duplicateimages in a dataset?
- Such an application is a subset of the CBIR field calledimage hashing:
- Image hashing algorithms compute asingle integerto quantify the contents of an image.
- The goal of applying image hashing is to find all duplicate / near-duplicate images.
- Practical use cases of image hashing include:
- De-duping a set of images you obtained by crawling the web.
- You may be using myGoogle Images scraperor myBing API crawlerto build a dataset of images to train your own custom Convolutional Neural Network.
- In that case, you want want to find all duplicate / near-duplicate images in your dataset (as these duplicates provide no additional value to the dataset itself).
- BuildingTinEye, a reverse image search engine.
- Reverse image search engines:
- Accept an input image
- Compute its hash
- And tell youeverywhere on the webthat the input image appears on
- Reverse image search engines:
- De-duping a set of images you obtained by crawling the web.
-
Step # 7: Scaling Image Hashing Search Engines (Intermediate)

- At this point you know how image hashing algorithms work – but how can wescalethem like TinEye has?
- The answer is to utilize specialized data structures, such asVP-Trees.
- This tutorial will show you how to efficiently use VP-Trees to scale your image hashing search engine:
-
Where to Next?
- The techniques covered here will help you build your own basic image search engines.
- The problem with these algorithms isthey do not scale.
- If you want to build more advanced image search engines thatscale to millions of imagesyou’ll want to look into:
- The Bag-of- Visual-Words model (BOVW)
- k-Means clustering and forming a “codebook”
- Vector quantization
- Tf-idf weighting
- Building an inverted index
- ThePyImageSearch Gurus courseincludes over 40 lessons on building image search engines,including how to scale your CBIR system to millions of images.
- If you’re interested in learning more about the course, and extending your own CBIR knowledge, just use the link below:
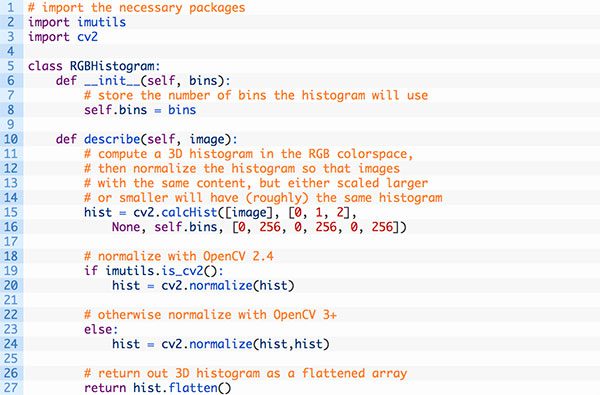

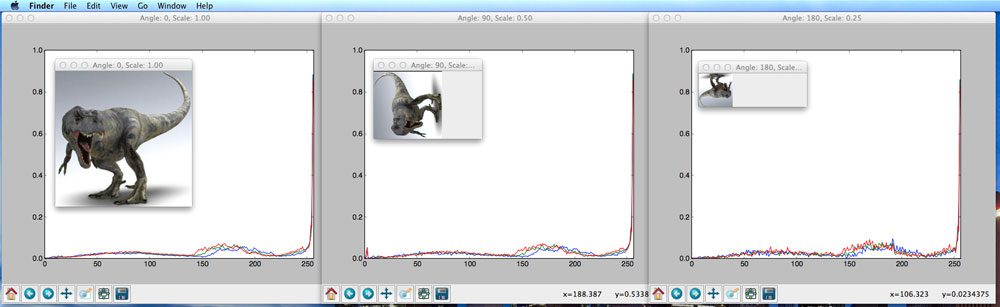
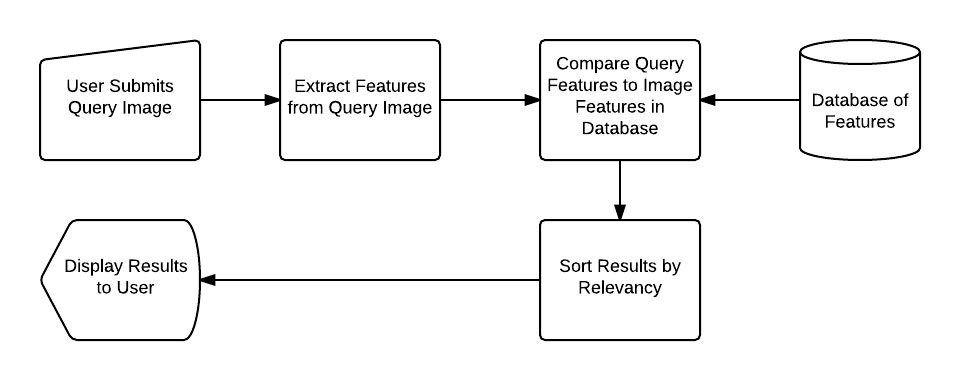
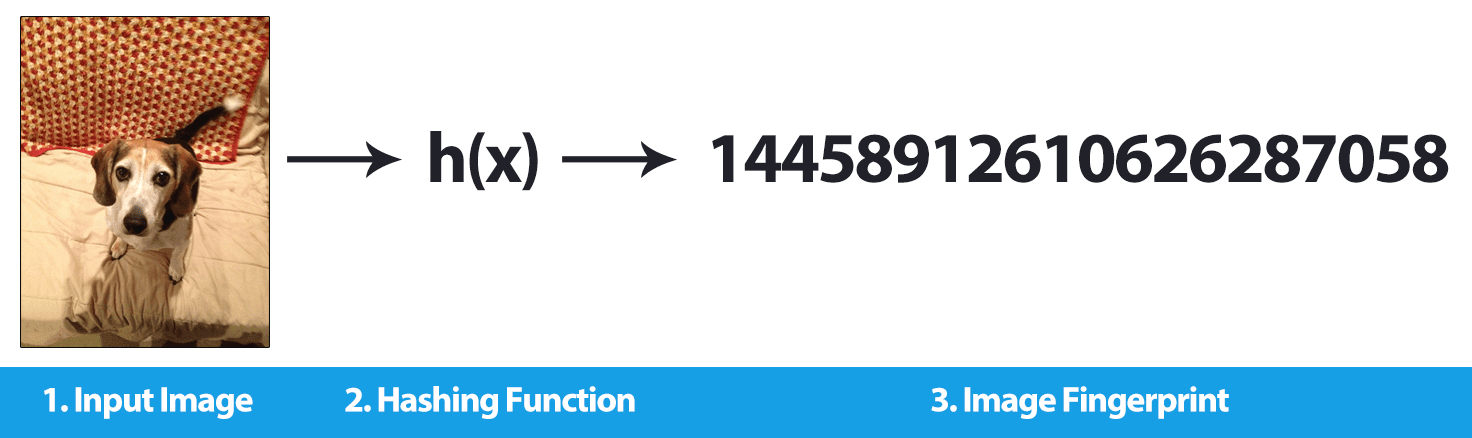
Interviews, Case Studies, and Success Stories
You can learn Computer Vision, Deep Learning, and OpenCV– I amabsolutely confidentin that.
And if you’ve been following this guide, you’ve seen for yourself how far you’ve progressed.
However, we cannot spendallof our time neck deep in code and implementation – we need to come up for air, rest, and recharge our batteries.
When then happens I suggest supplementing your technical education with a bit of light reading used to open your mind to what the world of Computer Vision and Deep Learning offers you.
After 5 years running the PyImageSearch blog I’ve seen countless readers dramatically change their lives, includingchanging their careersto CV / DL / AI, beingawarded funding,winning Kaggle competitions, andeven becoming CTOs of funded companies!
It’s truly a privilege and an honor to be taking this journey with you – thank you for letting me accompany you on it.
Below you’ll find some of my favorite interviews, case studies, and success stories.
-
Step # 1: A Day in the Life of Adrian Rosebrock (Beginner)
- Ever wonder what it’s like to work as a Computer Vision / Deep Learning researcher and developer?
- You’re not alone.
- Over the past 5 years running PyImageSearch, I have received 100 s of emails and inquiries that are “outside” traditional CV, DL, and OpenCV questions.
- They instead focus on somethingmuch more personal –my daily life.
- To give you an idea of what it’s like to be me,I’m giving you a behind the scenes look at:
- How I spend my day .
- What it’s like balancing my role as a (1) computer vision researcher / developer and (2) a writer and owner of PyImageSearch.
- The habits and practices I’ve spent years perfecting to help me get shit done.
- You can read the full post here:
-
Step # 2: Intro to Computer Vision (Beginner)

- Back in 2015 I was interviewed on Scott Hanselman’s legendary podcast,Hanselminutes:
- (I was featured on the Hanselminutes podcast: Computer vision and the impact it has on our daily lives.)
- Inside the podcast Scott and I discuss the types of problems Computer Vision can solve, from medical issues to gaming, retail to surveillance.
- This podcast is anexcellent listenif you’reBrand newto the world of Computer Vision (or if you want something entertaining to listen to).
-
Step # 3: Computer Vision – Where are We Going Next? (Beginner)

- A more recent podcast (April 2019) comes from an interview on theSuper Data Science Podcast, hosted by Kirill Eremenko:
- In the podcast we discuss Computer Vision, Deep Learning, and what the future holds for the fields.
- I highly recommend listening to this podcast, regardless if you are brand new to Computer Vision or already a seasoned expert – it’s both entertaining and educational at the same time.
-
Step # 4: From Developer to CTO (Beginner)

- Saideep Talari’s story holds a special place in my heart.
- He started his career as a network tester, found his first job in Computer Vision after completing thePyImageSearch Gurus course, and then after completingDeep Learning for Computer Vision with Pythonis now the CTO of a tech company with over $ 2M in funding.
- He’s also an incredibly nice person – he used his earnings to clear his families debts and start fresh.
- Saideep is one my favorite people I’ve ever had the privledge of knowing –there’s a lot you can learn from this interview:
-
Step # 5: $ 30, 500 in Grant Funding (Beginner)

- Tuomo Hiippala was awarded a $ 30, 500 research grant for his work in Computer Vision, Optical Character Recognition, and Document Understanding.
- Find out how he landed the grant in the interview with him:
-
Step # 6: Winning Kaggle’s Most Competitive Image Classification Challenge Ever(Beginner)
- David Austin and his teammate, Weimin Wang, took home1st place (and $ 25, 000)in Kaggle’s Iceberg Classifier Challenge (Kaggle’s most competitive challengeever) ).
- David and Weimin used techniques from both thePyImageSearch Gurus courseandDeep Learning for Computer Vision with Pythonto come up with their winning solution – read the full interview, including how they did it, here:
-
Step # 7: Landing a Research and Development (R&D) Position (Beginner)
- Kapil Varshney was recently hired at Esri R&D as a Data Scientist focusing on Computer Vision and Deep Learning.
- Kapil’s story is really important as it shows that, no matter what your background is, youcanbe successful in computer vision and deep learning –you just need the right education first!
- You see, Kapil is a long-time PyImageSearch reader who readDeep Learning for Computer Vision with Python(DL4CV) last year.
- Soon after reading DL4CV, Kapil competed in a challenge sponsored by Esri todetect and localize objects in satellite images(including cars, swimming pools, etc.).
- He finished in 3rd-place out of 53 Competitors.
- Esri wasso impressedwith Kapil’s work that after the contest they called him in for an interview.
- Kapil nailed the interview and was hired full -time at Esri R&D.
- His work on satellite image analysis at Esri now impacts (millions of peopleacross the world daily – and it’s truly a testament to his hard work.
- You can read the full interview with Kapil here:
-
Where to Next?
-

- I can’t promise you that you’ll win a Kaggle competition like David or become the CTO of a Computer Vision company like Saideep did, but Icanguarantee you that the books and courses I offer here on PyImageSearch are thebest resourcesavailable today to help you master computer vision and deep learning.
- If you’d like to follow in their steps, you can see what books and courses I offer here:
- If you need help choosing a book / course, I suggest starting here:
- And if you have any questions on my books / courses, feel free to reach out to me:
-
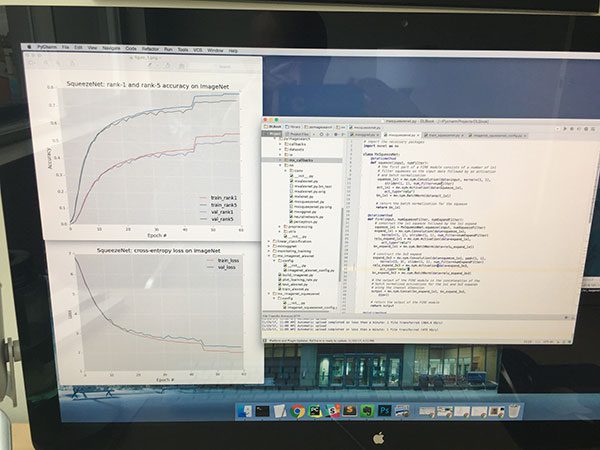


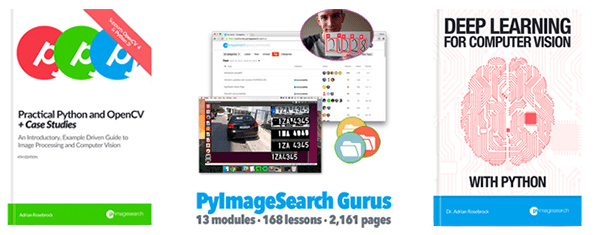
Need More Help?
I’m dedicated to helping you learn Computer Vision, Deep Learning, and OpenCV.
If you need more help from me, here are a few options:
-
Books and Courses
- Practical Python and OpenCV
- My gentle introduction to the world of computer vision and image processing through OpenCV.
- If you’re brand new to the world of computer vision and image processing, start with this book so you can learn the fundamentals first .
- Deep Learning for Computer Vision with Python
- In-depth dive into the world of computer vision and deep learning.
- Whether this is the first time you’ve worked with machine learning and neural networks or you’re already a seasoned deep learning practitioner, DL4CV is engineered from the ground up to help you reach expert status.
- PyImageSearch Gurus
- Similar to a college survey course in computer vision but much more hands-on, and practical.
- Covers 13 modules broken out into 168 lessons, with other 2, 161 pages of content.
- Includes private community forums which I participate indaily .
- Great way to get faster , more detailed answers to your questions.
- Raspberry Pi for Computer Vision
- Apply Computer Vision and Deep Learning algorithms to embedded devices, including the Raspberry Pi, Google Coral, and NVIDIA Jetson Nano.
- I recommend reading this book together withPractical Python and OpenCVand / orDeep Learning for Computer Vision with Python.
- RPI for CV uses both Computer Vision and Deep Learning algorithms so some previous experience issuggestedbut notrequired.
- Practical Python and OpenCV
-
Blog
- I’ve authored over 350 free tutorials on thePyImageSearch.com blog.
- It’s likely that I have already authored a tutorial to help you with your question or project.
- Make sure you use the “Search” bar to search for keywords related to your topic.
- The search bar can be found on top-right of the sidebar on every page
-
FAQ
- I’ve compiled answers to to the most common questions I receiveon my official FAQ page.
- Please check the FAQ as it’s possible that your question has been addressed there.
-
Contact
- Feel free to ask me a question,but kindly keep it to one question per email.
- My contact form


GIPHY App Key not set. Please check settings