

What Is Svelte?
Svelte is an alternative to web frameworks like React, Vue, and Angular. Like its counterparts, Svelte can be used to build entire web apps. It can also be used to create custom elements that can be used in existing web apps implemented with other frameworks.
Svelte was developed by Rich Harris, who formerly worked atThe Guardianand is currently atThe New York Times. Harris previously created theRactive web framework, Which is used atThe Guardianand inspired parts of Vue. Harris also created theRollup module bundler, which is an alternative to Webpack and Parcel.
Svelte has not yet received the attention it deserves. When it is mentioned, the focus is typically on its ability to produce bundled code that is significantly smaller than the alternatives. However, Svelte makes many tasks easier, including defining components, managing component state, managing application state, and adding animation.
This article provides a thorough introduction to Svelte and walks you through the fundamentals necessary to start building web applications with it.
Why Consider Svelte?
Svelte apps have smaller bundle sizes than equivalent apps created with other web frameworks. This is achieved by compiling the application code to a single, optimized JavaScript file that includes a very small amount of framework code.
Svelte is a web application compiler implemented in TypeScript. It is not a runtime library.
For example, the Todo app presented later has a bundle size that is 13% of the size of an equivalent React app. These apps can be foundhereandhere.
This websitecatalogs statistics on building real-world web applications using many web frameworks. The reported gzipped app sizes in KBs for some popular choices include:
- Angular ngrx: 134
- React Redux: 193
- Vue: 41 .8
- Svelte: 9.7
Some web frameworks, including React and Vue, use a virtual DOM to optimize rendering changes. When components re-render, the framework builds a new version of the DOM in memory and then compares it to the previous version. Only the differences are applied to the actual DOM.
While this is faster than updating everything in the actual DOM, it does take time to build a virtual DOM and compare it to the previous one.
Svelte provides reactivity without using a virtual DOM. It does this by tracking changes to top-level component variables that affect what each component renders and only re-rendering those parts of the DOM when changes are detected. This contributes to good performance.
Svelte dramatically simplifies component and application state management. Contributing features include context, stores, and module context, each of which is covered in detail later.
Svelte provides runtime warnings for accessibility issues. For example,altattribute are flagged.
Svelte does not currently support using TypeScript, butwork to add this is underway.
Svelte Native supports developing mobile apps. It builds on NativeScript.
Does Svelte Disappear?
Some say that Svelte disappears once an app is built.
The Svelte library is mostly defined by. jsfiles in thenode_modules / sveltedirectory. The main functions are defined ininternal.js, which is currently around 1, 400 lines of code.
Other library files are used for specific features. These include:
easing.jsmotion.jsregister.jsstore.jstransition.js
Enteringnpm run buildproduces files in thepublicdirectory, includingbundle.js. Svelte library functions that are used by the app are copied to the top ofbundle.js. In the case of the Todo app shown later, this is approximately 500 lines of code.
So Svelte library code doesn’t disappear; it is just very small compared to other web frameworks.
Important Resources
Here is a list of important resources to check out when learning Svelte:
- Rethinking Reactivity
This is a talk by Rich Harris atYou Gotta Love Frontend (YGLF) Code Camp 2019. It describes the motivations behind Svelte 3 and provides a brief introduction. - Svelte home page –https://svelte.dev
- Svelte tutorial –https://svelte.dev/tutorial
- Svelte API –https://svelte.dev/docs
- Svelte examples –https://svelte.dev/examples
- Online Svelte REPL –https://svelte.dev/repl
This is great for trying small amounts of Svelte code. It can also display generated code and save code for sharing and submitting issues. - Svelte blog –https://svelte.dev/blog
- Discord chat room –https://discordapp.com/invite/yy 75 DKs
- Svelte GitHub repository –https://github.com/sveltejs/svelte
(Getting Started)
Let’s walk through the steps to create and run a Svelte application.
1. Install Node.js fromhttps://nodejs.org.
- This installs the
node,npm, and (NPX) Commands.
2.npx degit sveltejs / templateapp-name
- Rich Harris created the
degittool to simplify project scaffolding. It downloads a git repo, by default the master branch. In this case “sveltejs” is the user name and “template” is the repo. The second argument is the name of the directory to create.
3.cdapp-name
4.npm install
5.npm run dev
- This starts a local HTTP server and provides live reload, unlike
npm run start, which omits live reload. Syntax errors are reported in the window where this is running, not in the browser. This happens because Svelte doesn’t produce a new version of the app if there are errors.
6. Browse localhost: 5000
- This just outputs “Hello world!” in purple.
Now you are ready to start modifying the app.
A peek at thepackage.jsonfile reveals two things. The first is that Svelte uses Rollup by default for module bundling. If desired, it can be changed to use Webpack or Parcel. The second is that Svelte apps have no required runtime dependencies, only devDependencies.
The most important starting files are:
public / index.htmlsrc / main.jssrc / App.svelte
These files use tabs for indentation, but the tabs can be replaced by spaces if preferred.
1. The filepublic / index.htmlcontains the following:
head>
charset="utf8"/>
metaname=" viewport "content="width=device-width"/>
title>(Svelte app) /title>
linkrel="icon"type="image / png"(href)="favicon.png"/>
rel="stylesheet"HREF="global.css"/>
link(rel)="stylesheet"(href)="bundle.css"/>
/(head)>
body>
script(src)="bundle.js">/ (script)>
/body>
/html>
Note how this pulls in two CSS files and one JavaScript file.
global.cssholds CSS that can affect any component.bundle.cssis generated from the CSS in each component.bundle.jsis generated from the JavaScript and HTML in each component and any other JavaScript in the app.
2. The filesrc / main.jscontains the following:
importApp from'./ App.svelte';constapp=(new) ***************************************************** (App) ({ target:document. (body), Props:{ name:'world' }});exportdefault (app) ;
This renders theAppcomponent. Thetargetproperty specifies where the component should be rendered. For most apps this is the body of the document.
Thenameprop is passed to the (App) component.
Typically the topmost component does not need props and thepropsproperty here can be deleted.
3. The filesrc / App.sveltecontains the following:
script> export let name;/script>Style> h1 { color: purple; }/style>Hello {name}!/(H1)>
Exported variables can be set as props in files that use the component.
Curly braces are used to output the value of a JavaScript expression. This is referred to asinterpolation. As we will see later, curly braces are also used for dynamic attribute values.
Defining Components
Popular web frameworks use different kinds of JavaScript containers to define components.
- Angular uses classes.
- React uses functions or classes.
- Vue uses object literals.
Svelte doesn’t use any kind of JavaScript container.
A Svelte component is defined by a. sveltefile that contains JavaScript code, CSS, and HTML. These are combined to form the component definition, which automatically becomes the default export.
The.sveltefiles can be anywhere under theSRCdirectory. They contain the following three sections, all of which are optional.
script> // Scoped JavaScript goes here./script>Style> / * Scoped CSS rules go here. * //style>
Note the different comment syntax that can be used in each section.
Component Names
Svelte component definitions do not specify a component name. The component name is not provided inside a source file by a class name, function name, or property value like in other frameworks; it is associated when a. sveltefile is imported, and it must start with an uppercase letter.
Lowercase names are reserved for predefined elements like those provided by HTML and SVG.
For example:
// Somewhat confusingimportAnyNameIWant from'./ some-name.svelte';// Less confusingimportSameName from'./ SameName.svelte';
Sharing Data
There are four ways to share data between Svelte components.
- 1. Props
- These pass data from parent components to child components.
- 2. Contexts
- These allow ancestor components to make data available to descendant components.
- 3. Stores
- These store data outside any component and make it available to all of them.
- 4. Module Scope
- These store data in component modules and make it available to all instances of the component.
These built-in approaches are so useful that there is really no need for state management libraries.
Props
Components can accept input through props. They are specified as attributes on component elements rendered by parent components.
For example, a parent component can do this:
script> import Hello from './Hello.svelte';/script>name ="Mark"/>
In this case, the value of the (name) prop is a literal string.
Prop values that are JavaScript expressions or non-string literals must be surrounded by curly braces instead of quotes.
The child component defined insrc / Hello.sveltecan do this:
script> export let name='World';/script>div> Hello, {name}!/div>
Props are declared in the let score=0; const inputAttrs={ type: 'number', max: 10, min: 0, value: score };
The example above usesbindto simulate a two-way data binding. This is explained more later.
Styling
Styles in
tags of.Sveltefiles are automatically scoped to the component.
Svelte achieves the scoping by adding the same generated CSS class name,svelte -hash, to each rendered element of the component that is potentially affected by these CSS rules.
Global styles should be defined inpublic / global.css
As in standard CSS, comments within the style tag must use/ ** /comment delimiters.
The “svelte3” ESLint plugin warns about unused CSS selectors.
A CSS class can be conditionally added to an element. In the following example, the CSS classerroris added only ifstatusis greater than zero .
0}>{result}
Importing Components
Components can import others inside their let count=0; const increment=()=>count ;
A new value must be assigned to trigger this. Pushing new elements onto an array doesn’t do this.
The following approaches do work:
myArr=myArr.concat(newValue);// Alternative trickmyArr.Push(newValue);myArr=myArr;
Reactive Declarations
Beginning a JavaScript statement with a name followed by a colon creates alabeled statement. Labeled statements can be used as targets ofbreakandcontinuestatements.
Interestingly, it is not an error in JavaScript to use the same label name for more than one statement in the same scope.
When used on a top-level statement (not nested inside a function or block) and the name is a dollar sign, Svelte treats the top-level statement as areactive declaration.
This is another example of the Svelte compiler treating valid JavaScript syntax in a special way. Such statements are repeated when the value of any variable referenced by the statement changes. This is somewhat like (computed properties) ********************************************** (in Vue.
For example:
// The value of average is computed initially and// recomputed if the value of total or count changes.$:average=total/count;// The value of count is output in the devtools console// when this statement is executed and again every time it changes.// This is great for debugging!$:Console. (log)('count=', (count) );
When$:is applied to an assignment to an undeclared variable (as in the assignment toaverageabove), the (let) keyword is not allowed.
($:can be applied to a block.
For example:
$:{ // statements to be repeated go here}
This can also be applied to multiline statements, such asifstatements.
For example:
$:(if)(someCondition){ // body statements}
The example above executes if any variables referenced in condition or body change, but of course the body only executes when condition is true.
For example, if a condition includes calls to functions, they will be called if any references in the body have changed.
Logic In Markup
There are three common approaches to adding conditional and iteration logic in markup.
- React uses JSX, where logic is implemented by JavaScript code in curly braces.
- Angular and Vue support framework-specific attributes for logic. For example, Angular supports
ngIfandngFor, and Vue supportsv-ifand (v-for) . - Svelte supports Mustache-like custom syntax that wraps elements. Examples include
{# if}and{# each}.
(if) Statement
Svelte conditional logic begins with{# ifcondition}. Starting with#indicates a block opening tag.
Mark the end with{/ if}. Starting with/indicates a block ending tag.
The markup to be conditionally rendered goes between these.
Other block tags that can be included between these are{: else ifcondition}and{: else}. Starting with:indicates a block continuation tag.
For example:
{# if color==='yellow'} Nice color!{: else if color==='orange'} That's okay too.{: else} Questionable choice.{/ if}
While this syntax may seem odd at first, it does have the benefit of being able to conditionally render multiple elements. The Angular / Vue approach of adding special attributes to elements requires specifying a common parent element.
(each) Statement
Svelte iteration begins with{# eachiterableaselement}.
Mark the end with{/ each}.
The markup to be rendered for each element goes between these.
Often the iterable is an array, but any iterable value can be used.
Content after{: else}is rendered when the iterable is empty.
For example, suppose the variablecolorsis set to['red', 'green', 'blue']:
{#each colors as color} {color}{/ each}{#each colors as color, index} {index 1}) {color}{/ each}{#each people as {name, age}} {name} is {age} years old.{: else} There are no people.{/ each}
If items in a list will be added, removed, or modified, a unique identifier should be supplied for each element. This is similar to the need for thekeyprop in React and Vue.
In Svelte the unique identifier is supplied as part of the# eachsyntax, not as an element prop. In the following example, the unique identifier for eachpersonis the corresponding (id) ******************************** (property.)
{# each people as person (person.id)} {person.name} is {person.age} years old.{/ each}
Promises
Svelte provides markup syntax to wait for promises to resolve or reject. It can render different output based on whether the promise is still pending, has resolved, or has rejected.
The following examples assume the component has agetDatafunction that returns aPromise. Any variable name can be used after: thenand: catchto receive the resolved or rejected value.
{# await getData ()} Waiting for data ...{: then result} result={result}{: catch error} Error: {error.message}{/ await}
The next example omits the markup to render while waiting for thePromiseto resolve. The: catchportion can also be omitted.
{# await getData () then result} result={result}{: catch error} Error: {error.message}{/ await}
Slots
Slots allow child content to be passed to a component. The receiving component can decide whether and where to render it.
Note that whitespace counts as child content.
The receiving component can mark the spot where all child content is rendered with
It can also provide default content to render for parent elements that do not provide content for the slot. For example,
Named slots allow parent elements to provide multiple sets of content, for which the receiving component can decide whether and where to render. The parent element identifies these with aslotattribute. The child element defines where they will be rendered withslotelements that have a matchingnameattribute .
Here is an example of HTML from a parent element that targets multiple named slots in the child elementShippingLabel:
divslot="address"> 123 Some Street,/> Somewhere, Some State 12345 /div> divslot="name">Mark Volkmann [type="checkbox"] /div>/ShippingLabel>
Here isShippingLabel.svelte:
Style> label { display: block; font-weight: bold; }/style>div> label>Ship To:/label>name ="name">unknown/slot>name ="address"/>/div>
Binding Form Elements
Form elements like,, andcan be bound to a variable. This simulates two-way data binding.
In addition to providing the current value, two-way data binding provides event handling for updating the variable when the user changes the form element value.
Forelements with the typenumberor (range) , two-way data binding automatically coerces values from strings to numbers.
For example, consider the following HTML form:
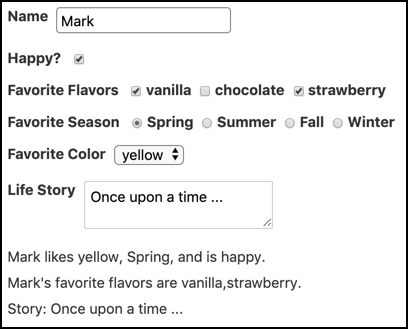
Here is an implementation that uses a single Svelte component. Note the use ofbind:in several places.
(Happy?{#each flavors as flavor} {/ each}(Favorite Season) {#each seasons as season} {/ each}(Favorite Color)(Life Story){#if name}{name} likes {favoriteColor}, {favoriteSeason}, and is {happy? 'happy': 'unhappy'}.{name} 's favorite flavors are {favoriteFlavors}.Story: {story}{/ if}
In addition to binding to primitive variables, form elements can bind to object properties. User input then causes those objects to be mutated.
Binding Custom Props
Svelte can bind a child component prop to a variable in the parent component. This allows child components to change values of parent component variables.
For example, here is a parent component:
pValue={pValue}
And here is the child component:
cValue={cValue}(Double)
When the button in theChildcomponent is pressed,cValueis doubled, and that becomes the new value ofpValuebecause it is bound tocValue.
Event Handling
Event handling is specified with theon:event-nameattribute whose value is a function to invoke when the event is dispatched . The event name can be the name of a standard DOM event or a custom event. An event object is passed to the given function.
For example:
Action functions can optionally return an object withupdateanddestroyproperties that are functions. This feature is not frequently used.
Theupdatefunction is called every time an argument value changes. Of course this doesn’t apply if there are no arguments.
Thedestroyfunction is called when the element is removed from DOM.
Context
Contextprovides an alternative to using props and stores (covered next) for making data in a component available in others. Context data can only be accessed in descendant components.
To define a context in a component, import thesetContextfunction and call it , supplying a context key and the value.
For example:
import{setContext}from'svelte';// Must be called during component instantiation.setContext('favorites',{color (***************************************************:'yellow', (number) :19});
To use context in a descendant component, import thegetContextfunction and call it, supplying a context key. This gets the context value from the closest ancestor component that has defined a context with that key.
For example:
import{getContext}from'svelte';// Must be called during component instantiation.constfavorites=getContext('favorites');
Context keys can be any kind of value, not just strings.
Context values can be any kind of value, including functions and objects with methods that can be called by descendant components.
If a component that has created context callssetContextagain with the same key but a different value, descendant components will not receive updates. They only see what is available during component initialization.
Unlike props and stores, context is not reactive.
Here’s an example of using context to make data available in a descendant component.
script> import {setContext} from 'svelte'; import B from './B.svelte'; setContext ('favorites', {color: 'yellow', number: 19});/script>div> This is in A. /(b)>/div>
script> import C from './C.svelte';/script>div> This is in B./ >/div>
script> import {getContext} from 'svelte'; const {color, number}=getContext ('favorites');/script>div> This is in C. div>favorite color is {color}/div> div>favorite number is {number}/div>/div>
This renders the following:
This is in A. This is in B. This is in C. favorite color is yellow favorite number is 19
Stores
Storeshold application state outside any component. They are an alternative to using props or context to make data available in components.
For stores that should be available to any component, define and export them in a file like (src / stores.js) and import them from that file wherever needed.
For stores that should be available only to descendants of a given component, define them in that component and pass them to descendants using props or context.
Svelte provides three kinds of stores.
- writable stores– These are the only kind that can be modified by components.
- readable stores– These handle computing their own data.
- derived stores– These derive data from the current values of other stores.
All of these have asubscribemethod that returns a function to call to unsubscribe.
Custom stores can also be created. Their only requirement is to be an object with a properly implementedsubscribemethod.Here’s an example.
Writable Stores
To create a writable store, call thewritablefunction, which is defined in Thesvelte / storePackage. Pass an initial value and optionally a function that takes asetfunction. If supplied, this function can asynchronously determine a value for the store. For example, it can call a REST service and pass the value returned toset. This function is not called until the first component subscribes to the store.
In addition to thesubscribemethod, writable stores have the following methods:
- (set)newValue)
- This sets a new value for the store.
- (update)fn)
- This updates the store value based on the current value.
fnis a function that is passed the current value and returns the new value.
Here’s an example of defining a writable store using just an initial value.
// In stores.jsimport{writable}from'svelte / store';// The initial value is an empty array.exportconstdogStore=writable([]);
Here’s an example of defining a writable store using a function to dete rmine the value.
// In stores.jsimport{writable}from'svelte / store';exportconstdogStore=writable(initialValue, (Async) set=>{ // Called when subscribe count goes from 0 to 1. // Compute initial value and pass to set function. constres=await fetch('/ dogs'); constDogs=await res. (JSON)(); set( (Dogs) ); return()=>{ // Called when subscriber count goes to 0. };});
It is possible to bind the value of a form element to a writable store. When the user changes the form element value, the store is updated.
The$prefix on store names is explained below.
Readable Stores
To create a readable store, call thereadablefunction, which is defined in Thesvelte / storePackage.
As with writable stores, this is passed an initial value and optionally a function that takes a (set) function.
For example:
import{readable}from'svelte / store';exportconstdogStore=readable( [],// initial value set=>{ constres=await fetch('/ dogs'); constDogs=await res. (JSON)(); set( (Dogs) ); // Can return a cleanup function here. });
Thesetfunction can usesetIntervalto continuously change the value.
Using Stores
To begin using a store, get access to it in one of these ways:
- Accept it as a prop.
- Get it from a context.
- Import it from a
.JS (file (for global scopes).
There are two ways to get the value from a store:
- Call the
subscribemethod on it (somewhat verbose). - Use the auto-subscription shorthand (usually preferred).
Here’s an example of using thesubscribemethod.
script> import {onDestroy} from 'svelte'; import {dogStore} from './stores.js'; let dogs; const unsubscribe=dogStore.subscribe (value=>(dogs=value)); onDestroy (unsubscribe);/script>
Here’s an example of using auto-subscription.
All variables whose names begin with$must be stores. With this approach components automatically subscribe to stores when first used and unsubscribe when the component is destroyed.
script> import {dogStore} from './stores.js';/script>
Here’s an example of making changes to a writable store.
Components that subscribe to the store will see the changes.
Store Demo
Here’s an example of getting changes from a store using$references in the HTML.
script> import {dogStore} from './stores.js';/script>div> {$ dogStore.name} is a {$ dogStore.breed} that is {$ dogStore.age} years old./div>
Here’s the same thing, but getting the data from the store in JavaScript code.
script> import {dogStore} from './stores.js'; // Parens are needed here so it knows the // open curly brace is not the the start of a block. $: ({age, breed, name}=$ dogStore);/script>div>{name} is a {breed} that is {age} years old./(div)>
Module Context
To run JavaScript code in a component source file only once instead of once for each component instance created, include the code in ascripttag that specifies module context.
script (context)="module"> .../script>
When ascripttag doesn’t specify its context, it isinstance context.
Both kinds ofscripttags, instance andmodule context, can appear in a component source file.
Values can be exported from both contexts. A default export cannot be specified because the component itself automatically becomes the default export.
The module context can declare variables and define functions. These are accessible in the instance context of all instances of the component, but they are not reactive. The component won’t rerender when they change. This allows sharing data between all instances.
Instance context variables and functions are not accessible in the module context.
Note that it is not important to move functions that don’t access component state to the module context because (from the Svelte API docs) “Svelte will hoist any functions that don’t depend on local state out of the component definition. ” However, one reason to put functions in module context is so they can be exported and called from outside.
Batched DOM Updates
Component state is invalidated by changing the values of top-level component variables.
From the Svelte documentation, “When you invalidate component state in Svelte, it doesn’t update the DOM immediately. Instead, it waits until the next microtask to see if there are any other changes that need to be applied, including in other components. Doing so avoids unnecessary work and allows the browser to batch things more effectively. “
Thetickfunction “returns a promise that resolves as soon as any pending state changes have been applied to the DOM (or immediately, if there are no pending state changes). “
This can be used to make additional state change after DOM updates have been applied.
script> import {tick} from 'svelte'; ... // Make some state changes. // The following prevents batching of updates // that occur after call to tick. await tick (); // Make more state changes after the DOM updates. .../script>
Callingawait tick ()is also useful in tests to wait for a change to be processed before testing for the effect.
Animation
Svelte provides many features that make it easy to add animation to elements. The following is a list of some of the functions and transition values that are provided.
Thesvelte / animatepackage provides theflip function.
Thesvelte / motionpackage provides thespringandtweenedfunctions.
Thesvelte / transitionpackage provides thecrossfadefunction and the transition values draw(for SVG elements), (fade) ,fly,scale, andslide.
Also see thesvelte / easingpackage that provides easing functions that control the rate of animation changes over time.
Here’s a basic animation example that causes a list item to fade in when mounted and fade out when destroyed.
script> import {fade} from 'svelte / transition';/script>litransition: fade> /li>
Custom animations can be created.Here’s an example.
Components can listen for events to know when a transition starts and ends. This is done by listening for the following events:
IntrostartandintroendoutrostartandOuttroend
Special Elements
Svelte supports several special elements that have the form
- This renders the component specified by
expression. Ifexpressionis falsy it renders nothing. The optional props are passed to the component that is rendered. - This allows a component to render an instance of itself. It supports recursive components and is needed because a component cannot import itself.
- This registers a function to be called when a given event is dispatched by the DOM
windowobject. One example is theresize (event.)- This binds a variable to a window property. One example is
innerWidth.- This registers a function to be called when a given event is dispatched by the DOM
bodyelement. Examples includemouseEnterandmouseLeave.elements- This inserts elements in the
headelement of the DOM document. Examples include insertinglinkandscripttags.- This is placed at the top of a
. sveltefile, not inside ascripttag. It specifies compiler options including:- (immutable) ********************************
- This means props will be treated as immutable, which provides an optimization.
The default value is
false. Being immutable means parent components will create new objects for object props rather than modify properties of existing objects. This allows Svelte to determine whether a prop has changed by comparing object references rather than object properties.When this option is set to (true) , if a parent component modifies object properties of a child component, the child will not detect the change and will not re-render.
accessors- This adds getter and setter methods for the component props. The default is false. These can be useful when Svelte components are compiled to custom elements that are used in non-Svelte apps.
namespace="value"- This specifies the namespace of the component. One use is for SVG components which use a namespace of
svg. tag="value"- This specifies a name to use when a Svelte component is compiled as a custom element. It allows Svelte components to be used as custom elements in non-Svelte apps.
Debugging
Use@ debugto break when given variables change and output their values in the devtools console.
Place this at the top of the HTML section, not inside a,
, and HTML.
Add the following npm script topackage.json:
"format":"prettier --write '{public, src} / ** / *. {css, html, js, svelte } '',
To run Prettier, enternpm run format.
Todo App
Let’s walk through the implementation of a simple Todo app to pull together the most important Svelte concepts. This code can be found in GitHub athttps://github.com/ mvolkmann / svelte-todo.
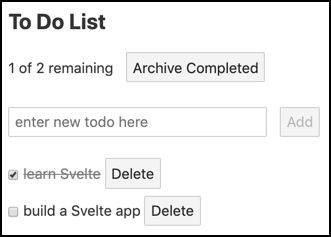
To add a new todo, enter its text in the input and press the “Add” button or the enter key.
To toggle a todo between done and not done, click the checkbox to its left. Note that the “remaining” text near the top shows the number of todos that are not currently checked and the total number of todos.
To delete a todo, click the “Delete” button to its right.
To archive all the checked todos, click the “Archive Completed” button. They aren’t really archived in this version of the app. They are just deleted.
Here is the filesrc / main.jsthat kicks off the app by rendering aTodoListcomponent in the document body.
importTodoList from'./ TodoList.svelte';constapp=(new) TodoList({ (target) :document.body});exportdefault (app) ;
Here is the code for the (Todo) component in the filesrc / Todo.svelte.
It is a list item that contains:
- The text of the todo
- A checkbox
- A “Delete” button
It takes one prop named “todo” that holds the text of a todo.
When the checkbox is toggled it dispatches a “toggleDone” event.
When the “Delete” button is pressed it dispatches a “delete” event.
script> import {createEventDispatcher} from 'svelte'; const dispatch=createEventDispatcher (); export let todo; // the only prop/script>Style> / * This draws a line through the text of todos that are marked as done. * / .done-true { color: gray; text-decoration: line-through; } li { margin-top: 5px; }/style>li> inputtype="checkbox"checked={todo.done}on: change={()=>dispatch ('toggleDone')} /> spanclass={'done -' todo.done}>{todo.text}/(span)> buttonon: click={()=>dispatch ('delete')}>Delete/button>/li>
Here is the code for the (TodoList) component in the filesrc / TodoList.svelte.
After what you have learned about Svelte so far, this code should be mostly self-explanatory.
To Do List
{status}
{#each todos as todo}
deleteTodo (todo.id) } on: toggleDone={()=>toggleDone (todo)} /> {/ each}
Unit Tests
Unit tests for Svelte components can be implemented using Jest. In addition, use of “Svelte Testing Library” is recommended. It works with Jest to simplify writing unit tests for Svelte components.
Explaining the details of these testing tools is beyond the scope of this article, but example test code is provided below. To learn more about these tools visithttps://jestjs.io/andhttps://testing-library.com/.
To install everything needed, enternpm install -Dnamewherenameis:
@ babel / core@ babel / preset-env@ testing-library / sveltebabel-jestjestjest-transform-svelte
Create the filebabel.config.jswith the following contents:
Module.exports={ Presets:[ [ '@babel/preset-env', { targets:{ node:'current' } } ] ]};
Iftargets.nodeis not set as shown above, the error message “regenerator-runtime not found” will be displayed when the tests are run.
Create the filejest.config.jswith the following contents:
Module.exports={ transform:{ '^. $ .js':'babel-jest', '^. $ svelte':'jest-transform-svelte' }, moduleFileExtensions:['js','svelte'], bail:(false), Verbose:(true)};
Settingbailto (false) means that Jest should not exit a test suite when one of its tests fails.
Settingverboseto (true) causes Jest to show the result of each test, rather than just a summary of the results for each test suite.
Add the following npm script topackage.json:
"test":"jest --watch src",
To run the unit tests, enter (npm test) .
Here is code for testing theTodocomponent in the filesrc / Todo.spec.js:
import{cleanup,render}from'@ testing-library / svelte ';importTodo from'./ Todo.svelte';describe('Todo',()=>{ consttext='buy milk'; consttodo={text}; // Unmounts any components mounted in the previous test. afterEach(cleanup); test('should render',()=>{ const{getByText}=render( (Todo) ,{props:{todo}}); constcheckbox=(document.) querySelector('input [type="checkbox"] '); expect(checkbox).not.toBeNull();// found checkbox expect(getByText( (text) ));// found todo text expect(getByText('Delete'));// found Delete button }); // There is no easy way to test that events are fired // when the checkbox state is changed // or when the "Delete" button is pressed. // These are covered by tests in TodoList.spec.js.});
Here is code for testing theTodoListcomponent in the filesrc / TodoList.spec.js:
import{tick}from'svelte';import{cleanup,fireEvent,render, (wait) }from'@ testing-library / svelte';importTodoList from'./ TodoList.svelte';describe('TodoList',()=>{ constPREDEFINED_TODOS=(2); afterEach(cleanup); // This is used by many of the test functions below. functionexpectTodoCount( (count) ){ returnwait(()=>{ // Each todo has anroot element. constlis=(document.) querySelectorAll('li'); expect(lis. (length)).toBe(count); }); } test('should render',Async()=>{ const{getByText}=render( (TodoList) ); expect(getByText('To Do List')); expect(getByText('1 of 2 remaining')); expect(getByText('Archive Completed'));// button await expectTodoCount(PREDEFINED_TODOS); }); test('should add a todo',Async()=>{ const{getByTestId,getByText}=(render) *************************************************** (TodoList); constinput=getByTestId('todo-input'); constvalue='buy milk'; fireEvent.input(input,{target (***************************************************:{value}}); fireEvent.click(getByText('Add')); await expectTodoCount(PREDEFINED_TODOS(1)); expect(getByText(value)); }); test('should archive completed',Async()=>{ const{getByText}=render( (TodoList) ); fireEvent.click(getByText('Archive Completed')); await expectTodoCount(PREDEFINED_TODOS-(1)); expect(getByText('1 of 1 remaining')); }); test('should delete a todo',Async()=>{ const{getAllByText,getByText}=(render) *************************************************** (TodoList); consttext='learn Svelte';// first todo expect(getByText( (text) )); constdeleteBtns=getAllByText('Delete'); fireEvent.click(deleteBtns[0]);// deletes first todo await expectTodoCount(PREDEFINED_TODOS-(1)); }); test('should toggle a todo',Async()=>{ const{container,getByText}=(render) *************************************************** (TodoList); constcheckboxes=(container.) querySelectorAll('input [type="checkbox"] '); fireEvent.click(checkboxes[1]);// second todo await tick(); expect(getByText('0 of 2 remaining')); fireEvent.click(checkboxes[0]);// first todo await tick(); expect(getByText('1 of 2 remaining')); });});
End-to-End Tests
End-to-end tests for Svelte applications can be implemented using Cypress. Explaining the details of Cypress is beyond the scope of this article, but example test code is provided below.
To learn more about Cypress, visithttps://www.cypress.io/.
To install Cypress, enternpm install -D cypress.
Add the following npm scripts topackage.json:
"cy: open":"cypress open","cy: run":"cypress run",
To launch the Cypress test tool in interactive mode, enternpm run cy: open. This also creates acypressdirectory, if it doesn’t already exist, with the following subdirectories:
- (fixtures)
- These can hold data used by tests. The data is typically in
.jsonfiles that are imported into tests. integration- Your test files go here, either at the top of this directory or in subdirectories.
plugins- These extend the functionality of Cypress. For examples, seehttps://github.com/bahmutov/cypress-svelte-unit-test. Cypress automatically runs the code in the
index.jsfile in this directory before running each spec file. screenshots- This holds screenshots produced by calling
cy.screenshot (). These are useful when debugging tests. support- Files here add custom Cypress commands, making them available in tests. Cypress automatically runs the code in the
index.jsfile in this directory before running each spec file.
These directories are populated with sample files, all of which can be deleted.
Create test files under thecypress / integrationdirection with extensions of.spec.js.
To run the end-to-end tests:
- Start the application server with
npm run dev - Enter
npm run cy: open - Press the “Run all specs” button in the upper-right corner of the Cypress tool
This opens a browser window where all the tests are run.
When finished running the tests, close this browser window and the Cypress tool.
Here is code for end-to-end tests of the Todo application in the filecypress / integration / TodoList.spec.js.
constbaseUrl='http: // localhost: 5000 / ';describe('Todo app',()=>{ it('should add todo',()=>{ visit(baseUrl); contains('1 of 2 remaining'); // The "Add" button should be disabled until text is entered. contains('Add') .as('addBtn') .should('be.disabled'); // Enter todo text. consttodoText='buy milk'; get('[data-testid=todo-input]') .as('todoInput') .type(todoText); get('@ addBtn').should('not.be.disabled'); get('@ addBtn').click(); get('@ todoInput').should('have.value',''); get('@ addBtn').should('be.disabled'); contains(todoText); contains('2 of 3 remaining'); }); it('should toggle done',()=>{ visit(baseUrl); contains('1 of 2 remaining'); // Find the first checkbox and toggle it. get('input [type=checkbox]') .first() .as('cb1') .click(); contains('2 of 2 remaining'); // Toggle the same checkbox again. get('@ cb1'). (check)(); contains('1 of 2 remaining'); }); it('should delete todo',()=>{ visit(baseUrl); contains('1 of 2 remaining'); consttodoText='learn Svelte';// first todo contains('UL',todoText); // Click the first "Delete" button. contains('Delete').click(); contains('UL',todoText).should('not.exist'); contains('1 of 1 remaining'); }); it('should archive completed',()=>{ visit(baseUrl); consttodoText='learn Svelte';// first todo contains('UL',todoText); // Click the "Archive Completed" button. contains('Archive Completed').click(); contains('UL',todoText).should('not.exist'); contains('1 of 1 remaining'); });});
To rerun the tests, click the circular arrow button near the top of the browser window.
To aid in debugging, addconsole.logcalls in the application code and open the devtools console in the browser window where the tests are running.
Tests will automatically rerun when changes are saved to application source files or test files.
To launch the Cypress test tool in command-line mode, enternpm run cy: run. This outputs test results in the terminal window, records a video of the test run, and outputs the file path of the video. Double-click the video file to watch it.
Related Tools
The following is a list of Svelte-related tools that are worthy of investigating.
- Svelte VS Code extension
- (Sapper) –https://sapper.svelte.dev/
This is an “application framework powered by Svelte.” A Sapper is a soldier responsible for tasks such as building and repairing roads and bridges, laying and clearing mines, etc. Sapper is similar to Next and Gatsby. It provides routing, server-side rendering, and code splitting. - Svelte Native–https://svelte-native.technology/
This is a community-drive project that supports implementing native mobile apps using Svelte . It is based on nativescript-vue. - Svelte GL–https://github.com/Rich-Harris/svelte-gl
This is an in-work Svelte version of the Three.js 3D graphics library. - Storybook with Svelte–https://storybook.js.org/docs/guides/guide-svelte/
Storybook is a tool for demonstrating and experimenting with web UI components.
Conclusion
There you have it! Svelte is a worthy alternative to the currently popular options of React, Vue, and Angular. It has many benefits, including small bundle sizes, simple component definitions, easy state management, and reactivity without a virtual DOM.
Thanks so much to Charles Sharp and Kristin Kroeger for reviewing this article!
Please send corrections and feedback to[email protected].


GIPHY App Key not set. Please check settings