

Meta forwardThe latest and most powerful Llama 3 language models in the open source field were released in two days.
The Llama 3 released this time includes two parameter sizes: 8B and 70B, with a total of four versions: 8B, 8B-instruct, 70B, and 70B-instruct. Among them, 8B and 70B are pre-trained models, while the models with the instruct suffix have been fine-tuned with instructions and can perform dialogue tasks.There is also a 400B version of Llama 3 that is still in training and has not yet been made public.
The vocabulary of Llama 3 has been increased to 128K, and the context length has been increased to 8K. The context length is not too large.
Below we will introduce how to quickly deploy and experience Llama 3 locally in the MacOS environment.
Quickly experience or deploy Llama 3
After the release of Llama 3, Llama 3 was immediately launched on the NVIDIA official website and can be experienced online. It is quite fast without queuing.
https://build.nvidia.com/meta/llama3-70b

HuggingFace has also launched the Llama3-70B version.
https://huggingface.co/chat/models/meta-llama/Meta-Llama-3-70B-Instruct
In addition to the online experience, we can use Ollama to deploy the model locally. After installing Ollama, execute the following command to run Llama 3:
ollama run llama3
The default version is an 8B 4bit quantized version with a size of 4.7 GB.
Combined with Open-WebUI, you can experience it on the Web page. Use docker to quickly start Open-WebUI:
docker run -d -p 3000:8080--add-host=host.docker.internal:host-gateway-v open-webui:/app/backend/data--name open-webui ghcr.io/open-webui/open-webui:main
ChatGPT-Next-Web currently also supports ollama local API, use docker to quickly start:
docker run -d -p 3001:3000 yidadaa/chatgpt-next-webVisit http://127.0.0.1:3001, then check the custom interface in the settings, fill in ollama's API address http://127.0.0.1:11434 for the interface address, fill in the local model name for the custom model name, and leave the API Key null. Be careful not to configure a login password, otherwise the Authorization Header will cause a CORS exception and make it unusable.
Download and deploy models manually
Of course, we can also download the original model file from the official website or HuggingFace and deploy and run it manually.
Download model
-
Download from HuggingFace
HuggingFace application page https://huggingface.co/meta-llama/Meta-Llama-3-8B/tree/main
-
Download from Meta official website
Submit an application to download the model on the official website https://llama.meta.com/llama-downloads/, and then receive an email containing the download address.
Next, pull the llama3 project code on Github:
# 下载 Github 仓库git clone https://github.com/meta-llama/llama3# 设置代理,需要用香港或者海外代理export http_proxy=127.0.0.1:8080export https_proxy=$http_proxy# 下载模型sh download.sh
Then enter the corresponding parameters according to the command line prompts, and then start downloading
Enter the URL from email:Enter the list of models to download without spaces (8B,8B-instruct,70B,70B-instruct), or press Enter for all:Downloading 8b_pre_trained正在连接 127.0.0.1:8080... 已连接。已发出 Proxy 请求,正在等待回应... 206 Partial Content长度:16060617592 (15G),剩余 16003715825 (15G) (binary/octet-stream)正在保存至: “./Meta-Llama-3-8B/consolidated.00.pth”
After the download is completed, you will get the following files: checklist.chk, consolidated.00.pth、params.json、tokenizer.model
Use llama.cpp to adapt to Apple chips
There is no NVIDIA graphics card on the Macbook. If you want to run the model file, you need to use the llama.cpp project to perform some adaptation and conversion work.mainly dividedbyNext few steps:
-
Compile and install llama.cpp
-
Transformation model
-
Quantitative model (optional)
-
Run the model
First, we compile and install llama.cpp, download the source code from the project code repository and compile:
https://github.com/ggerganov/llama.cpp
git clone https://github.com/ggerganov/llama.cppcd llama.cppmake
Install dependencies and use the convert.py script to convert the model from PTH to GGUF format
# 安装相关依赖python -m pip install -r ./requirements/requirements-convert.txt# 进行转换,注意此处需要特别指定 bpe 类型python convert.py --vocab-type bpe ~/llama3/Meta-Llama-3-8B-Instruct
After running it, it was found that the version downloaded from the Meta official website link could not be successfully converted:
FileNotFoundError: Could not find a tokenizermatching any of ('bpe')
I have read several llama.cpp project issues and found that many people have encountered the same problem and have not seen any public solutions yet. So I analyzed the error code myself and found that it was an exception triggered in the VocabFactory class of convert.py:
Once you know the reason, you can easily solve it. You can download the corresponding version of tokenizer.json from HF and put it in the same directory as the model to successfully convert it.
https://huggingface.co/meta-llama/Meta-Llama-3-8B-Instruct/raw/main/tokenizer.json
Llama 3 8B-Instruct The converted model file is ggml-model-f32.gguf, with a size of 32GB.
You can then choose to use llama.cpp's quantize for model quantization, for example:
./quantize ./ggml-model-f32.gguf ./ggml-model-Q4_K_M.gguf Q4_K_MOf course, if local resources are sufficient, you can go directly to the next step and run the model without quantification.
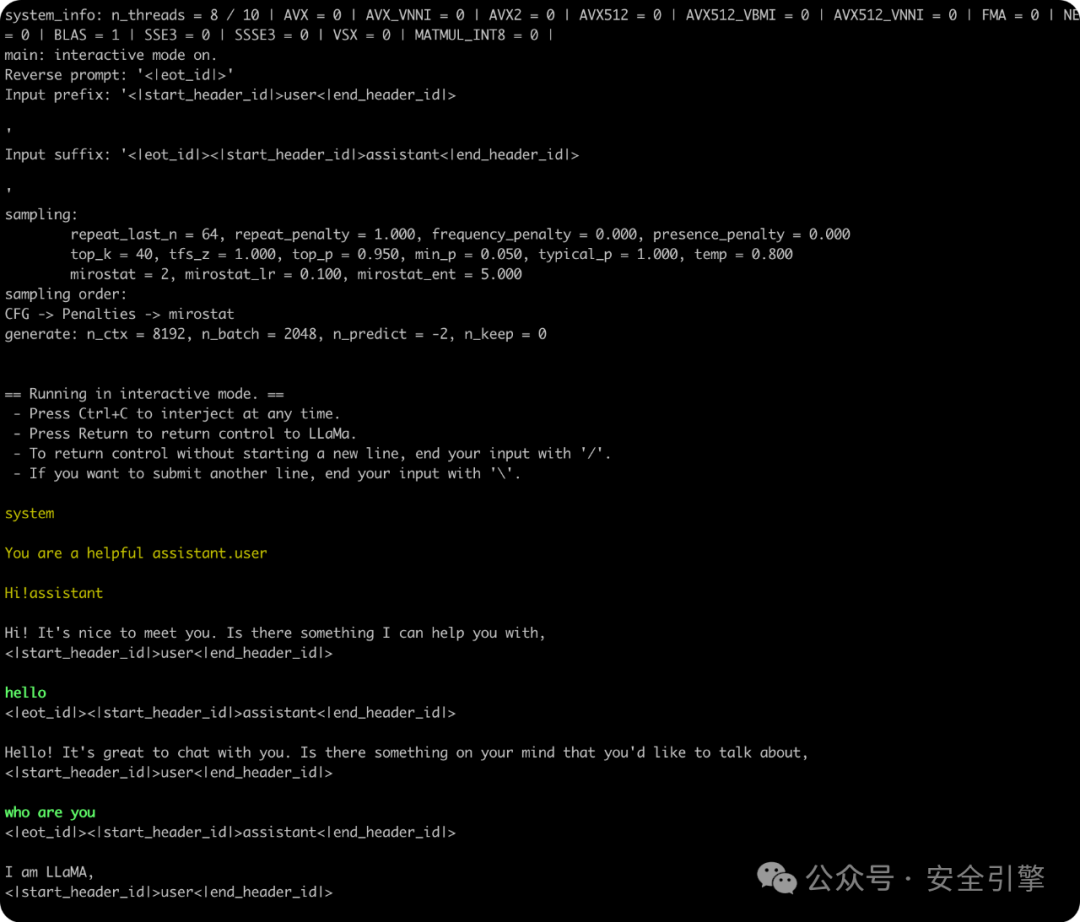
Run the model
Use the llama.cpp compiled executable file to run the converted model file:
./main -m ./Meta-Llama-3-8B-Instruct/ggml-model-f32.gguf--color -e -s 0-p '<|begin_of_text|><|start_header_id|>system<|end_header_id|>\n\nYou are a helpful assistant.<|eot_id|><|start_header_id|>user<|end_header_id|>\n\nHi!<|eot_id|><|start_header_id|>assistant<|end_header_id|>\n\n'-ngl 99 --mirostat 2 -c 8192-r '<|eot_id|>'--in-prefix '<|start_header_id|>user<|end_header_id|>\n\n'--in-suffix '<|eot_id|><|start_header_id|>assistant<|end_header_id|>\n\n'-i
Local simple application: AI knowledge base
local combination Hostagean note, you can quickly apply Llama 3 in AI knowledge base scenarios.
Search and install Copilot in the Obsidian third-party plug-in market, and check Use ollama local model in the plug-in settings. In addition, before starting the ollama service, you need to configure the environment variable OLLAMA_ORIGINS. Otherwise, Obsidian is restricted by CORS and cannot call the local API interface, and a “Failed to Fetch” error will occur.
# 拉取 text embedding 模型ollama pull nomic-embed-text# 设置环境变量并启动 ollama 服务OLLAMA_ORIGINS=app://obsidian.md* ollama serve# MacOS 下也可以使用 launchctl 设置launchctl setenv OLLAMA_ORIGINS "app://obsidian.md*"# 如果需要设置多个 CORS Origin,可以这样配置launchctl setenv OLLAMA_ORIGINS "app://obsidian.md*,http://your-website.com:8080/"
For detailed configuration, please refer to:
https://github.com/logancyang/obsidian-copilot/blob/master/local_copilot.md#ollama
https://github.com/ollama/ollama/blob/main/docs/faq.md#how-do-i-configure-ollama-server
Note: When the Obsidian plug-in configures the Ollama Base URL option, the URL does not need to have / at the end. For example: fill in http://127.0.0.1:11434 instead of http://127.0.0.1:11434/
Command + P opens the command panel, enter Copilot Index, and refresh the vector index of Vault for QA. After the vector library is created, you can experience the full functionality.


GIPHY App Key not set. Please check settings