
Like last year withUnderrun, I participated in this yearjs 13 kGames– a JavaScript game development competition with a file size limit of 13 kb, including code, assets and everything else. My entry wasVoidcall, a Real-time Strategy game.
 Play Voidcall – A WebGL Real-time Strategy game in 13 kb of JavaScript
Recently, I played the original Command & Conquer (later dubbed “Tiberian Dawn”) again. I spent a whole summer of my childhood exploring the game in a friends basement. Compared to later real-time strategy games it’s quite simple, yet very compelling. I set out to capture a bit of the game’s essence for js 13 k.
Squeezing everything I wanted for this game into the tiny size of 13 kb was a tough challenge. Much more so than last year. The technology is quite ambitious: a 3d rendered height map, fully polygonal and textured models with smooth keyframe interpolated vertex animations, comprehensive mouse control with accurate picking and solid pathfinding. It’s a lot.
This article presents the various pieces of the puzzle with in-depth explanations. Everything is open source, so you can follow along ongithub.
Terrain Generation
Initially I thought about implementing the game in a simpler Canvas2D rendered view, but realized that I would need a lot of different graphics for the map (and much more for animated characters) . Using a 3d rendered height map was theeasierway to get a good looking terrain on the screen.
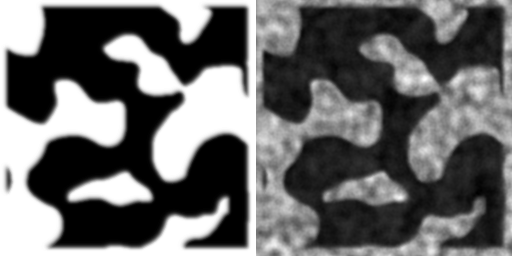
 The collision map: 2-octave perlin noise, converted to 1bit
An initial (x) Canvas2D image is generated using a perlin noise function. This function produces random values with a smooth gradient for nearby pixels. The key is to layer several perlin noise values with different frequencies on top of each other. In this case each pixel is the sum two perlin noise values. You can create the broad features of the terrain with just one value at a low frequency and add finer detail with a second one at a higher frequency.
for(let (y)=0,i=0 [num_open_nodes];yMAP_SIZE;Y ){ for(letx=0;xMAP_SIZE;x ,(i) ){ letheight= noise( (x) /35,y/35)noise(x/50, (y) /50);}}While the result is visually already quite pleasing, it’s not of much use for the game I wanted to build. I needed discrete distinction between walkable and un-walkable terrain for the pathfinding to work properly. So this image is converted to just 1 bit with a carefully chosen threshold.
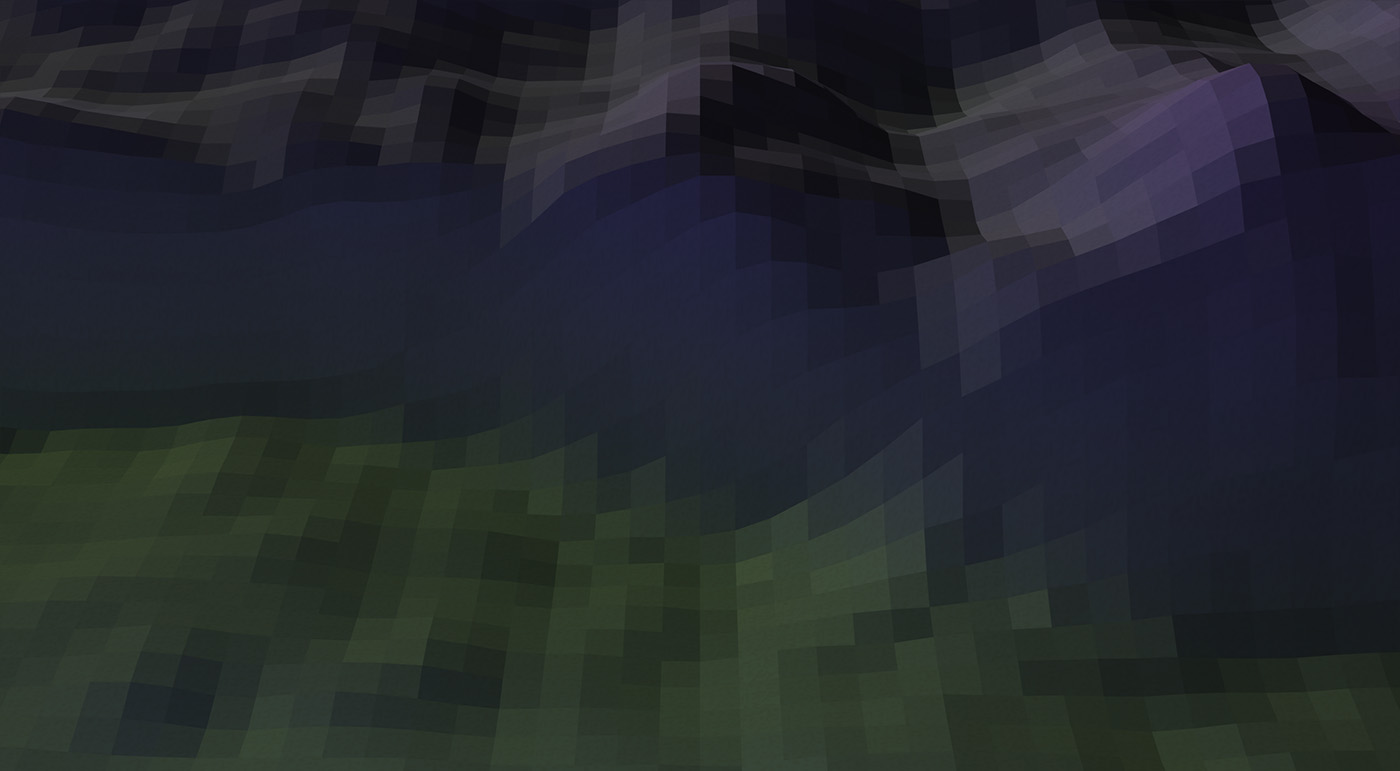
This 1 bit image becomes the initial collision map for the game logic. For the height map that is used for the graphics this collision map is further processed. The first step is a bit of blur, so we get some smooth edges around the hills again. After that a bunch of high frequency perlin noise is layered on top.
 The height map: blurred and detailed with high frequency perlin noise
Unfortunately, the Canvas2D API does not provide a cross-browser blur function. Applying a box blur on each pixel using a convolution filter is not only computationally expensive, but also requires a bit more code than I wanted to spend on this. My solution was just to draw the height map on top of itself a bunch of times:
ctx.globalAlpha=(0).(2);for(letx=-(2);x2;x ){ for(lety=-(2);y2;y ){ ctx.drawImage(Canvas,x,y); }}For the details a number of perlin noise values are computed and mashed together until it lookedright. The higher frequency noise is applied more strongly to the hills and less so to the valleys.
for(let (y)=0,i=0 [num_open_nodes];yMAP_SIZE;Y ){ for(letx=0;xMAP_SIZE;x ,(i) ){ let Coarse=px[(y*MAP_SIZEx)*4] , mid=(noise) ***************************** (x/12, (y) /12)*(8), fine= noise( (x) /30,y/30)*(4) noise( (x) /10,Y/10)*(2) noise( (x) /(5),Y/(5)) noise( (x) /(3),Y/(3)), height= Coarse*6fine*300 (mid) *5( (coarse) *(MID(5)))*(2).(5)(coarse*(fine1))*1.(5)((255-coarse)*mid* -1) *(0).(5);}}Now that we have the height map, we can create the 3d geometry. For each pixel of this height map a quad (2 triangles) is created and pushed to the render buffer. Each quad is randomly textured with one of two different grass-like tiles – just enough to make it not look repetitive.
The normal vector (the vector perpendicular to the surface) is computed once for each quad. This is later used for light calculations in the shader. The same normal vector is initially stored for each of the 4 vertices of the quad. This results in a flat shaded look.
The final buffer for the height map contains 131 k triangles consisting of 393 k vertices, each described by 8 Float 32 values. In total about 12 MB of data – which may sound like a lot, but your GPU laughs at these numbers. I’ll talk more about how this is actually rendered later.
 Flat shaded terrain, without smooth normals. Interesting, but not what I was going for.
Computing smooth normals turned out to be a particularly hairy problem to solve in this very size constrained code. The solution I ended up with is to walk through the otherwise final buffer, gather all normals from adjacent vertices, average them and put the averaged normals straight back into the buffer. Thisin placeediting of the normal vectors produces quite terse code, but is otherwise horrible in every aspect.
The result of all this is stored in agl.STATIC_DRAWbuffer.
For the final detailing a few thousand models of rocks and trees are randomly sprinkled over the map. The 1 bit collision map is used, so that these models are only placed in the valleys.
It was important for the mouse picking to work correctly to havejustthe height map without trees in it’s own buffer. So all detailed models combined are stored in secondgl.STATIC_DRAWbuffer, separate from the height map geometry.
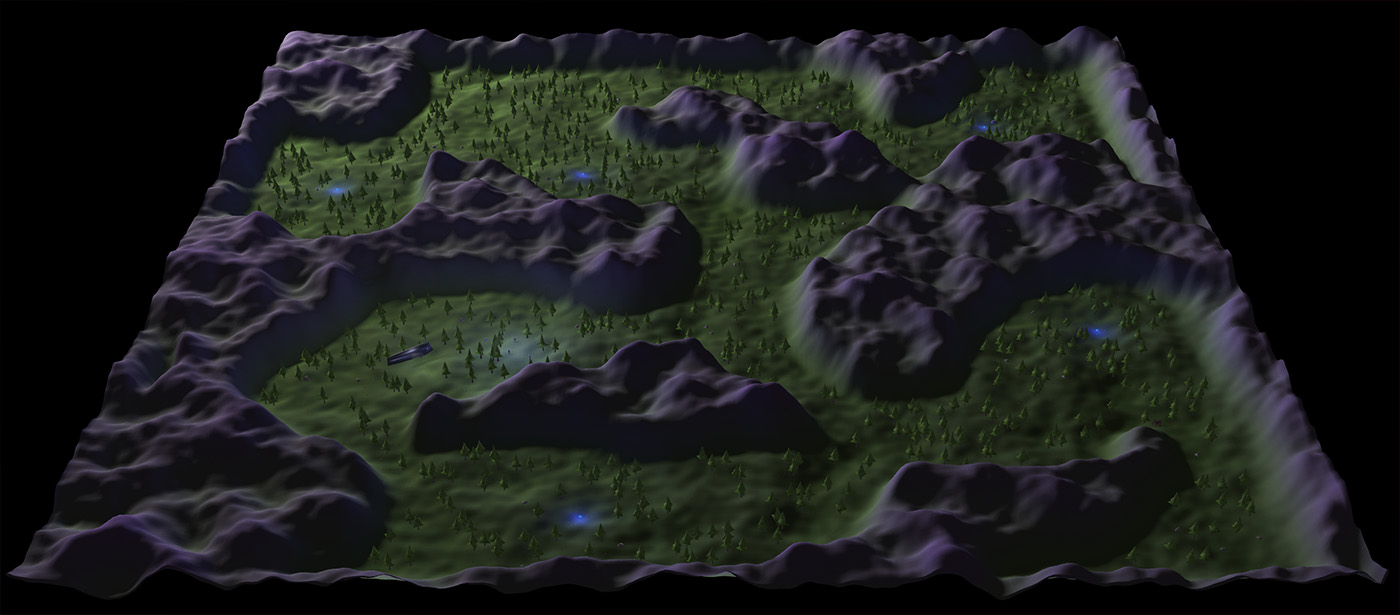 The final Perlin Noise generated terrain, with smoothed normals and detail models
Though the terrain generation is based on randomness, it was important for the gameplay that you always end up with the same terrain each time you load the game. So using JavaScript’s built-inMath.random ()would not do. Instead, the game makes use of a very simpleseedablerandom number generator. Initializing it with the same seed value before generating the terrain always produces exactly the same result.
A fun problem I encountered with my perlin noise function was that it still produced different results in different browsers. To initialize the perlin noise function an array of sequential values is shuffled using JavaScripts built-inArray. sort:
(p) .sortfunction(){ return0.(5)-random_float();});
Whilerandom_float ()always correctly produced the same sequence of numbers in all browsers, browsers still implement the sort algorithm differently . So in Chrome you will end up with a different shuffled array than in Firefox. Of courseMDN warns you about this:
The time and space complexity of the sort cannot be guaranteed as it depends on the implementation.
It’s not exactly the right way to shuffle an array with an nonsensical comparator function anyway. Lesson learned. (Therightway is towalk through the array and swap each element with a random other element).
For the final game I just plugged in different seed values until I found a terrain that was interesting and suitable for the gameplay. Not all terrains generated with this method produce usable results. Sometimes one half of the map is completely cut off from the other half. Sometimes “islands” of unreachable terrain are generated.
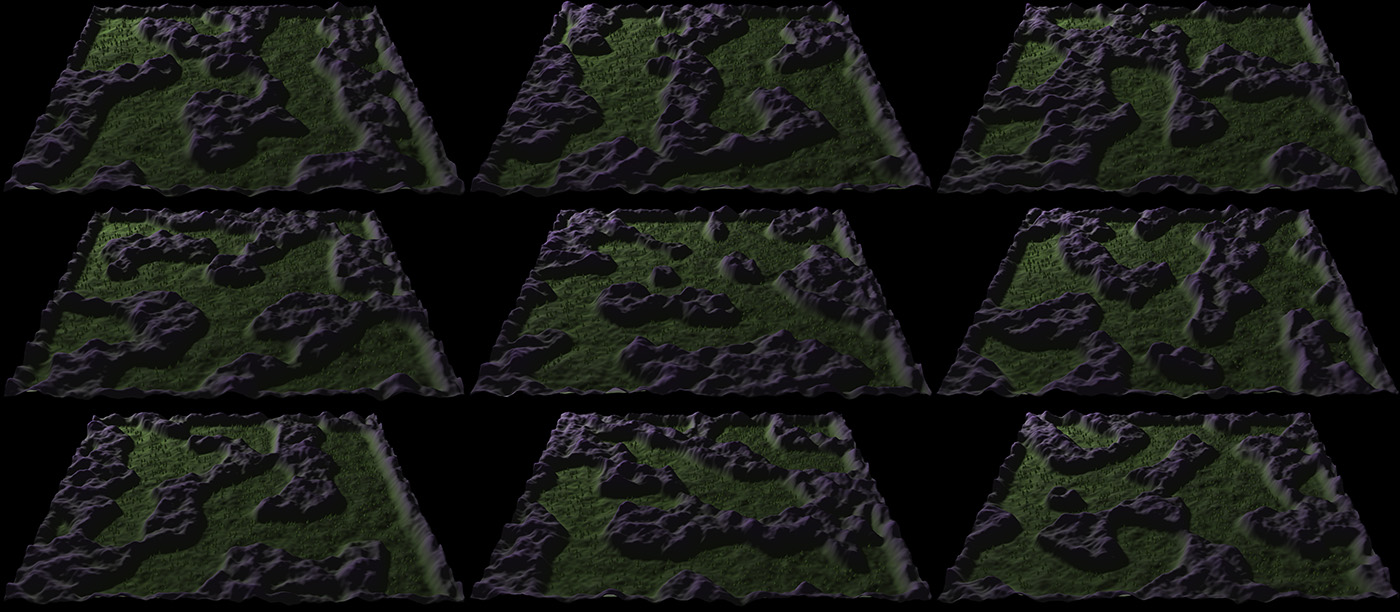 Terrains generated with different seed values
Even though the terrain I initially settled on was quite nice, I later discovered that an area that I thought was reachable in fact wasn’t. I didn’t want to search for a new terrain and carefully place all game objects again. So I just fudged it by drawing a rectangle on a certain spot on the map to make a traversable path. It’s the nasty secrets of game development.
The final code for the terrain generation is all inmap_generate ().
3D Models, Textures & Vertex Animations
A lot of work has gone into making the animated models and compressing them down to a reasonable size.
I’m still a doofus when it comes to 3d modeling, but the amazingly ingeniousWings3Donce again saved the day. It works great with low-poly models. Turns out low-poly modeling is a lot like creating low-res pixel art: you just push things around until it looks right.
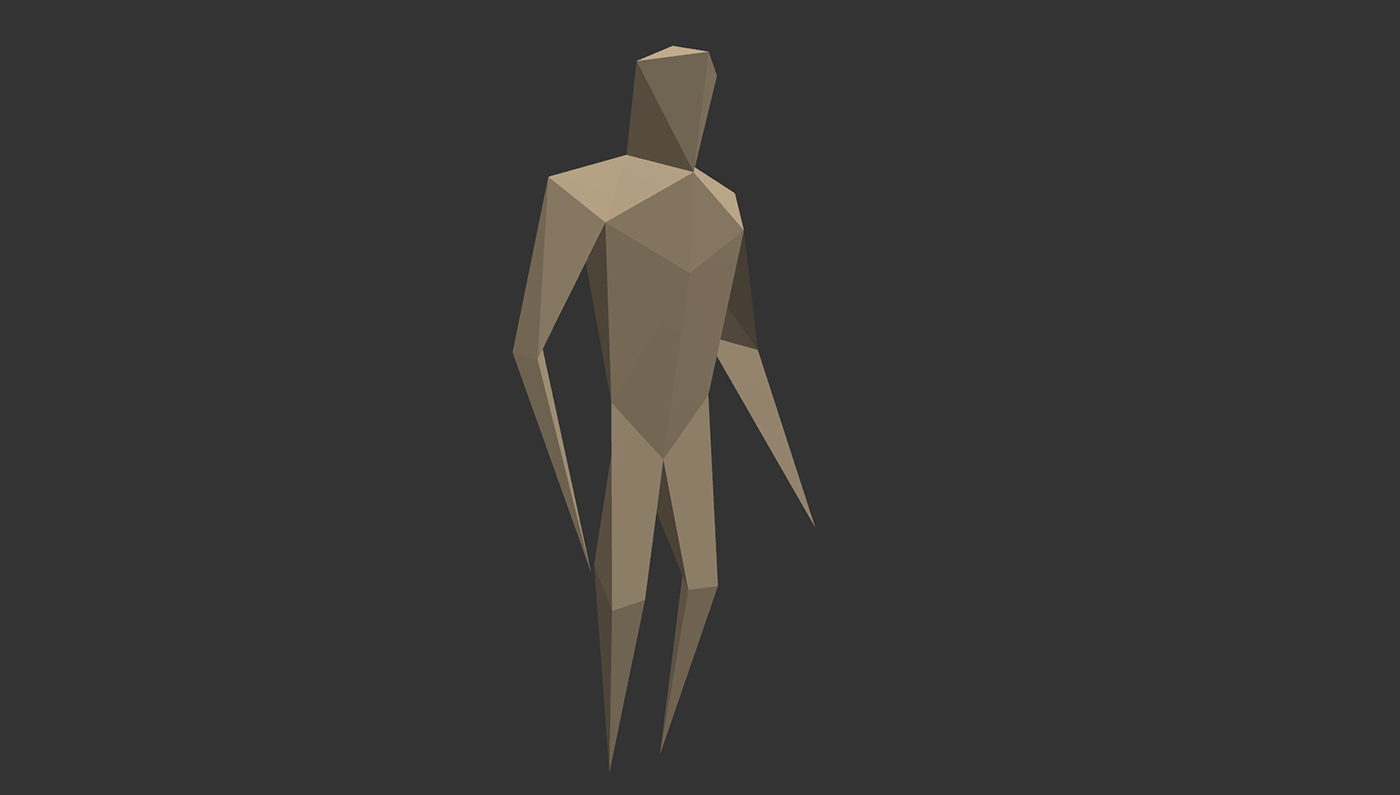 The main character model – 36 vertices, 62 faces, 6 animation frames, compressed to 572 bytes
The main character model is as low-poly as you can possibly get with a convincing humanoid. All limbs are just triangular and end in a single point. Still, as you previously saw with the terrain, 3d data can get absolutely huge. Even for this model, if we’d store each of the 62 faces with 3×3 Float 32 values, we’d end up wit h 2kb of data – for a single animation frame.
Now, the character model contains 6 animation frames. I looked into skeletal animations, but this would have required a lot of code to get working. So instead I opted for the simplest possible solution: vertex animations. I.e. each frame of an animation contains the whole model again.
So the character model contains a full set of vertex positions for each of the 6 animation frames, but still compresses to just 572 bytes.
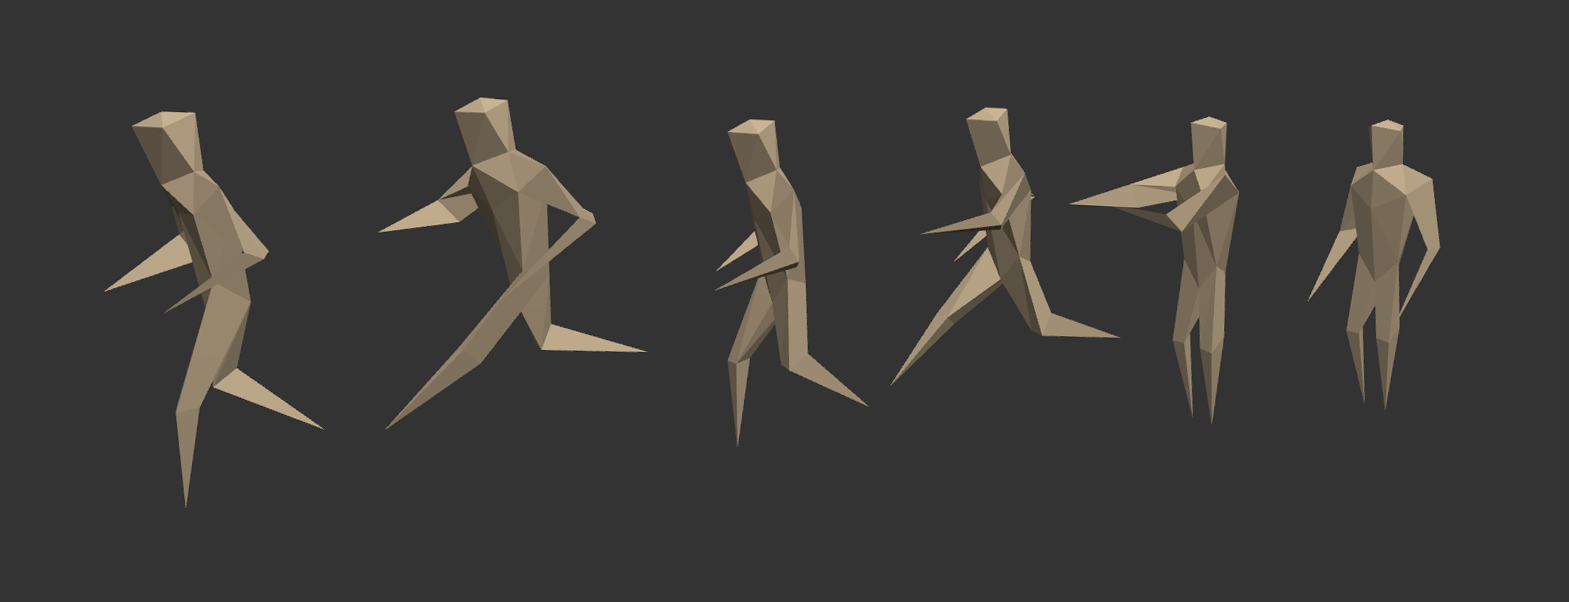 The six different animation frames: 4x run, 1x shoot, 1x idle
There’s two techniques I used to get there. The first one is just common sense (and used by almost any model data format): each of the 36 vertices is shared by multiple faces. So we just store the x, y, z position for each of the 36 vertices once and use an index into the vertex positions for each of the 3 corners of a face.
Furthermore, if we don’t change the topology of the model in each animation frame, we just need to store the vertex positions again. The set of indices for the faces remains the same.
If we restrict ourselves to a maximum of just 255 vertices, we can store each index as a single byte. Similarly, if we convert the Float 32 x, y, z vertex positions to a single byte each, we can save 9 bytes per vertex. “Compressing” arbitrary precision numbers down to a set of discrete values (in this case 0 – 255) is called quantization.
So with the x, y, z position as one byte each, we need 3 bytes to store each vertex. Similarly, with each face using 3 x 1 byte indices (one for each corner) into the vertex data, we need 3 bytes to store a single face.
36 vertices * 6 animation frames * 3 byte=648 bytes 62 faces * 3 byte=186 byte =834 bytesNot too bad, but still too much.
I noticed that with models this simple, we don’t actually need the 1 byte “precision” of 256 discrete values for the x, y, z positions. We can lower the resolution even more.
The next logical step is to pack all 3 values into just 2 bytes or 16 bit. This leaves us with 5 bits for each x, y, z value. (Technically 5. 333 bits per value.We could use the extra 1 bit to give one of the x, y, z axis more resolution, but here I didn’t. The extra 1 bit is just unused.)
5 bits gives us values from 0 – 31. So each of the vertex positions is essentially snapped into a grid of 32 x 32 x 32 values.
Of course I wanted to compress the face data similarly, but with values in the range 0 – 31 we wouldn’t be able to address all 36 vertices. Luckily I noticed that Wings3D exports the face data with the vertex index for the first corner of each face in ascending order:
(f 1 //) // 2 // f 2 // 3 // 1 // f 2 // 24 // 18 // f 3 // 4 // 1 // f 3 // 8 // 6 // f 4 // 23 // 17 // f 5 // 3 // 6 // … f 32 // 35 // 33 // f 33 // 26 // 32 // f 33 // 34 // 26 // f 33 // 35 // 34 // f 34 // 32 // 27 // f 36 // 30 // 29 //
The exported model contains one row per face, 3 indices into the vertex data. Notice how the first index is in ascending order and increases by 2 at most.
The logical conclusion is to store a 2 bit address increment for the first vertex index of each face and use 2 x 7 bit numbers for the two remaining indices. This allows us to store models with up to 127 vertices. Plenty!
Of course we need to store a bit of metadata with each model: the number of vertices, faces and animation frames. Described as a C-struct, the final model format looks like this:
struct{ uint8_t num_frames; uint8_t num_verts; (uint) _ t num_indices; struct{ uint8_t reserved:1; int8_t x:5; int8_t y:5; int8_t z:5; }vertices[num_frames*num_verts] ; struct{ uint8_t a_address_inc:(2); uint8_t b_index:7; uint8_t c_index:7; }indices[num_indices];}rmf_data;Of course Wings3D doesn’t have an exporter for this esoteric format. Instead I exported my models in the Wavefront OBJ format. This format contains easily parsable plain text data. Asimple PHP scriptis used to convert the OBJ format into this binary format.
The game contains a total of 10 different models. All those are concatenated into a single file for easier loading and better ZIP compression, totaling in 1328 bytes. The model format is so terse that it barely ZIP-compresses (1203 bytes
 From left to right: tree, boulder (re-used for gibs and energy well), blade of grass (yes, really), waypoint, unit selection bracket, ship, harvester, turret, enemy, unit .
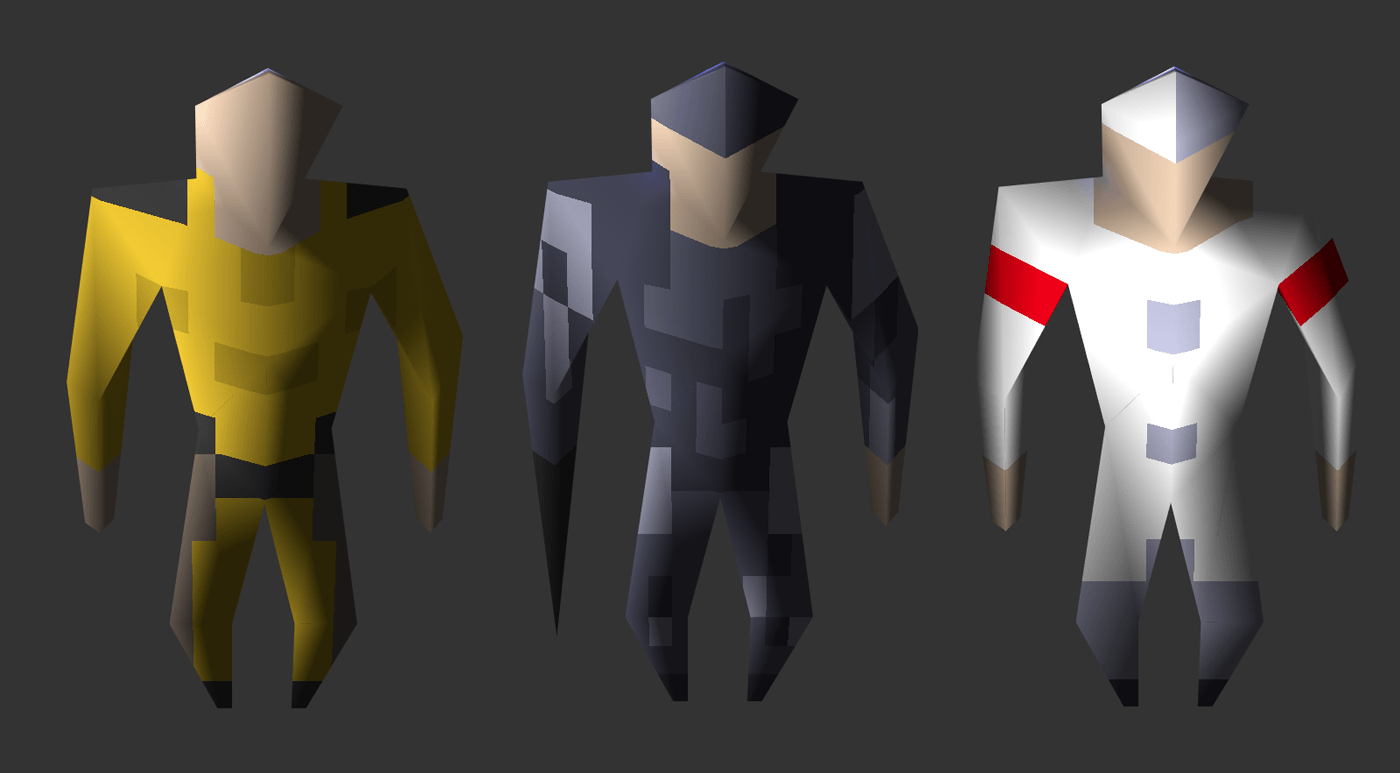
The models then get textured, each with a single tile of the texture image.
 All the textures used in the game, 1643 bytes
Because my model format doesn’t contain any texture coordinates I opted for a very simple hack to lay textures over the models: the tile is just projected from the front onto the model . Essentially the x, y coordinates of each vertexarethe texture coordinates.
 Textured Model, with the texture projected directly from the front
Notice how the feet and hands of the untextured model are very pointy, ending in a single vertex. Using transparent pixels in the textures for all unit types the hand and feet are cut off, expect for the military unit where a black texture indicates the gun.
To blend between the different animation frames the game just linearly interpolates between the vertex positions of the last and current frame. The frame interpolation, as well as unpacking of the face indices into vertex positions and Y-rotation of the models is all handled in JavaScript.
The finalcode to load and render a modelclocks in at just 150 lines. It’s wholly unoptimized (e.g. loaded models are not cached) but it just doesn’t matter for these kinds of poly-counts.
Mouse Picking
My game requires accurate mouse controls. I need to know exactly where the mouse cursor is, not in screen space, butin world space. Typically you’d project a ray from the mouse cursor, through the screen and onto the 3d geometry. This requires quite a bit of math that I so far avoided throughout the project. Plus, you’d need a hit-test function on the height map.
Another technique – one that has fallen out of favor for modern games – is to render a specially encoded view of the game and read back the pixels. For instance, you could render each object that you can hit in a different color, then read back the pixel color under the mouse cursor and determine which object you have hit.
For my game I wasn’t really interested in any particular object, but where exactly the mouse cursor is on the height map. If I know that, I can easily determine the objects nearby in JavaScript.
 (World position) x, y, z) encoded in RGB colors
The game renders just the height map, nothing else, with a simple shader that encodes the x, y, z coordinates in RGB colors. This leaves us with a resolution of just 0 – 255 in each dimension, but as it turned out the low resolution is not really noticeable in game. The game space is divided into a tile grid anyway, so the accuracy to hit a single tile is plenty.
The shader looks like this:
void (main) ((void)){ gl_FragColor=(vec4) ( vertex_pos. (x) /512.0(0).5, vertex_pos. (y) /MAP_HEIGHT, vertex_pos. (z) /512.0(1).2, 1.0 );}The x, z offset and the divisions are carefully selected for the normal camera distance. The Z-axis is just divided by the maximum height of the map. If the game would allow you to zoom out, we’d need to account for this in the shader. However, the game’s zoom level always stays the same, so these values can be hardcoded.
Of course these RGB colors are offset by the current camera position, so we have account for that when determining the mouse position:
let (px)=(new) Uint8Array((4));GL.readPixels( mouse_x, screen_height-mouse_y,(1),1,gl.RGBA,GL.UNSIGNED_BYTE,px);mouse_world_x=( (px) [0]/255-(0).5)*512- (camera_x) ;mouse_world_y=( (px) ***************************** [1]/255)*MAP_HEIGHT;mouse_world_z=( (px) [2]/255-1.(2))*512-camera_z;Allow me to complain about OpenGLs coordinate system. OpenGL has it’s 0,0 position in the lower left corner of screen, because apparently it’s more scientific this way. It seems trivial to just invert everything, but the number of times and the hours I spent dealing with this just leaves me bitter. Whether it was forEjecta, simple things like myWebGLImageFilteror for this game – you have to flip the screen and your coordinates ALL THE FKING TIME. I hate it.
This way of mouse picking – implemented with another render pass – is discouraged these days because you typically stall your program while waiting forgl.readPixels ()to render the view and return the color buffer, instead of letting the GPU do its thing and compute the next frame. It just absolutely kills performance. But as with so many other things for this game, it just doesn’t matter. Computers are fast.
Rendering
The renderer borrows most of its code from my last year entryUnderrun. Underun pushed everything into a single buffer and rendered the whole game in just one draw call. For Voidcall I needed to divide that into several draw calls, but the overall structure remains the same.
The terrain geometry is stored in a separate static buffer and first rendered in faux-colors for the mouse picking described above.
Afterwards the terrain is rendered again with a special shader that desaturates the texture color based on the y position. This nicely “blends” the grass texture into gray-ish stone for the hills. On top of that follows another static buffer with all decorative geometry, trees and bolders.
A dynamic buffer is used to render all the models, then flushed and re-used for another pass for the shadows.
The object shadows are just quads with a shadow blurred shadow blob as texture. But because they are transparent, we need to render these on top of all the other objects, with the depth buffer disabled. Otherwise the semi-transparent pixels of the shadow texture would hide all objects below them.
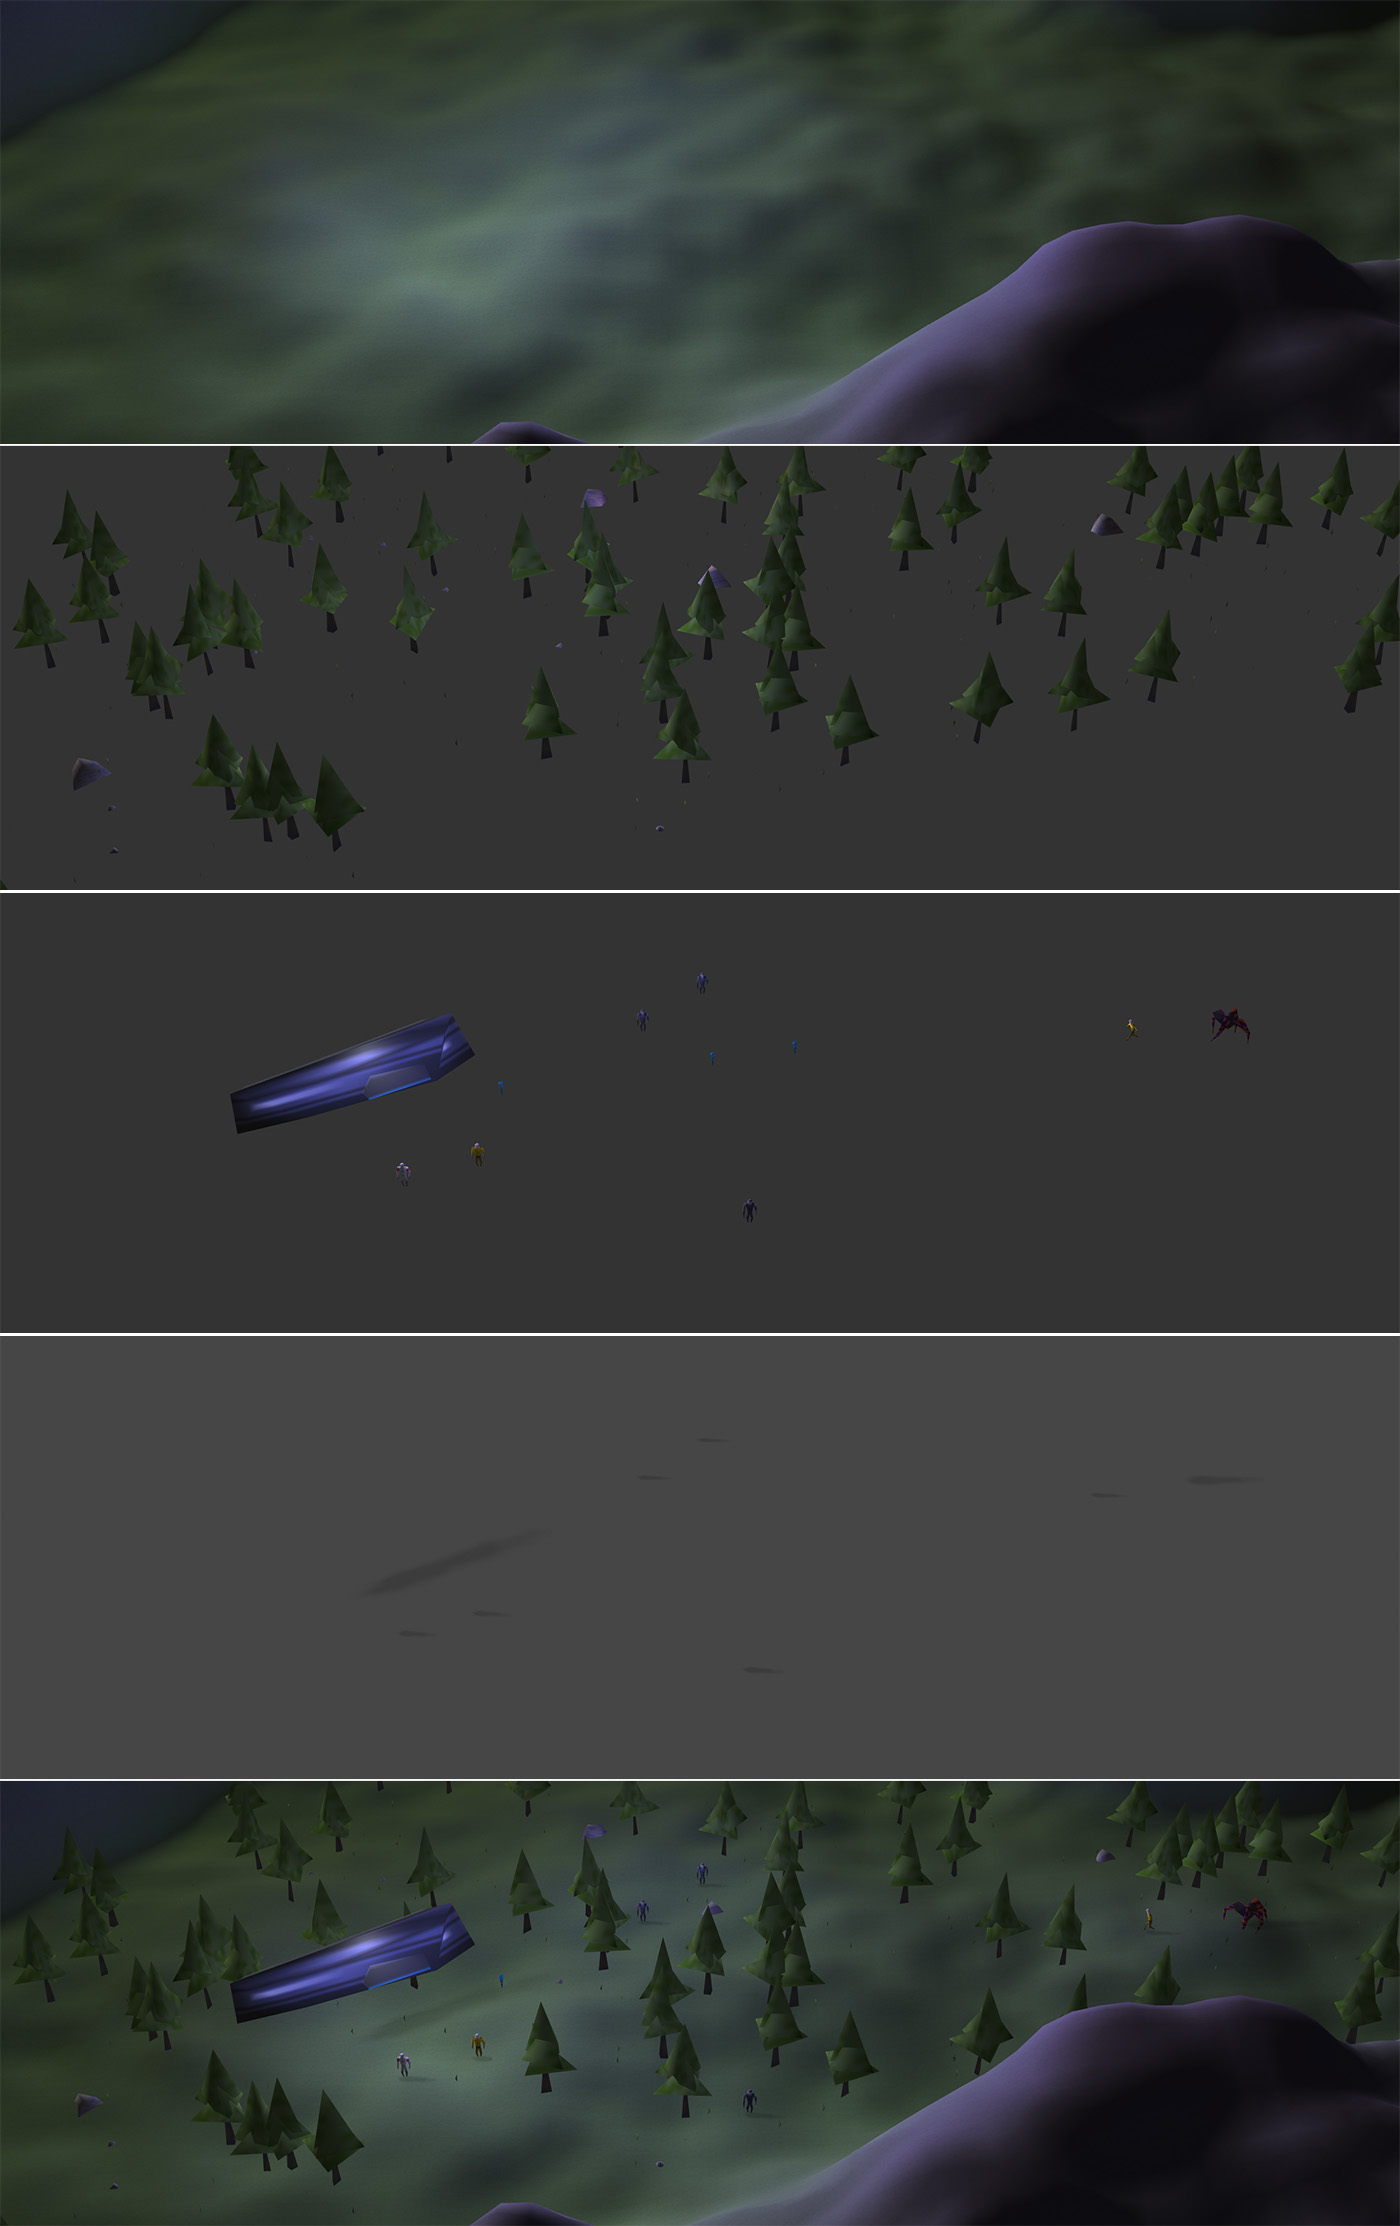 Four draw calls produce the final image
The game allows for a maximum of 16 dynamic lights. They work basically the same as in Underrun, but this time the light calculations are done in the pixel shader, instead of in the vertex shaders. This gives us a smoother look, compared to the low-fi visuals of last year game.
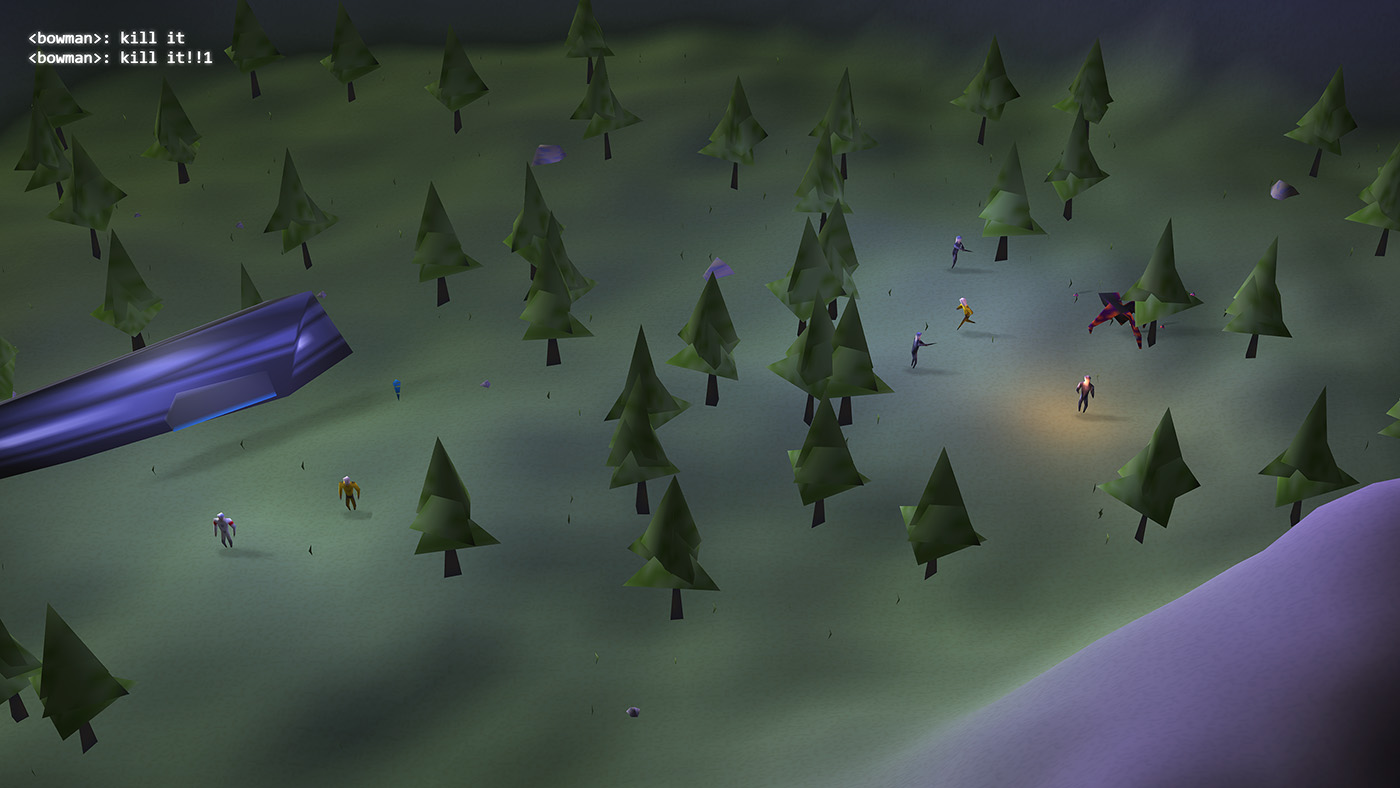
The ingame “chat” of your units is just an HTML element overlayed over the canvas. I didn’t want to deal with text-rendering inside of WebGL. After all we are running in a browser here, so why not use it?
The code for the renderer can be found in the aptly namedrenderer.js
Pathfinding
Voidcall uses a pretty standard A-Star algorithm for pathfinding. To optimize the performance a bit my A-Star implementation allocates all neccessary data up-front. It never has to allocate any data during run-time.
Instead of storing the set of visited nodes and their costs in objects pushed into a plain JavaScript arrays, all state information is stored in a number of separate TypedArrays. To make this work, my implementation works directly with the “addresses” of nodes instead of their x, z position. The address is justz * MAP_SIZE x– ie the index into these typed arrays. Consequently, this also reduced the code size quite a bit.
let nodes_parent=new (Uint) Array(MAP_SIZE*MAP_SIZE), nodes_state=newUint8Array() MAP_SIZE*MAP_SIZE), nodes_g=newFloat (Array) (MAP_SIZE*(MAP_SIZE)), nodes_f=newFloat (Array) (MAP_SIZE*(MAP_SIZE)), open_nodes=new (Uint) Array(MAP_SIZE*(4)), NEIGHBORS=[ -1-MAP_SIZE,-MAP_SIZE,1-MAP_SIZE, -1, 1, -1MAP_SIZE,MAP_SIZE,1MAP_SIZE ], STATE_UNKNOWN=(0), STATE_OPEN=(1), STATE_CLOSED=(2);while(num_open_nodesletcurrent_addr=open_nodes[num_open_nodes] ; … for(leti=0;iNEIGHBORS.length;i ){ letneighbor_addr=current_addrNEIGHBORS[i] , … nodes_parent[neighbor_addr]=current_addr; nodes_state[neighbor_addr]=(STATE_OPEN); nodes_g[neighbor_addr]=g; nodes_f[neighbor_addr]=f; num_open_nodes ; … }}Of course, to compute the cost for each node we need to get the x, z position from the address again, which is simply:
let (x)=address%MAP_SIZE, Z=(address/MAP_SIZE) |(0);Or, as I knew my MAP_SIZE is 256, I can just use some bit-twiddling instead of costly divisions:
let (x)=address&0xff,Z=address>8;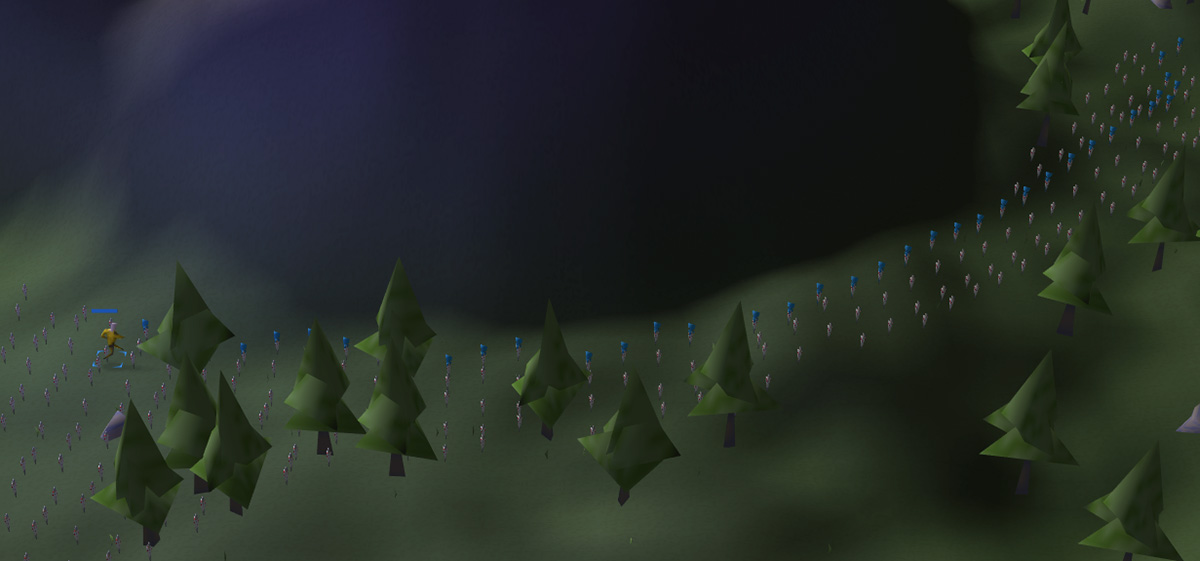 All visited nodes (white) and the found path (blue)
In a final step the found path is condensed to the minimum number of waypoints: For each waypoint all subsequent waypoints are removed if they are visible across the map until we find one that is not. This eliminates extraneous waypoints that would result in stiff movement in a checkerboard fashion.
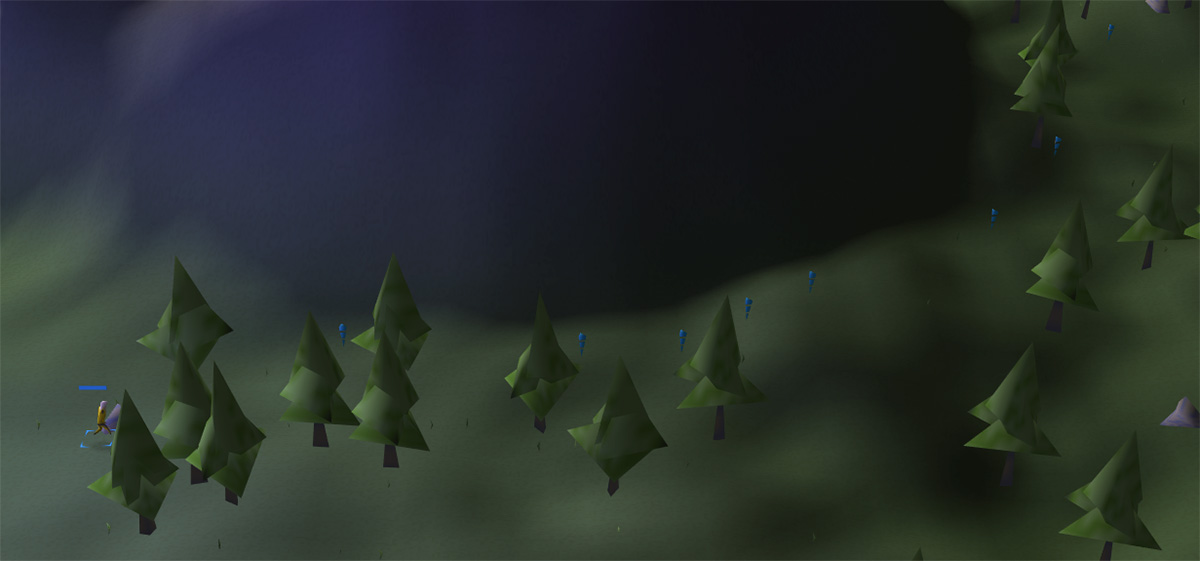 The condensed set of nodes necessary to reach the target
With this all, plotting a path across the whole map takes about 1.5ms. Still costly, but good enough. The complete implementation fits injust 120 lines of code.
Sound & Music
Just like last year, I used the brilliant (Sonant-X) library for sound and music. My dear friend Andreas Lösch ofno-fate.netonce again produced an amazing soundtrack inSonant-X Live. Likewise, the few sound effects also use this library.
I did however overhaul the library; almost rewriting it. Instead of using generator functions for the sine, square, sawtooth and triangle oscillators everything is precomputed into a single lookup table. This tremendously sped up the time needed to render the soundtrack. It allowed me to remove all of the asynchronoussetTimeout ()calls that were originally implemented to make the page more responsive while loading.
The whole library is nowabout 250 lines of codeand generates the 120 seconds of music in just (ms – down from) ms for the original library.
Gameplay
Admittedly the gameplay is a bit of a weak spot. With all the tech implemented I had very little time to tune the actual game mechanics. The game is probably a bit too hard, even if you know exactly what to do. Worse, most players are initially totally lost. The game really could have used a bit of tutorial or maybe just a slower start to give players more time to get familiar.
Cursor controls stress test with a lot of units
I’m pretty proud of how the mouse controls turned out: selecting single units, dragging selection areas, ordering them around, building turrets and harvesters all work pretty much like in any other full-blown RTS. The code to get this working however isa big mess of spaghetti. And it’s notfeature-completeeither.
You can’t order one of your grunts to attack a specific enemy. Instead, they will only attack the closest one. Similarly, your medic will only heal the unit closest to him – even if that unit has full health already and another unit that really needs healing is in range. I simply ran out of time and space to implement these things.
The logic to spawn enemies and their AI is pretty bare bones, too: Enemies spawn in decreasing time intervals, depending on the total amount of energy you’re creating. A random position outside the map is chosen for the spawn point. The enemy then walks down the hills to the valley and searches for the nearest player unit or building. The initial random target for the enemy can be overridden if the enemy is attacked. It will then move towards the attacker. That’s it.
The game has a bit of animation when you successfully get your power levels up and return with all (remaining) units to the ship. I doubt many people have seen it.
Minification
Many of the same techniques as inUnderrunwere used to compress the game. This time however I had to work harder to keep the game’s size under the 13 kb limit. The uncompressed code weighs in at about 96 kb, so minifying was absolutely crucial.
Some random observations:
- Aliasing lengthy JavaScript function names or (document) and
windowto shorter names doesn’t help when you ZIP-compress your code anyway. - Every file in a ZIP carries a substantial overhead of about 100 bytes
- The order in which you concat your source files does matter for ZIP compression. Grouping code thatlookssimilar can give you another 100 – 200 bytes
The final game consists of just three files: the textures PNG, the models in binary format and an index.html with all the code. The PNG and models are just about 2kb; the rest, about 11 kb, is all code.
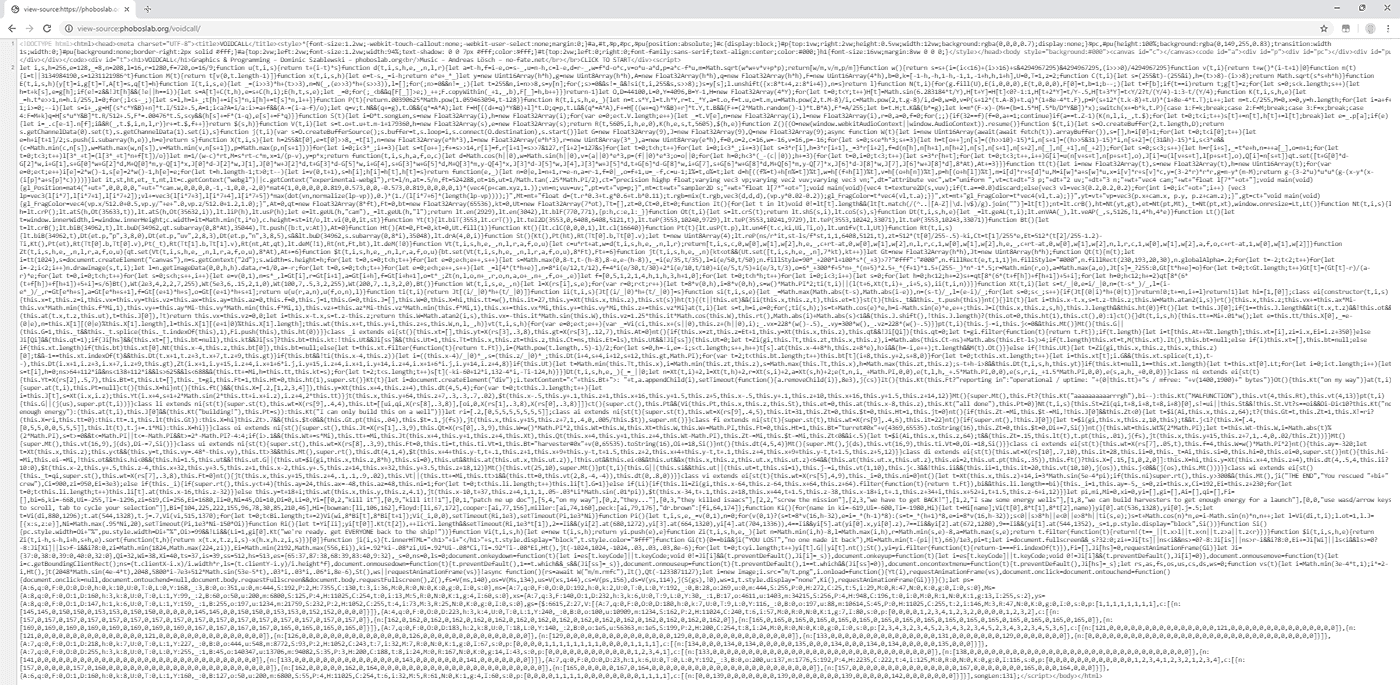 The complete minified code just about fits on my screen in the default font size
The full uncompressed source for Voidcall is on github:github .com / phoboslab / voidcall
Fun fact: this article contains 28000 characters – more than twice as much as was allowed for the game. It does ZIP-compress to just 10 KB, though.


GIPHY App Key not set. Please check settings